How To Make A Swag Wreath For Christmas: A Detailed Step By Step Tutorial
This post may contain affiliate links. Please read our Disclosure Policy.
The holidays are the perfect time to bring the beauty of nature into your home, and an outdoor Christmas Swag Wreath is a stunning way to do just that. Learning how to make a teardrop swag wreath using evergreen branches is not only a fun, festive project, but it’s also a wonderful tradition to start. This natural wreath-making process will fill your home with the fresh scent of evergreens and create a beautiful seasonal display.
This post may contain affiliate links. For more information, please see our full disclosure policy.

Watch This Video Tutorial: How to Make a Christmas Swag Wreath
Creating a Christmas teardrop swag is a perfect beginner project for those new to wreath-making. Not only is it simple to learn, but it also uses minimal supplies—you can even repurpose a regular metal coat hanger as the base to get started right away! Once you’ve mastered this straightforward design, you’ll be ready to tackle more advanced creations, like a traditional Christmas wreath, which you can learn to make in this step-by-step guide. For a fun way to display your swag, consider pairing it with a vintage sled! You can easily make one by following this DIY Vintage Sled tutorial. For now, let’s explore how to craft a beautiful swag wreath and personalize it with your favorite seasonal accents!
Table of contents
- Watch This Video Tutorial: How to Make a Christmas Swag Wreath
- How To Make a DIY Christmas Swag Wreath
- Materials Needed For A DIY Swag Wreath
- Gather Greenery And Trim To the Desired Length
- Arrange Greenery to Create a Swag Wreath Base
- Secure Greenery With Floral Wire
- Step 4: Add Decorative Elements To A Swag Wreath
- Step 5: How to Hang A Swag Wreath
- Tips For A Professional Looking Wreath
- FAQ
- Ideas with Pictures on How to Decorate a Swag
How To Make a DIY Christmas Swag Wreath

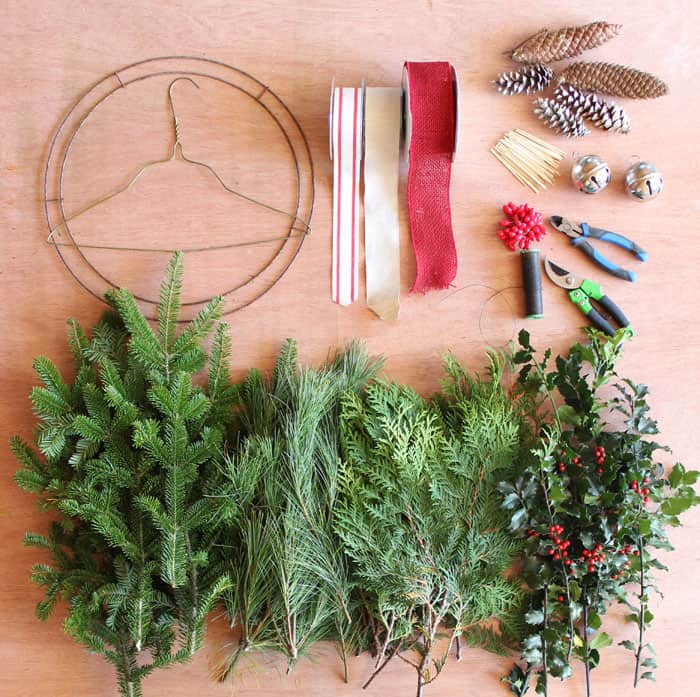
Materials Needed For A DIY Swag Wreath
To start your Christmas swag wreath, you will need to gather a few supplies:
- Coat hanger (the wreath ring is for making a natural round wreath)
- Balsam Fir, Pine, Cedar, holly clippings (pictured in that order)
- Garden pruners
- Floral wire
- Wire cutters
- Pliers
- Decorations (ornaments, pinecones, bells)
- Floral picks
- Ribbon
Gather Greenery And Trim To the Desired Length
- Gather greenery. If you live near a wooded area you can collect the necessary pieces. Otherwise, most hardware stores and farm markets offer fresh-cut bundles of boughs.
- Push the sides of the coat hanger to the centre, stretching it into a long line. Use a pair of pliers, and bend the hanger’s hook into a loop to create a wreath hanger.
Arrange Greenery to Create a Swag Wreath Base
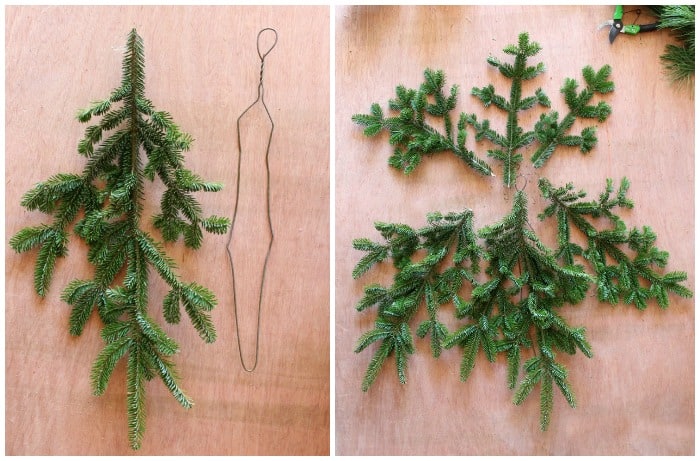
- Start with a long sturdy fir branch that is approximately 18″ long, for the swag base.
- Layer the bottom branch with two additional sturdy pieces approximately 16″ long.
- Make a similar arrangement of three branches, with the ends pointing in the opposite direction measuring approximately 10- 12″ long.

Secure Greenery With Floral Wire
- To secure the stems, twist the end of the florist wire around the coat hanger.

- Layer the six fir branches together on top of the coat hanger. Twist the wire around the entire bunch of greenery multiple times, securing it to the hanger.
- Add additional layers of cedar, pine, holly, and eucalyptus as desired, following the same arrangement process. Secure each new layer by wrapping floral wire around the base.
- Alternatively, if you prefer the look shown below, position the branches so they all face downward and secure them around the neck at the top of the hanger.

TIP: To avoid the wire slipping up and down the hanger, wrap the wire a few times around the hanger before adding the boughs on and occasionally throughout the process.
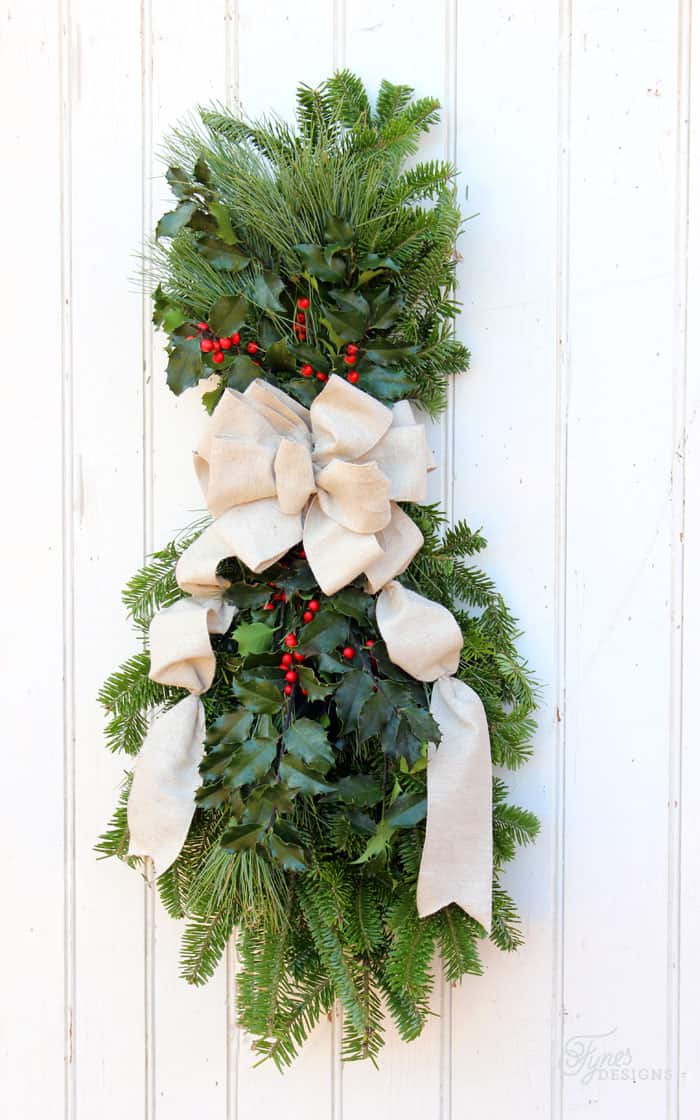
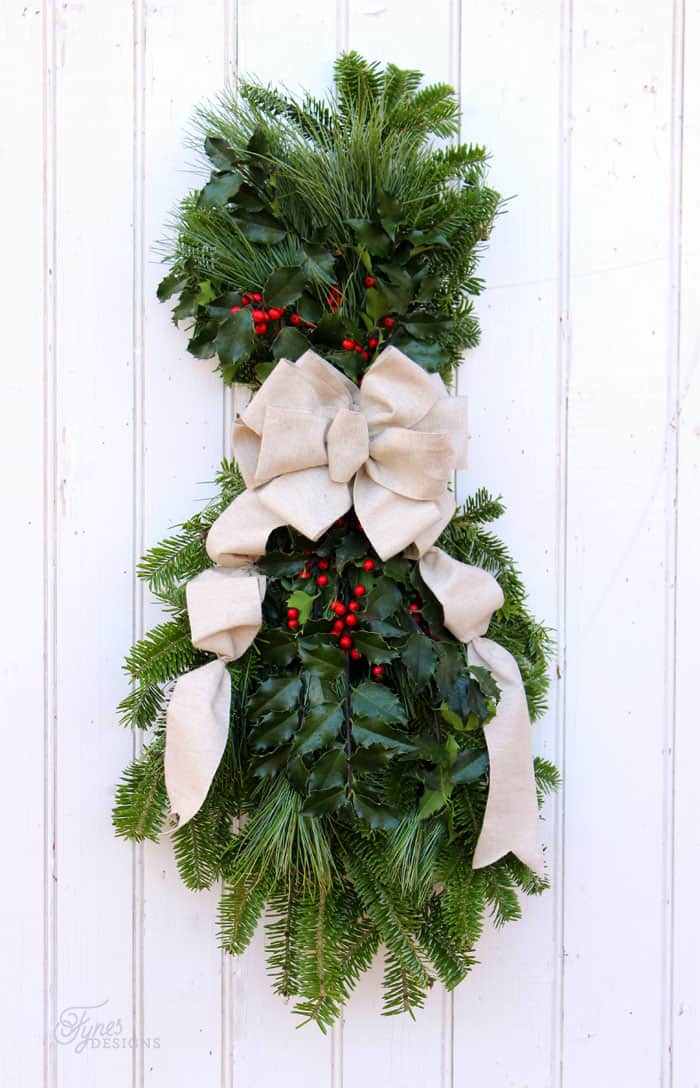
Step 4: Add Decorative Elements To A Swag Wreath
Enhance your Christmas teardrop swag with lights and festive flair by adding decorative elements. Start with a ribbon—cascade it down the swag for a classic look, tie a simple bow at the top, or create a designer-style bow to conceal the wires at the center of your swag wreath base. Next, embellish your swag door wreath with bells, pinecones, small ornaments, or red berries to bring a festive and personalized touch to your design.

Step 5: How to Hang A Swag Wreath
For easy hanging, use the loop from the top of the metal coat hanger! This method works well, ensuring the swag stays secure and balanced on your door or wall. Additionally, you can loop a ribbon through the hanger and hang it over a door for a decorative touch.

Tips For A Professional Looking Wreath
- Finish with a Bow: Add a well-crafted bow as a focal point; choose a ribbon that complements the wreath’s colors and style.
- Choose Quality Boughs: Use fresh, high-quality greenery, Avoid any pieces that are yellowing or rusty-looking needles. If purchasing, dig down through the pile and get ones that haven’t had too much sun exposure and may be dried out.
- Layer Wisely: Create depth by layering different types of foliage and decorations. Start with larger pieces and gradually add smaller accent pieces near the top.
- Secure Decorations: Ensure all embellishments are firmly attached with wire or floral stems to prevent them from falling off. Consider if the elements will withstand wind, rain and snow for many months.
- Vary Textures and Colors: To create visual interest, mix various textures and colors; however, make sure to stick to a cohesive color palette for a harmonious look. Additionally, consider adding embellishments to enhance the wreath’s vibrant and polished appearance.
- Keep It Balanced: As you work, step back periodically to assess the overall shape and balance of the wreath, making adjustments as needed to achieve symmetry. Once you have completed your design, hang the swag and then trim any pieces that appear asymmetrical for a more refined finish.

FAQ
The main difference between a wreath and a swag is its shape.
Wreath: A wreath is typically circular and is formed by arranging foliage, flowers, or other materials around a base, often made from a wire or foam ring.
Swag: A swag is usually a long, curved arrangement of greenery or flowers that hangs down, often tapering at both ends. Typically more linear.
Wrap toothpicks or skewers with a small piece of wire to easily insert decorations into the greenery. For stability, ensure the stick is pushed into the center of the swag. For heavier items like bells, secure them directly to the middle using wire for added support.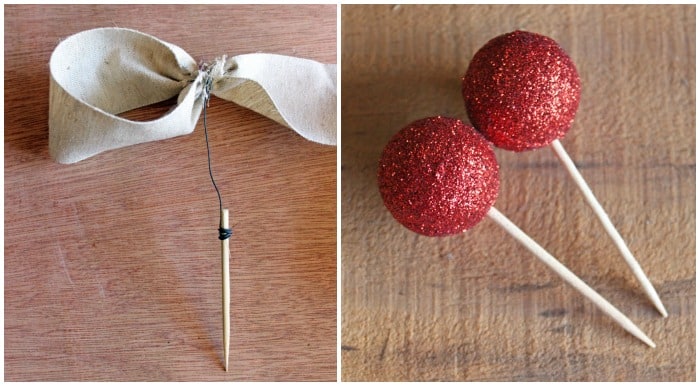
Typically, a fresh evergreen swag wreath can last from November to March in a cool winter climate. The longevity depends on factors like the type of greenery used, exposure to sunlight, and overall weather conditions. To extend its freshness, consider keeping it out of direct sunlight and misting it occasionally if you don’t experience winter conditons to prevent it from drying out.
Ideas with Pictures on How to Decorate a Swag


I absolutely love how simple and budget-friendly it is to create a Christmas swag wreath. Not only is it one of my favorite holiday decorations, but it also adds a beautiful, personal touch to any space. With just a little effort, you can craft something truly festive and unique for the season!


This is beautiful!! Pinning to the Monday Funday board!
Love your swag and you make it look so easy. Thanks so much for showing us how to make our own.
Funny, I thought I could smell this while I was watching the tutorial! Very pretty! and it’s getting me in the Christmas mood!
I have so wanted to make one like this. It looks like fun. I am now excited to have this step by step. Thanks
I hope you make one, please share a photo on my FB page when you’re done, I would love to see it!
These are just gorgeous, Virginia! I definitely want to try some natural swags and wreaths this year. Thanks for sharing!
Gorgeous!
Love this idea. I have several large Box Woods, can I use them?
Oh my goodness yes! I so wish I had had boxwood plants. I have two tiny guys I can’t wait until they get bigger! I would LOVE to see it if you make them… I’m a little jealous!
Can you help with a little direction on the bow and how you start it and secure it? I love these and want to make one for you my door but need help with the bow.
The ribbon is very easy to do (I just forgot to take photos along the way) You use one continuous stand of ribbon. Make a loop and twist a piece of wire around, use the wire to attach it to the brush (like a twist tie) make another loop (repeat the process)nestle the connecting piece underneath a piece of brush. I hope you can follow that!
These are so beautiful, I will definitely be doing this with the grandkids this year! Will the holly stay green for several weeks? Thanks again for the instructions.
You’re most welcome! Thanks for swinging by!
I just made a swag following your instructions – you made it so easy.
Thank you very much. ^^
WOW! I’ve always admired these swags and wreaths but been scared of having a go at making them. Now I can’t wait to go out and pick some greenery! Thanks SO much for sharing your knowledge, and being so inspirational.
Merry Christmas
Judi in the UK
Go get em girl! So happy you found the tutorial, I’d love to see what you make! Happy Holidays
Very Pretty! Great tutorial!
I love your wreath. A friend recently gave me some pine cones and this is just what I need to make! thanks for sharing at the #HomeMattersParty
Thanks for the tute. Very well done. Pinned to my Christmas board. Hope you are enjoying the Fall season. Linda @Crafts a la mode
Hi just stopping by the let you know that this awesome post was picked as one of the highlights this week on the #HomeMattersParty linky. You can find it at http://adventuresfrugalmom.com/home-matters-linky-party-63/ make sure to grab the I was featured button for your side bar. Congrats.
Those are beautiful!! Never knew they could be so easy to make. Might have to try this, this year!! #HomeMattersParty
These are beautiful! I really want to get wreaths for my windows this Christmas, and I think I should add a swag now, too! I’ll be following for more ideas. I’d love for you to check out my free Christmas Card List template on my blog and linked through The Creative Exchange Link Party. Thanks!
I love the departure from what has become the standard wreath shape. Congratulations on your feature on the #HomeMattersParty
Beautiful! Congratulations of the Home Matters Party highlight. Thanks for linking up to Home Matters Party. #HomeMattersParty http://cu-rio.net/home-matters-linky-party-63/
Definitely on my to-make list for Christmas 2016. But here in Florida, it will have to be artificial greenery. Real evergreens would have survived about a day in our 2015 holiday heatwave. I put out luminaries Christmas Eve wearing shorts and a tee shirt!
I think it would still look great! I’d love to see it
Thanks for the step by step. Just beautiful! I’ll definitely do this!