Step By Step DIY Glass Photo Ornament Tutorial
This post may contain affiliate links. Please read our Disclosure Policy.
I’ve been creating these DIY photo ornaments for years, and they’ve become a favourite holiday tradition. If you’re wondering how to make photo ornaments in glass balls, they’re a beautiful way to capture memories and make wonderful keepsakes or thoughtful gifts for loved ones.

Watch How to Create Your Own Photo Christmas Ornaments in Minutes
Follow this simple step-by-step photo guide to making your own easy DIY photo ornament-
I just had to share this tutorial on making DIY Christmas ornaments with pictures, so you can see how easy it is to get a photo inside a glass ornament! If you love creating photo Christmas ornament ideas that feel extra personal, be sure to check out my DIY Keepsake Photo Ornaments Tutorial and Christmas Photo Ornament Craft for more creative ways to display your favorite memories.
You might also enjoy some of my other festive DIY Christmas ornament ideas like these Gingerbread House Christmas Wood Ornaments and Air-Dry Clay Christmas Ornaments — both are fun, simple, and perfect for holiday crafting with the family.
Follow this step-by-step photo guide to make your own personalized glass photo Christmas ornament…
DIY Photo Ornaments

Materials Needed for Your DIY Glass Photo Ornament:
- Photos relative to the size of the ornament you’ve chosen. A child’s photo or old family photos are so sentimental and will be cherished for years to come
- Clear glass bulbs (I prefer these glass bulbs because they have a wider opening to make it easier to get the photo in)
- A stick (I prefer a paintbrush so I have a soft tip)
- Clear craft fishing line
- Acid-free double-sided tape (so your photo doesn’t yellow over time)
- Ribbon
- Cardstock
- Scissors
- Pencil
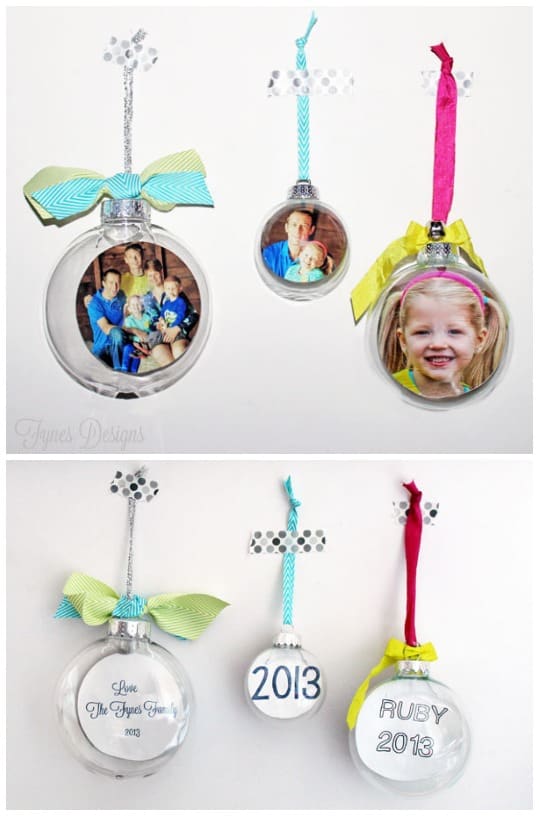
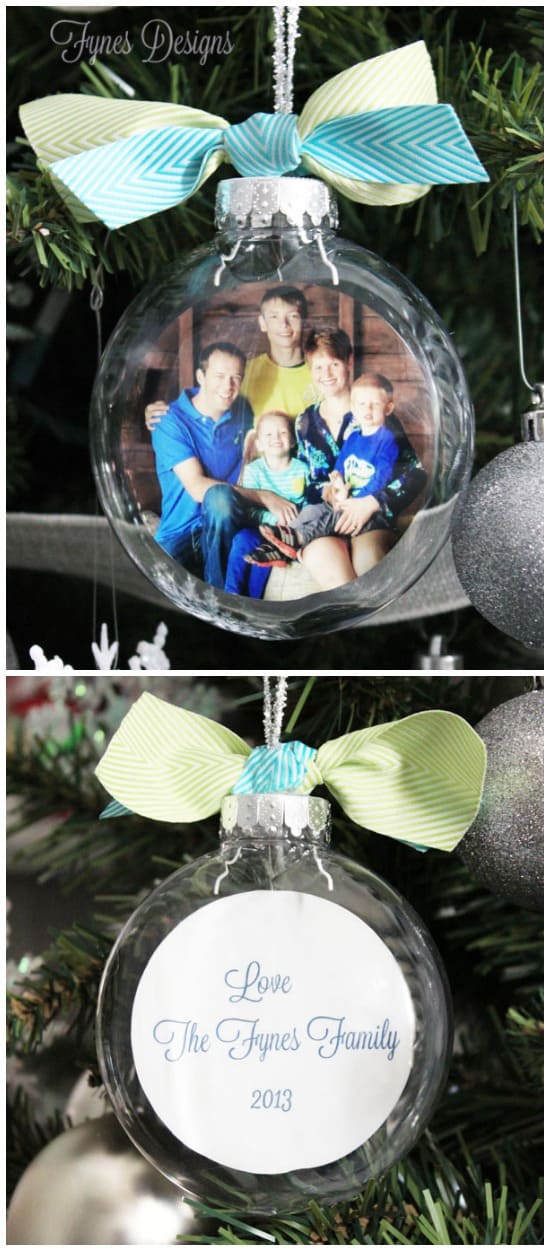
Personalize With Names Or Dates
I suggest adding a date, name or both to the back of the ornament photo to personalize these photo ornaments. You can easily create this in Canva or a Word document. Print it on lightweight card stock using your inkjet printer or send it to a local printer.

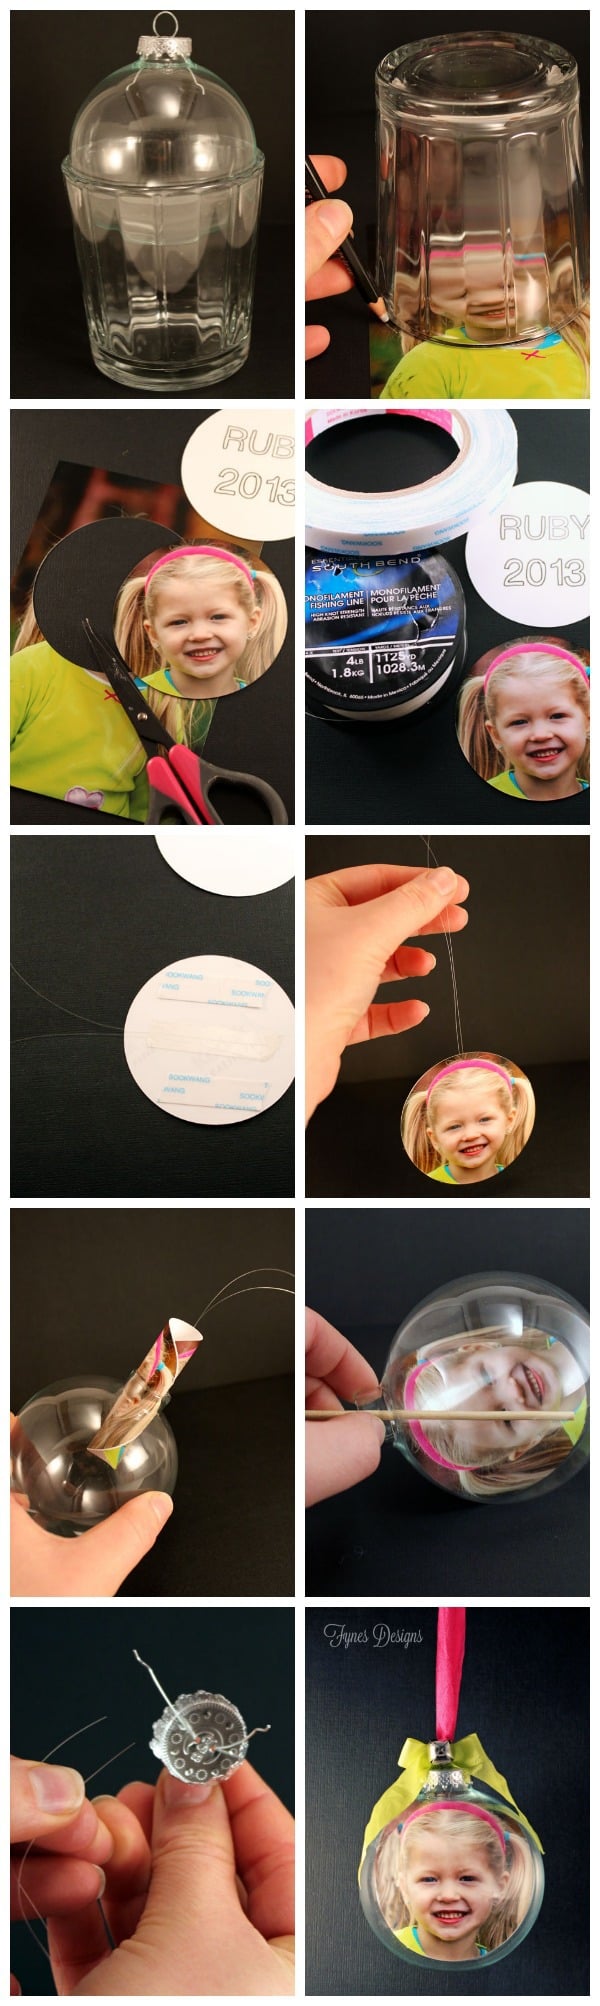
Instructions to Make Your DIY Glass Photo Ornament
- Find a drinking glass that your ornament will sit into (you want it to sit in about 1/4 of the way, a smaller circle is better than one too big), and use this as a template for your circle. If you have another means of circle cutting, a large ornament will need a 3″ circle.
- Cut two circles, one from your photo and the other from the cardstock. Add names, dates, or sentiments to the paper circle, with your printer or stamps
- Apply strips of (acid-free) double-sided tape to the photo. Cut a long piece of fishing line and fold it in half. Stick the looped end along the centre of the photo.
- Sandwich the fishing line between the two circles.
- Gently roll the photo into a tube (the photo on the outside of the roll) and slide it into the ornament. Be sure there are no sharp points of glass that will scratch the photo.
- Hold onto the fishing line and run the stick back and forth over the photo to flatten it out, be careful not to dent or scratch the picture. *make sure you hold the line, getting it back out is NO fun (tape it to the outside of the bulb if need be.
- You will find two small holes in the ornament’s cover where the wire runs through the cap. Poke the ends of your fishing line through the holes (one on each side), slip the cap back onto the ornament, and tie off the fishing line. I like to knot the strings multiple times to ensure they will not come undone.
- Complete your ornament with the ribbon of choice or add a hanger.
Tips And Tricks For Achieving The Best Results
- Photos from a self-print kiosk tend to flatten more easily because instant prints are usually thinner.
- You must purchase the correct glass bulbs for your DIY ornaments. There are two styles available: completely round and flat. If you buy the flat ones, you will not be able to flatten out your photo.
- Rub your finger around the edge of the bulb opening to be sure there are no sharp points which will scratch and ruin your photo.
- Try not to roll your photo too tight. It will be much easier to flatten out once inside the ornament.

Add the Finishing Touches
To add a personal touch to your glass Christmas photo ornament, decorate the top of your ornament with festive details like ribbon, twine, or even small charms. Wrapping twine around the top adds rustic charm or using nail polish to paint the cap helps coordinate with your other decorations. This simple decoration transforms your DIY ornament into a thoughtful, one-of-a-kind gift!
I Loved this photo ornament idea but don’t have much of a crafty bone. I loved this simple idea from Inspired By Charm. You could easily recreate this using these gold frames or these vintage-inspired frames to add a sentimental touch to your Christmas tree decorations.
With these simple steps, you can create beautiful, personalized glass photo ornaments that will become cherished keepsakes or heartfelt gifts for years to come.
Try These Other Photos Ornaments


Love it, as always!
i dont know how to straighten out the picture..using q tip but no luck
I could not find the video, however, I am going to do my best to make this ornament. I am now a g-grandma and this will make the most precious Christmas gift. Thank you so much for sharing.
Sam
So cute! I have a few glass ornaments waiting for inspiration, and this is perfect!
I love these! I’m definitely going to make some this year. Where do you get your clear ornaments?
I’m hosting a link party and would love for you to link up this project.
Take care!
Daniela
http://iputabirdonit.blogspot.com/2013/11/my-favorite-free-christmas-fonts-and.html?m=1
You can pic them up at Michaels, Walmart or the dollar store! Happy crafting!
I get my bulbs from A.C. moore if I am in a pinch and need them fast. They always seem to have something I can make work. If I have time to wait for shipping and all, I use Consumer Crafts. They have always given me good prices, frequent sales, and reasonable shipping.
I LOVE the ornaments Virginia!! I’m going to attempt to make some too! Thanks for the tutorial.
These are so cute Virginia – I absolutely love them! Pinning!!
I can’t get my picture to uncurl do you have any suggestions??
Hi Tiffany, Use a Q-tip to poke at the center of the photo, it shouldn’t damage the photo so you can give it a bit more push. The thinner the photo paper and cardstock the better. I hope this method helps. Thanks for stopping by!
Great idea–and best of all, CHEAP! 🙂 I definitely want to try it. Thanks so much for sharing. Merry Christmas!
What a genius idea I’m going to try this thanks Virginia for sharing your idea with everyone.
I have been doing this for years and both my sons have a separate tree decorated with the yearly ornaments,the grandkids lokk forward to the “new ” ornament each year
That is SO great Roseanne! Thats what I hope for! When I was a kid we had engraved ornaments, we were so excited to find ours on the tree after it was decorated!
I have been doing this for years,(I use the wallet size school pictures)both my sons have a seperate tree just for the photo globes,each year the grandkids look forward to getting their ornament.Its become a tradition in this family..brings a lot of laughter on tree decorating day
I believe I’ve found the craft I’ll make with my grandbabies this Christmas! Thanks for such a great idea. 🙂
I’m so happy I found this! I have been looking all over for the best possible method for doing this and yours is the first that explains it the best. I’m doing one for each member of the family a picture of my grandpa who passed away in October from cancer. I tried a sample picture rolling it up to insert it in but when it’s in the glass, it seemed to not wanna straighten out. Will the card stock help with this problem?
The bigger the bulb the easier it is to get the photo to straighten out, because it doesn’t have to roll so tightly (the loser you can roll the better). I don’t know if the cardstock makes a difference, I’ve never tried without. Using something with a soft end like a q-tip or paintbrush will let you apply a bit more pressure without damaging the photo. Good luck!
Love your blog design and these ornaments – so creative and pretty! Just wanted to let you know I featured it in my roundup of glass ornament crafts here. Feel free to check it out if you want and hope you like it! : )
-Mel the Crafty Scientist
Love this idea!
I love this idea and made some today! My boyfriend and I are putting up our first Christmas tree this year and I wanted to start a tradition for our tree. I made 4 (one for each year we have been together). Hope to make more in the future as we grow older. It will be a cute reminder of how much we have changed over the years and if we add any new members to our family that year!
So glad to hear Mel! I love looking back at ours, crazy how fast the kiddos grow!
Do you put the card stock on the back of the photo?
yes, you sandwich the string in-between the two pieces
I would like to print this , I don’t seem to be able to. Would someone please help me?
Thank you.
WHat did you want to print Bobbi?
Instead of card stock, I sandwiched the fishing wire in between the back of the photo and a piece of green tissue paper. It was thin so it rolled and unrolled easily. I also had my students rip up tiny pieces of red tissue paper for inside the bulb as well as some white glitter (snow like ) which stuck to the inside of the glass. It came out colorful and beautiful! I cut up thin strips of clear transparencies (used for overheads) and they wrote a message (Merry Christmas, I love you mom and dad, etc. or 2014) with a Sharpie and put them inside the ornament. Very unique and awesome!
Great ideas, I bet they turned out awesome!
I make these using transparent paper. The transparent paper rolls up and unrolls easily and you can see the picture on both sides.
I tried this and it didn’t work at all…. and I’m pretty good at crafts. The picture wouldn’t unroll AT ALL and unfortunately I spent the last of my money getting these as Christmas gifts for everyone….so there goes Christmas.
And it wasn’t the card stock, because I used regular paper that I printed out and cut…it doesn’t get much thinner than that.
I’m so sorry that it didn’t work for you, I’ve never had a problem with making them. Another reader wrote to say that not all glass ornaments are created equal, some have smaller holes than others. Perhaps you could return what you bought and get ones with a larger hole. I hope you get it sorted out. Merry Christmas
What size picture did you use? I have a 3.25 inch ornament and I’m not sure what size picture would be good!
I started with a 4×6 photo, but just cut it down to the appropriate size.
What a wonderful idea! I have all year to make these for relatives and friends for Christmas 2015. Thanks for sharing.
I’ve made many of these in years past, but I printed my pictures on transparency paper, and cut the photo to the exact size of the ornament, and it just sits in the ornament all by itself! It isn’t quite as easy to see, but it is a cool effect!
I’ve always wanted to try that too!
What size is your ornament?
I’m not sure of the size, but can tell you not all the holes are the same size. Be sure to remove the top and check that your finger would fit in the hole before you buy!
What size do you use for the bulb?
You can use which ever, bigger is better becasue you don’t have to roll the photo so tight.
I would like to make one o these for each of my Cub Scouts, but use an individual photo on one side and a group photo on the other. Do you think that would work?? Also, when I bought the ornaments I ran into another woman who was purchasing them too. She said she had made them last year and was doing it again this year. She also said she laminated the photos she used and tried to explain how she went about making her ornaments, but I didn’t quite understand her explanation! What do you think? Could I use two photographs, back to back and would it help to laminate them? I was also thinking of putting fake snow in with the photos. Would that work?
Edwina
Sorry my response is coming so late. The only issue I see is that when you rolled it the photo would kind of crack and it may be hard to get it flatened back out.
Virginia, Carol Duvall did this years ago on The Home Show, HGTV. i never tried it, but she put the photos onclear sturdy plastic – like the clear lids on Xmass card boxes. she rolled them to to put them in the ornaments and they just popped open to fill the inside. i believe she measures like You did ~ with a glass the diameter of the ornament.
back then, she used a bleach solution inside the ornament to remove the “coloring” ~ much easier now to buy them at a craft store!
how times have changed! for the easier!
i think this year, i’ll make them!
did You tape the fishing line down with the double stick tape? i know You said “stick it in between the stock and photo” but is it taped down?
thank You for the ideas!
Yes, you’re right, double sided tape works well! Good luck
I made one for my daughter she loves it, thank you for posting the instructions. Judy
Thanks for visiting Judy!
Hmmmm . . .clicked on what I thought was a little girl’s purse pattern. . .got this. . .. ?
Question, what is the purpose of the fish line?
To keep the photo from falling, it is suspended inside the bulb