How To Make A Traditional Christmas Wreath: A Step By Step Tutorial
This post may contain affiliate links. Please read our Disclosure Policy.
Wondering ‘How do you make a Christmas wreath?” You’re not alone! One of the most common questions I get asked is exactly that. Today, I’m excited to walk you through a step-by-step tutorial on creating a traditional Christmas wreath.
This post may contain affiliate links. For more information, please see our disclosure policy.

Learning how to make a Christmas wreath is a fun and rewarding way to add a personal touch to your holiday decor. This Christmas wreath DIY will guide you through creating a stunning, traditional wreath that’s perfect for your front door or as a thoughtful gift. Whether you’re a crafting pro or a beginner, this tutorial ensures beautiful results every time. For more inspiration, check out these luxurious natural Christmas wreath ideas for your front door to get your creative juices flowing!
Once you’ve mastered this wreath, why not take your skills to the next level? Try creating a teardrop swag wreath for a unique twist on traditional holiday decor. Check out this tutorial on how to make a Christmas swag for all the tips and tricks you’ll need!
Table of contents
- Watch This Video: Step-by-Step Guide to Making a Traditional Christmas Wreath
- Is It Cheaper to Buy or Make a Wreath?
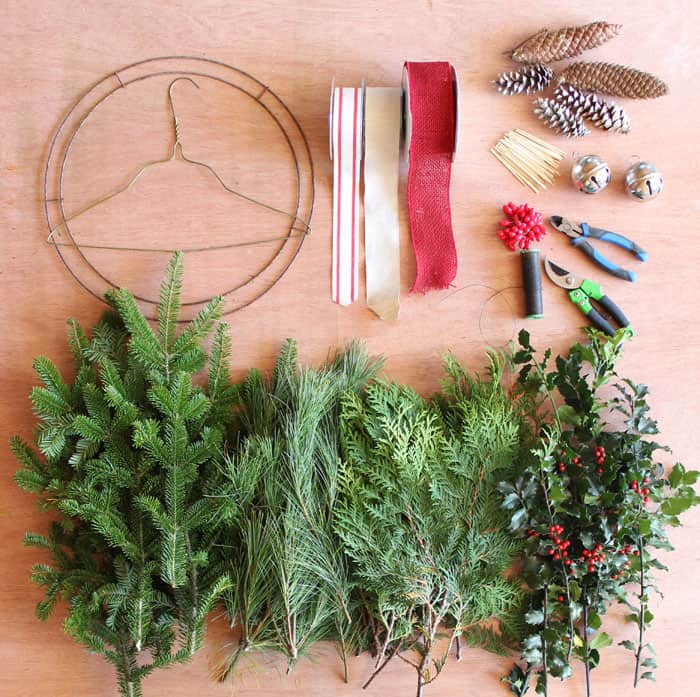
- What You Need to Create a Homemade Christmas Wreath
- How Do You Make a Christmas Wreath For Beginners?
- Step-by-Step Guide to Making a Traditional Christmas Wreath
- How to Attach Greenery to a Wreath Ring
- Final Steps for Completing Your Holiday Wreath
- How to Decorate a DIY Wreath
- How Long Does a Homemade Wreath Last?
- Other Christmas Wreath Decorating Ideas
- FAQ
Watch This Video: Step-by-Step Guide to Making a Traditional Christmas Wreath

Is It Cheaper to Buy or Make a Wreath?
Crafting a natural wreath is an affordable and charming way to enhance your outdoor holiday decor. The cost largely depends on your access to fresh greenery. If you’re lucky enough to have a property where you can gather foliage, it’s essentially free! Otherwise, you can easily buy fresh greenery from places like Costco, and farm markets, or even collect fallen branches from local parks or hiking trails. With the greenery in hand, you’ll only need a few basic wreath supplies, which should cost less than $10.
What You Need to Create a Homemade Christmas Wreath
- Balsam Fir, approx 25- 24 branches
- Wreath frame
- Pine, Cedar, and holly clippings, eucalyptus, and ivy *optional for embellishment
- Garden pruners
- Floral wire
- Wire cutters
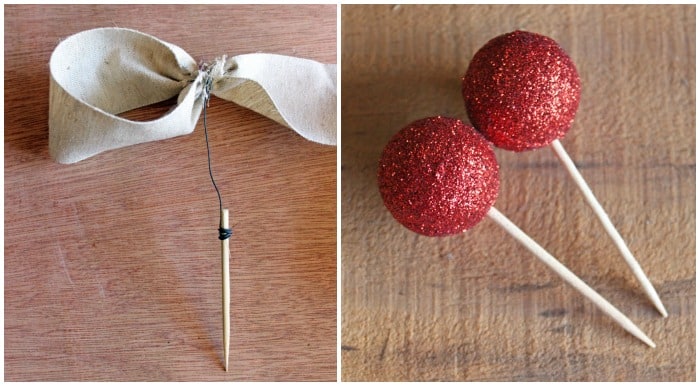
- Decorations- floral picks, pinecones, candy canes, dried oranges, red berries, cinnamon sticks, orange slices
- Floral sticks (cut skewers work too)
- Ribbon or bows
How Do You Make a Christmas Wreath For Beginners?
If you’ve been thinking about creating your own Christmas wreath to add a personal touch to your holiday décor, you’re in the right place! This simple, step-by-step guide will show you how to make a beautiful wreath from real branches, perfect for displaying on your front door. Whether you’re new to wreath making or just want to try crafting something special for the season, this tutorial is designed with beginners in mind. With a little time and effort, you can craft your very own Christmas wreath that will bring festive cheer to your home all season long!

Step-by-Step Guide to Making a Traditional Christmas Wreath
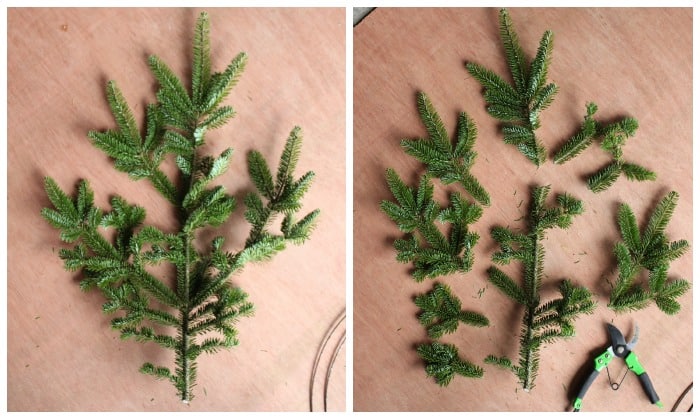
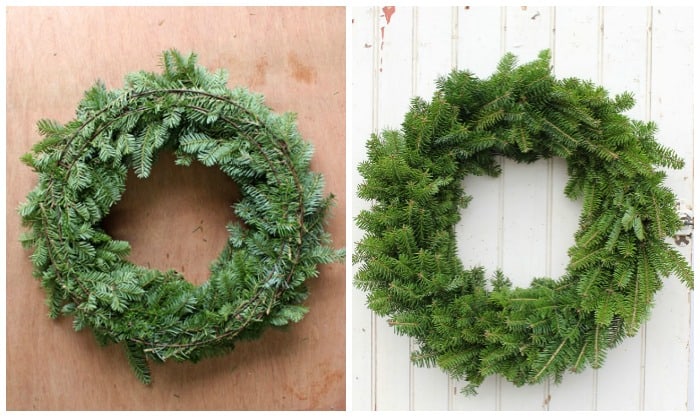
- After scouring the woods for the perfect fir brush, clip it down into wreath-size pieces.
- The photo above shows how to snip the ‘arms’ off, discarding the main branch. You will need to use approximately 25 large branches to complete a 14″ Christmas wreath.
How to Attach Greenery to a Wreath Ring
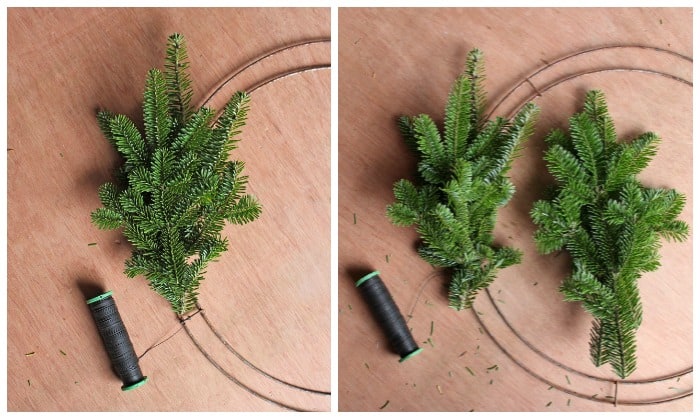
- Secure the floral wire to the metal ring by wrapping the end around the floral ring a few times.
- Make a small bunch of brush by laying about 3-4 pieces on top one another. Starting with a large piece in the back, and layer on smaller pieces.
- Twist the wire around the cut ends of the brush to secure it to the ring.
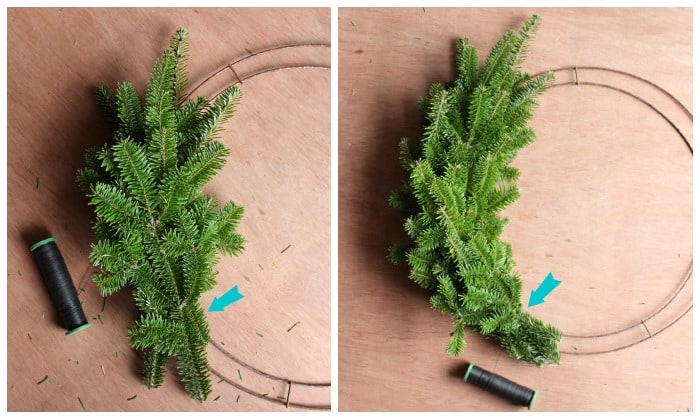
- Make another bunch of brush. Lay the second bunch on top of the first, slightly lower.
- Wrap with wire 2-3 times around and pull the wire spool tight towards you to secure. The arrows indicate where I have wrapped it with wire.
- One you get more experienced you can repeat this process on the front and back, sandwiching the ring between two layers.
Final Steps for Completing Your Holiday Wreath

- Repeat these steps, adding bunch by bunch until you reach back where you began the wreath.
- Lift up the ends of the first bunch of brush you started with and poke the final bunch in under the tips, wrap with the wire to secure.

- To complete the Christmas wreath make a loop with the wire for easy hanging, and twist loose end around the wireframe to the back of the wreath.
- Use pruners to snip back any pieces on the brush that appear too long or out of place.
- Decorate your Natural Christmas wreath as desired.
How to Decorate a DIY Wreath
Decorating a handmade wreath offers countless creative possibilities to enhance its beauty. A great place to start is by creating stunning bows, as the ribbon adds a lovely pop of color and elegance. Once you’ve mastered the bow, consider incorporating various decorative elements like floral picks, pine cones, candy canes, dried oranges, and vibrant red berries. Christmas bells and extra ornaments can also bring a festive flair, while magnolia leaves lend a touch of sophistication. Mix and match these elements to create a wreath that reflects your style and complements your holiday décor, making your DIY creation truly unique and eye-catching
How Long Does a Homemade Wreath Last?
I love making wreaths; they’re the perfect addition to your holiday décor! A fresh Christmas wreath DIY can last throughout the winter months, especially in colder weather. While the lifespan may vary based on your climate, you can generally expect a fresh wreath to remain vibrant from November to March.

Other Christmas Wreath Decorating Ideas
If you’re looking for other Christmas wreath decorating ideas, consider incorporating clusters of mini ornaments or seasonal foliage to enhance your Christmas decor. Start with a basic wreath form and use florists wire to secure your embellishments. You can mix and match colors and textures for a unique look. Don’t hesitate to visit your local florist for inspiration or additional materials. These creative touches can transform a simple wreath into a stunning Christmas wreath idea that will impress your guests!
FAQ
To ensure your fresh wreath stays vibrant and beautiful throughout the holiday season, it’s essential to have it in a cool location. Here in Canada (Zone 5) there are no issues with keeping it fresh after the crisp late fall air sets in. However, if you are in a warmer climate an effective tip is to mist the wreath with water regularly to keep the greenery hydrated. Alternatively, you can submerge the greenery in a water bath for a long drink before following this Christmas wreath step-by-step. Additionally, place your wreath in a cool, shaded area, avoiding direct sunlight and heat sources that can cause the foliage to dry out. With these simple care tips, your homemade Christmas wreath will remain a stunning centrepiece for your holiday decor!
A fresh wreath will last in the cold weather all winter long! Of course, this depends on your climate, but in general, a fresh wreath will last from November to March. If you’re in a warmer climate use the suggestions above to help give the wreath extra longevity.
When hanging a wreath, it’s important to consider your specific door and wreath, as not all are created equal. Natural wreaths tend to be heavier than faux ones, so I find an over-the-door hanger the most secure option. However, other methods, like Command Hooks, magnetic hooks, or ribbon secured by a Command Hook inside the door—as I did for my Christmas kitchen cabinet decor—can also work well depending on your needs.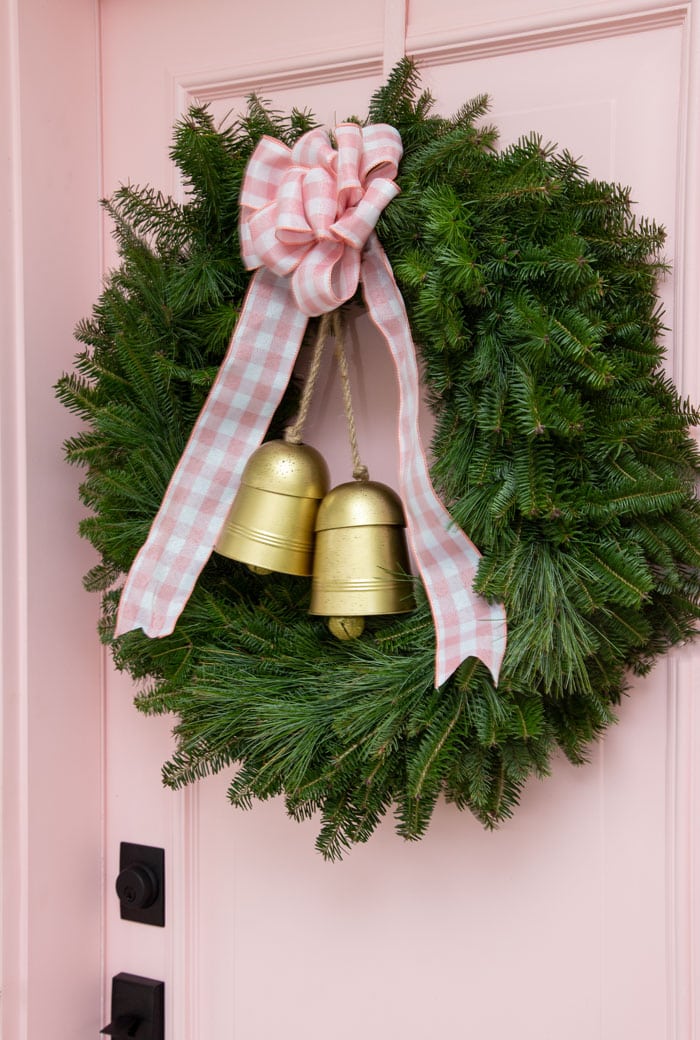
The options for a glass door are similar to the methods mentioned above, but you’ll need to consider wind movement to avoid damaging the glass. I recommend using an outdoor-specific Command Hook or a heavy-duty suction cup designed to hold substantial weight.


Such a great tutorial Virginia!! I absolutely CAN’T WAIT to make my very own using your tips and tricks! 🙂
Since it’s a natural wreath.. it will stay ”nice” how long?
Beautiful! No need to take a class when I have this great tutorial! Thanks for sharing, Virginia!
I have only ever done swags…I will have to try this. Thanks for the tutorial Virginia!! Pinned:)
THANKS Krista!
This wreath is soooo pretty and would go great with my new linky party starting this Saturday at 8pm called “Found & Foraged” I hope you come to share! Can’t wait to party with you at http://www.houseofhipsters.com
Love it! Wish we had evergreens in Texas like we did in Oregon!
We’re really fortunate that we have so many trees. My house actually is sitting on an old Christmas Tree farm! Thanks for visiting!
Hi there, your wreaths look really lovely, Ive had a go at making some myself but found that the berries especially dont last very long. Do you have any types on how to perserve these natural. And how long do you find yours lasts for? Many thanks (from Wales)
Hi Catherine. The berries typically last throughout the winter here, because it is very cold in Canada. I typically use holly berries, but when not cold they tend to turn more of a deep red, rather than vibrant like when they are fresh cut
Hi Virginia!!! I just wanted to ask if I can make this wreath following the same directions but using artificial pine boughs instead of real boughs. I have lots of 18 inch boughs; nice FULL ones and want to make some wreaths to sell.
That would be a fabulous idea!! I would love to see them when you’re done!
Thank you good tutorial