Diy Christmas Bottle Brush Tree: Step By Step Tutorial
This post may contain affiliate links. Please read our Disclosure Policy.
Are you looking to add a personal touch to your holiday décor? Try making your own DIY bottle brush tree Christmas display! By using creative materials like yarn, twine, garland, or even nylon rope, you can craft a one-of-a-kind collection of festive trees while saving money in the process.
This post may contain affiliate links. For more information, please see our disclosure policy.

Gather your materials and watch this tutorial video…

Materials Needed For The Project
- Needlenose Pliers
- 18-20 gauge craft wire
- Yarn, twine, garland, or rope
- Wine cork
- Utility Knife
- Cardboard
You can easily find these supplies at retailers like Walmart, Amazon, Michaels, or Hobby Lobby, allowing you to choose colours for your little trees that perfectly match your décor theme.

How to Make Bottle Brush Trees
Step 1: Making the Cardboard Tree Form
Cut triangle shapes from stiff cardboard to use as templates for wrapping yarn or twine. Vary the heights and widths to create a charming forest of trees in different sizes.
Step 2: Wrap the Yarn Around
Begin by using pliers to pinch the folded end of the wire and twist it a few times—twist, twist, twist! While holding the wire tightly, use your other hand to twist the tree until the wire feels secure. Next, make sure the base is tightly twisted; otherwise, the yarn strands may come loose and fall out. At this stage, the tree will resemble a fluffy, rough pom-pom.
Step 3: Slide the Form Out
Fold a length of 20-gauge craft wire over the narrow end of the cardboard tree form, leaving the tails long (the wire will shorten as you twist). Carefully slide the cardboard form out from the bottom, and twist the wire a couple of times by hand to secure it. Use scissors to snip the yarn loops along each side.

Step 4: Twist Into a Tree Shape
Using pliers, pinch the folded end of the wire and twist it a few times. Twist, twist, twist! Hold the wire tightly while twisting the tree with your other hand until the wire feels secure. Ensure the base is tightly twisted, otherwise the yarn strands will come loose and fall out. At this point, the tree will look like a fluffy, rough pom-pom.
Step 5: Cutting And Shaping The Bristles
At this stage, the tree needs a haircut. Holding it over a trash can, trim the yarn edges to make it into a triangle shape. Periodically stop to fluff the tree yarn and continue to shape the tree until it is the desired look.
Step 6: Preparing The Base For The Tree
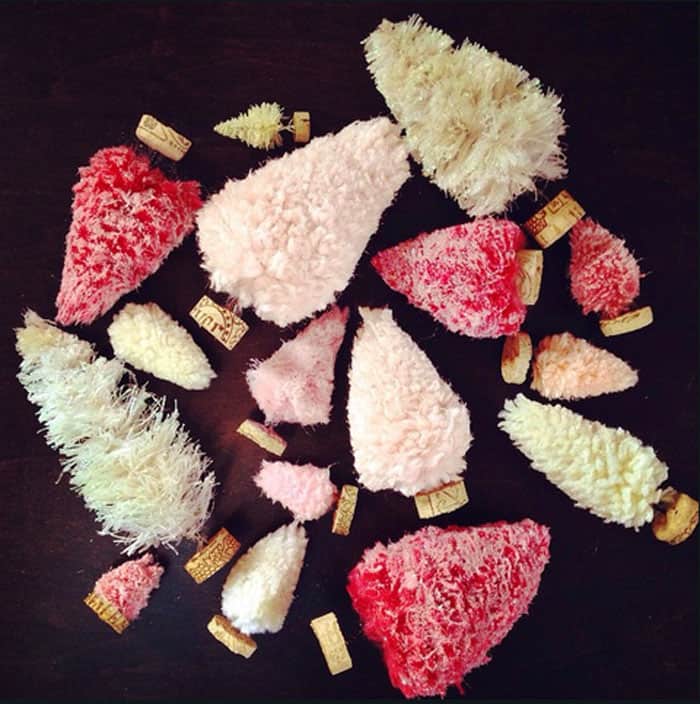
Trim the wire ends to your desired length, ensuring they are tightly twisted and firm. Cut a wine cork in half, and insert the wire ends into the cork to create a sturdy base for the tree. Alternatively, you can craft a small wood base and drill a tiny hole to secure the wire in place for the tree to stand.
Step 7: Adding Decorations And Finishing Touches
For truly personalized and unique Christmas décor, try adding decorations to your bottle brush trees. You can glue small beads between the “branches,” wrap them with sparkly ribbon or eyelash yarn as a garland or top them with a twinkling star for an extra festive touch.
How to Make Sisal Trees
Similar to the steps listed above switch out the yarn for Sisal rope to create more of a traditional-looking bottle brush tree.

- Cut strands of nylon rope, and untwist it a bit but don’t feel you have to go crazy it will separate a bit when you twirl it.
- Cut a length of wire, fold it in half and slip over the pile of rope.
- Pinch the end of the wire with pliers and give a few twists. Pinching the wire firmly twist the tree with your opposite hand, until it feels tight. Make sure the stump is well twisted.
- At this point, it will look like a fat pom-pom. Trim the tree into a triangle shape.
- Cut a wine cork in half, and poke the wire into the cork to stand your tree.
How to Display Bottle Brush Trees
Use your handmade Christmas trees in various creative ways, from decorating a snowy Christmas village or kitchen shelf to placing one on the back of a vintage toy truck. You can tie them onto gifts with a bow or even use them as ornaments on your Christmas tree. For a stunning tabletop arrangement, group the trees in varying heights, place them on a mantle or arrange them inside a glass bowl for a charming centrepiece. Scatter them across a coffee table or shelf, adding twinkle lights or small ornaments for a cozy, festive touch.

Variations and Ideas for Different Styles of Trees
One of the joys of making your own bottle brush trees is the endless creativity you can explore with different materials and textures. Here are some ideas to help you create a truly unique collection of Christmas trees that fit your holiday decorations:

- Yarn Trees: Use soft, colorful yarn to wrap around your form for a cozy, whimsical look. Thicker yarn will create fuller trees, while finer yarn offers a more delicate appearance. Consider using different colors, from traditional green to festive reds and whites, or even pastel tones for a modern twist.
- Twine Trees: For a rustic or farmhouse-style Christmas tree, twine is a perfect choice. The rough, natural texture adds an earthy, organic feel to your décor. Pair them with burlap bows or wooden stars to enhance the rustic charm. Follow the same instructions as the yarn tutorial to achieve this look. Start with thin baker’s twine to achieve the best results.
- Garland Trees: Incorporating garland adds a sparkly, festive touch. Metallic or tinsel garland creates an eye-catching shimmer, while natural greenery garland can offer a more traditional look. You can also mix and match these garlands with other materials for added dimension.
- Sisal Rope Trees: Sisal rope is a great option for a more traditional bottle brush tree. Its sturdy structure and bold texture allow for a striking contrast with other materials. You can dye the rope in different colours to match your theme, giving you flexibility in style. See how to dye bottle brush trees here.
- Miniature Ornament Trees: Add a playful element by hot gluing miniature ornaments use tiny bells or beads within the billows of branches. This adds a personal touch and gives each tree a fun and festive look, perfect for a kids’ craft project or playful holiday décor.
- Add Glitter: For extra creativity, try adding glitter to your finished trees. For a snowy look, spray them with glitter, or even a light spitz of a metallic finish.

By experimenting with these variations and materials, you can build a charming forest of DIY bottle brush Christmas trees that range from rustic to elegant, all while reflecting your personal style.
FAQ
Absolutely! Adding ornaments to your bottle brush trees is a fun and easy way to elevate their charm. The best options are beads or glittered styrofoam balls, often found as vase fillers. Larger beads, like pearls, work particularly well.
To attach them:
1. Make a small divot in the tree by separating the “branches” where you want the ornament to go.
2. Apply a tiny dot of hot glue to the bead.
3. Nestle the bead into the space you created and hold it in place for a moment.
4. Repeat until your tree is fully decorated!
The result is a festive, personalized bottle brush tree perfect for your holiday decor!
When crafting bottle brush trees, the ideal size range for this tutorial is between 1 inch and 8 inches. Trees within this range are manageable to create while maintaining consistent shape and density. Attempting to make larger trees is possible, but it can become challenging due to the wire-twisting process. The wire may bend unevenly, making the tree look misshapen, and the risk of snapping the wire increases with larger sizes. For best results, sticking to smaller, more manageable dimensions ensures a sturdy, even, and professional-looking tree.

The yarn trees are not only the easiest to shape, but they’re also a fantastic way to repurpose scrap pieces of yarn left over from other projects. Furthermore, they’re a creative and eco-friendly solution that adds a unique and festive touch to your Christmas décor.


You are amazing! These are beautiful. I will share these ideas with my crafty friends. 🙂
These look great. Love how they turned out, and they look amazed displayed together in the wooden crate -great job!
Thanks Dannyelle!I’m glad you stopped by!
These are awesome!
These are gorgeous! I love looking at them in the stores but now I’m super excited to make my own 🙂
Amazing! Who knew you could make all these tiny trees? Not sure I am brave enough to try, mine would probably look all wonky!
I’m sure yours would turn out lovely, give it a go! At worst you’re out a ball of yarn!
I had no idea these were so simple! What a fun project, I’ll be giving it a try, Thanks!
How do you do the purple garland one? Would you cut then in half short ways and lay them all together? Hope that makes sense.
Hi Lucy, I did the purple one the same way as I did in the water glass picture. I used skinny garland I found at Walmart. I hope that helps! (the gold one is with fat garland!)
So adorable! You are so very creative my dear! Angie xo
Super amazing!! I simply love these!
Those poofy yarn trees are soo cute! Pinning to our Monday Funday board. Thanks for linking!
I love these! I always wondered how people got all those great colours.
These are so sweet and so ingenious!!! Great job Virginia!!! I’ll have to give this a try….
These are so Cute! I love what you did with them! Awesome! Thank you for Sharing your Brilliance!
Those trees are so adorable. One thing i found for the yarn trees was to brush them with a wire brush – such as a cat brush. This made my yarn trees fluffier since I guess I didn’t use enough yarn to make them as fluffy as the picture. I for sure want to make some more in other colors!
That is such an awesome idea!! Thanks for stopping by to share
You my have tried this already, but if you use a drill on one end and hold the other end with the needle nose pliers you will get a more consistent twist.
Laurel 🙂
I have tried it Laurel, thanks for the tip. I was just providing a tutorial for those who might not have tools. Happy Holidays
Simply love your DIY ideas. The trees are such fun 🙂
If using the yarn around the bottle method do you twist the wire first, then cut the yarn? I love these so much I might be making 100 today!!! Thanks for the cute idea!
cut the yarn first. I’m now selling a kit at Jo-Ann to make these, and you can watch a video too! http://www.joann.com/hazel-ruby-holiday-crafternoon-handmade-trees/14709810.html#q=crafternoon&start=34
This is so easy! Thank you so much for this tutorial! I wish I could know about it in 2013 :< I made a very ugly small Xmas trees for my club that year from paper that year.
Thank you for making it look so easy I really want to try to make one out of something different