Easy Christmas Stockings Tutorial: Free Printable Template
This post may contain affiliate links. Please read our Disclosure Policy.
If you’re looking to add a personal touch to your holiday decor this year, making your own stockings is easier than you think! With this Christmas stockings template, you can create beautiful, custom stockings for your family or as thoughtful handmade gifts. Whether you’re a seasoned sewer or a beginner, this step-by-step tutorial, complete with a free printable template, makes the process stress-free and fun. Get ready to craft stockings that will not only decorate your mantel but also become cherished keepsakes for years to come.

I love adding a personal touch to my holiday decor with handmade projects that make my home feel uniquely festive. These stockings also pair beautifully with these handmade stocking holders, adding a cohesive and personalized touch to your mantle. Alongside these easy-to-sew Christmas stockings, I’ve created some of my favorite DIY ornaments that are perfect for gifting or decorating your tree. Check out my DIY Glass Photo Ornaments for a sentimental twist, try these Keepsake Photo Ornaments for cherished memories, or craft some adorable Air-Dry Clay Ornaments to bring a touch of whimsy to your tree. These projects, like the stockings, are simple yet meaningful ways to personalize your holiday decor.

Stocking Materials
- 1-yard main fabric(I used Premier Prints Ikat Dot in Grapevine Grey and White Linen)
- 1-yard white broadcloth(for lining)
- 1/4 yard of Muslin(for toe and heel pieces)
- 1/4 yard of medium-weight interfacing (or fusible web)
- Coordinating thread
- 1/2 yard of Ribbon (for the hanging loop)
- Pins
- Sewing Machine or Serger
*(makes 4 Christmas Stockings)

Download The Christmas Stocking Pattern
Download the free Christmas stockings template by clicking the button below to get started. The Christmas stocking pattern is formatted as a convenient PDF, ready to print on an 11×17″ sheet of white paper.

Cut Out The Printable Stocking Templates
Use paper scissors to carefully cut out the stocking template. If you’re including the toe and heel pieces, be sure to cut those separately as well. Don’t forget to cut out the small stress notches (the tiny triangles) on the curves of the heel and toe—these will help ensure smooth sewing and a polished finish.
Choose Fabric And Trace Template
Select your desired fabric for the stocking and a piece of coordinating lining fabric (white broadcloth). Place the fabrics with the wrong sides facing up, and lay the template on top. Carefully trace around the stocking outline onto both the main and lining fabrics, ensuring accuracy to maintain the proper seam allowance during sewing. For added convenience, you can pin the fabric layers together to prevent shifting as you cut. This step ensures your stocking will have a professional finish inside and out!

Cut Out Fabric Pieces
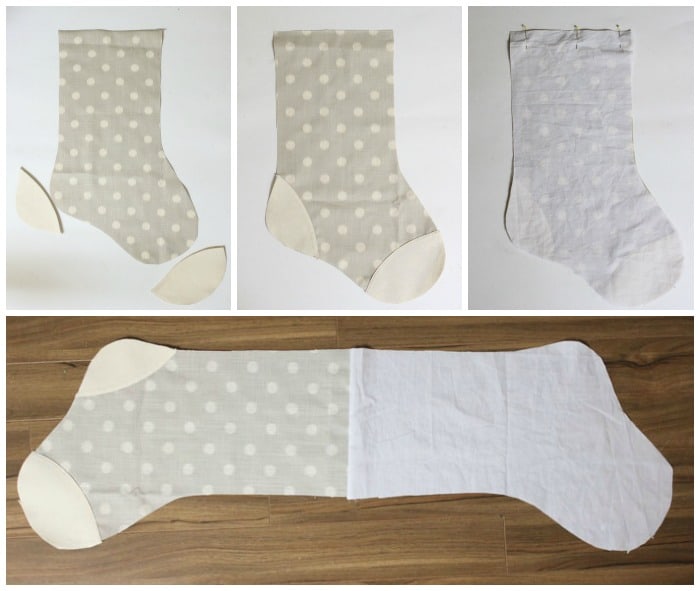
- Fold the main fabric in half. Using a Christmas stockings template, trace the stocking shape onto the fabric’s wrong side.
- Cut out the stocking shape with scissors or a rotary cutter.
- Repeat with the broadcloth lining. You should have two main fabric pieces and two broadcloth pieces.
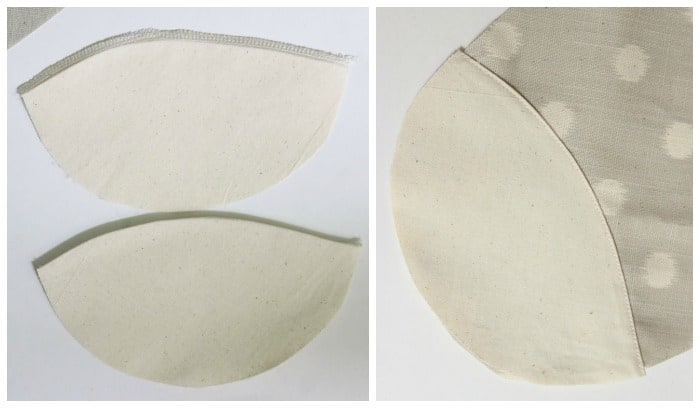
Prepare Toe and Heel Pieces
- Iron interfacing onto the back of the muslin pieces to add stability.
- Trace the toe and heel patterns onto the muslin and cut them out.
- Serge or zigzag the raw edges of the toe and heel pieces along the inside curve.
- Press the edges under with an iron, align them with the stocking body, and topstitch them into place.
Assemble the Stocking Body
- Place the broadcloth lining the right sides together with the main fabric.
- Stitch along the top edge using a ¼” seam allowance.
- Repeat this step for the front and back pieces of the stocking.
Press And Add Embellishments (Optional)
- Unfold and press the stitched seam flat.
- If you’d like to add trim, this is the time to do it! Create pleats from a muslin strip, pin them to the top edge of the stocking, and sew them down the center. Add a bow or other decorative details for a festive touch.
- Consider adding a monogram at this stage, either stitched or applied with iron-on vinyl, for a personal and elegant detail. Complete the look with a bow or other festive decorations to make your stockings truly special.
Sew On Loop For Hanging
- Cut a 5” strip of ribbon.
- Fold it in half and align the ends of the loop with the raw edge at the top of the stocking. Pin it in place.
Sew The Stocking Together
- Stack all the stocking pieces with right sides facing. This includes the front and back main fabric layers and their respective broadcloth linings.
- Pin them together and serge around the entire perimeter. If you don’t have a serger, use a sewing machine and zigzag stitch to secure the edges.
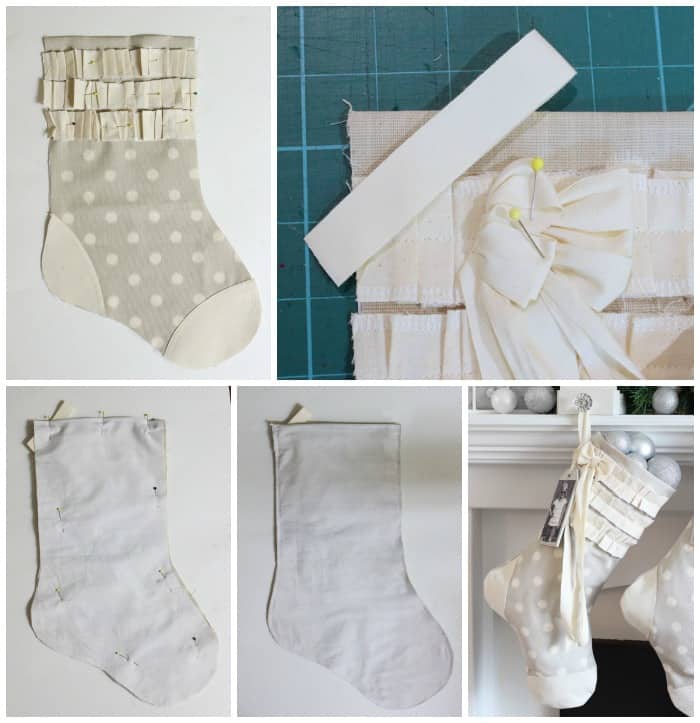
Flip And Finish
- Turn the stocking right side out.
- Use an iron to press the seams flat for a clean, polished look.
- Your personalized handmade stocking is now complete and ready to hang! Perfect for adding a cozy, custom touch to your holiday décor.

Personalize with a Name or Tag (Optional)
To personalize your Christmas stockings, add a tag with a name or image. This makes each stocking unique and allows you to easily update the look by swapping out the tag or ribbon. Use durable materials like wood, fabric, or cardstock, and decorate the tag with paint, embroidery, vinyl, or stamps. Attach the tag to the hanging loop or tie it with a decorative string for a stylish and flexible touch. I love these options available on Etsy- Personalized name tags, and these engraved nameplates.
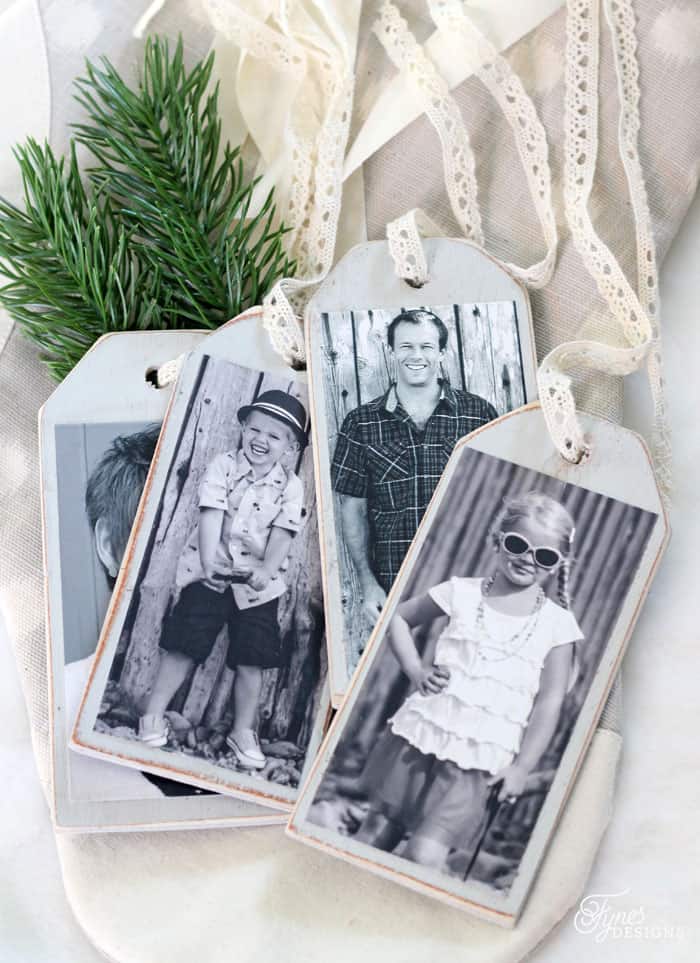
A simple piece of crochet ribbon allows you to tie the photo tags to the stocking loop, making the perfect personalized Christmas decoration.

FAQ
Standard Christmas stockings are usually 16–20 inches long, 7–10 inches wide, and have an opening of 6–8 inches. This size is perfect for holding small gifts, candy, and treats. Small stockings, around 6–10 inches, are great for decorations, while oversized large stockings, up to 24–30 inches, can make a bold statement.
Christmas stockings can be arranged in various creative ways to add charm to your holiday decor. The most common option is to hang them on the mantel above the fireplace, using stocking hangers or hooks. For a cohesive look, evenly space them like Ella Clare did with her stockings and use hangers that complement your stockings’ style—check out these handmade stocking holders for a perfect DIY option. In the past stockings were typically evenly spaced, but a newer trend is grouping stockings close together and a bundle like the Lily Pad Cottage did with her stockings.
The best thing to use to write on Christmas stockings depends on the fabric of the stocking. For most fabrics, fabric markers or puffy fabric paint are excellent options as they are easy to use, long-lasting, and come in various colors. For stockings made of smoother materials like felt or cotton, fabric markers work well for clean, precise lettering. Textured or stretchy fabrics, puffy fabric paint is a great choice because it adds dimension and adheres well to uneven surfaces. Always test your writing tool on a small, hidden area of the fabric before starting.
If you’re looking to buy Christmas stockings with names, I find Etsy is the best place to find unique, personalized stockings. I particularly like these options:
Personalized Christmas Stocking 1
Personalized Christmas Stocking 2
However, personalizing your own stocking is easy once you’ve made the stocking. You can add names with fabric markers, embroidery, or appliqué to make them truly unique to each family member.
If you don’t have a fireplace, there are still plenty of creative ways to hang your Christmas stockings! Here are a few ideas:
Staircase Railings: Drape stockings over the banister or use hooks to hang them along the railing.
Wall Hooks or Pegs: Install hooks or pegs on the wall in a decorative arrangement to hold your stockings.
Christmas Tree: Hang stockings directly on the tree using hooks or attach them to the branches for a festive touch.
Decorative Ladder: Use a rustic or modern ladder as a display piece to hang stockings across the rungs.
Over a Door or Window: Install hooks above doors or windows for a cute and unexpected stocking display.
Hutch or TV Stand: Hang stockings from the top edge of a hutch or TV stand using hooks or a decorative garland to add festive charm to your living room.
In conclusion, creating your own Christmas stockings can add a special, personalized touch to your holiday decor. With this easy tutorial and free printable template, you can craft beautiful stockings for your family or as heartfelt gifts. Whether you hang them on the mantel, staircase, or even the Christmas tree, these handmade stockings will bring warmth and joy to your home for years to come. Get creative and have fun with your designs, and enjoy the process of making cherished keepsakes for the holiday season. Happy crafting and happy holidays!
Check out these other Christmas fabric ideas
- Recovered Thrift Shop Ottoman by Satori Design for Living
- Fabric Covered Cork Board by The Happy Housie
- Bedroom Bench by Craftberry Bush
- Pink Ticking Curtains by So Much Better With Age
Oh WOW Virginia!! The stockings are absolutely BEAUTIFUL!! Want to make 4 for me? hehe 🙂
So, so pretty. I have intentions of making stockings every year and never seem to get around to it! Perhaps this year!
These are lovely. I love the classic neutral. The mod podge tags are pretty cool, too.
Virginia, those are amazing!! I love how each one is unique. You did a fabulous job 😉
Hugs, Jamie
Love this idea, will have to try. Thanks for sharing! Visiting from A Handful of Everything 🙂
As always, great instructions, Virginia. I’m sharing this!
Oh wow those are adorable! I love the idea of using a photo tag to identify the stockings. Since we have grown by one this year, I am shopping for new stocking ideas (our old ones have been discontinued from Pottery Barn).
If you’re a sewer Danielle, Online Fabric Store is having a contest where you can win a $100 gift card by sharing your finished product with them!
I love the photo tags, such a cute addition!
-Taylor
Thanks Taylor, that is one of my favourite parts too!
Stopping by from Create With Joy, I love the socks they are so cute and the wooden tags are adorable!!! Thanks for the tutorial.
Would love to have you stop by and linkup this weekend!!!
Enjoy your day!!!
Karren @Friday Features Linky Party
Love these, especially the colors you chose and the addition of the photo tags. They’re gorgeous! Thank you for sharing at Inspire Me Wednesday. Featuring you in next week’s issue.
Thanks so much Mel, Happy you stopped by!
They are absolutely adorable- with those picture tags!! So cute! And I love the stocking holders too, I am going to have to check those out. You are one talented lady:) Pinning and sharing on my FB page.
These are beautiful, I love the tags idea, (and your friend does have a beautiful fireplace!)
Thanks Julie, I love the tags too. Each year we have an exchange student, this will make it much easier to change it year after year.
Love love love! And the photo tags and stocking hangers are just brilliant!
These stockings are absolutely beautiful! I love your choice of coordinating fabrics – maybe I’ll get brave and make my own this year! I’d love for you to share this at the Talented Tuesday Link Party – it goes live every Tuesday at 9 central! http://homeremediesrx.com I hope to see you there! 🙂
You totally should! Online Fabric store is actually having a contest now where you can win a $100 gift card! Give it a go, I’m sure they will turn out lovely
These are SO great. Your Christmas mantel looks super pretty
Sarah @ EDEA Smith
http://www.edea-smith.co.uk
Your stockings are beautiful and you provided a great tutorial.
Thanks for sharing,
Bev
Cute stockings! I love the polka dots and the picture tags:)
These are so gorgeous! Thanks for sharing!
Tiffany
http://www.themommyglow.net
Hi Virginia! What lovely creations! Outstanding! And beautiful! Thanks for sharing the tutorials! Blessings from Bama!
These are adorable! I love the gray polka dot fabric and the way the stockings are each a little different.
Blessings, Deborah
Would you mind sharing the font you used on the holders… I absolutely LOVE these. The stockings and the stocking holders…
Andrea it is a font I purchased from the Silhouette Store called Fancy Flourish Alphabet. Thanks I’m so happy you like them!
Wow Virginia – these are some of the prettiest stockings I have seen and your tutorial is super easy to follow. I’ve made and gifted several now – and will feature on my new site with a link back to you.
Thanks so much for the inspiration
Thanks so much for stopping by Coralie, that is such a thoughtful gift!
Wow, Virginia! I know these are from last year, but I love these! So pretty, I’m totally inspired to make new ones this year!
I’m having trouble finding board that thin…. any suggestions of where to get them?
What I used was scraps of Meranti. Try Balsa wood from the craft store