How to Sew a DIY Floor Pillow: A Step-by-Step Tutorial
This post may contain affiliate links. Please read our Disclosure Policy.
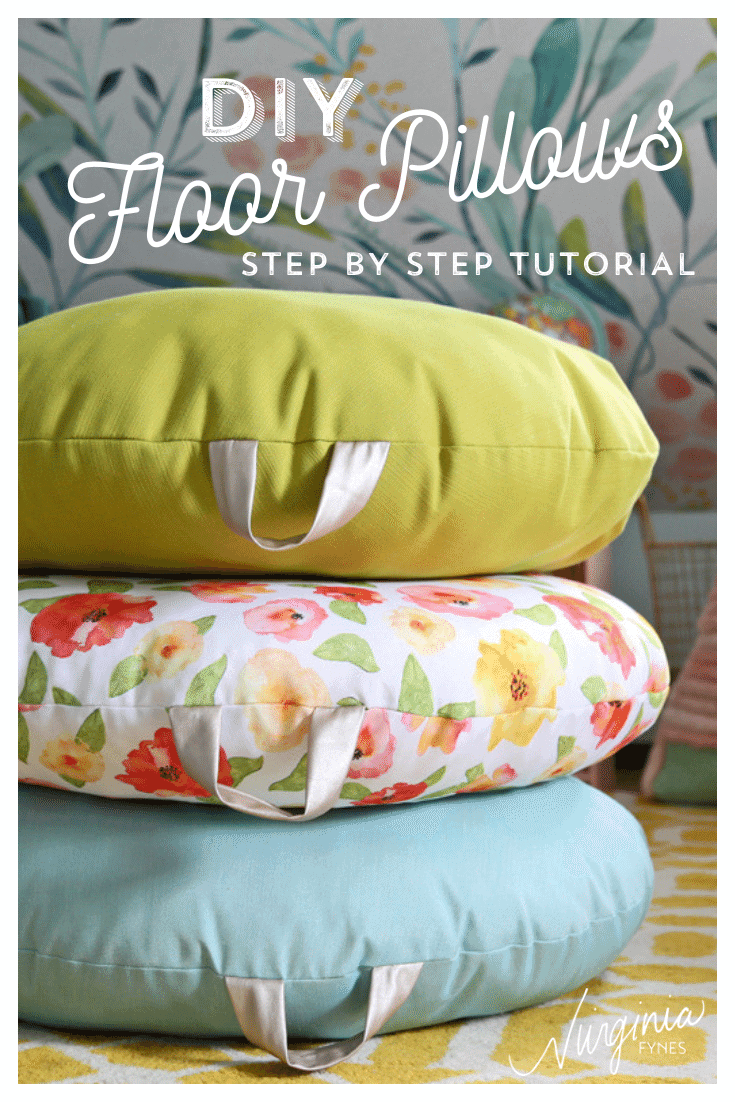
Looking to add style and comfort to your home? A DIY floor pillow is the perfect solution! Whether you’re creating a cozy reading nook, adding extra seating for guests, or simply elevating your decor, this step-by-step tutorial will guide you through sewing your floor cushion from scratch. With just a few materials and some basic sewing skills, you can craft a beautiful and functional piece that’s sure to be a favourite for movie nights in any room.
Why You Need Floor Pillows in Your Home Decor
DIY floor seating is a game-changer for families with kids! Whether it’s game night in the living room, watching movies, or building the ultimate blanket fort, these comfy cushions are perfect for lounging, creating cozy nooks, or using as a meditation pillow. Plus, they’re easy to make with this beginner-friendly tutorial! The total time investment is well worth it for years of comfortable seating.
If you love quick and creative sewing projects, don’t miss out on my 10-Minute Dish Towel Apron, the adorable Girl’s Purse Free Sewing Pattern, or the fun-to-make Mermaid Skirt. Let’s dive into this floor pillow tutorial and keep the sewing inspiration going!
Essential Materials for Your DIY Floor Cushion Project
Materials Needed for A DIY Floor Pillow:
- Stuffing: Floor pillow stuffing such as cotton, foam, or polyfill. I used 3 lbs. of Eversoft Foam Chips, which are budget-friendly (around $15 per pillow)
- Fabric: Approximately 2 yards of fabric (cotton, polyester, or blended fabrics work well)
- Leather Fabric Strip: One 14″ x 4″ strip of leather fabric (faux leather works just as well)
Watch this Simple DIY Floor Pillow Tutorial Video

How to Choose the Perfect Fabric for Your Floor Cushion
Indoor/outdoor fabric is highly recommended as it often includes a stain-resistant coating, making it ideal for a fabric cover on large floor pillows that will be exposed to spills, dirt, and everyday wear. For the floral pillow shown in the image, I used a fabric tablecloth, which worked wonderfully for stain resistance and easy spot cleaning.
If you’re looking to keep costs low, consider using scraps from previous projects to add a creative touch. Polyester fabrics are particularly durable for floor cushions that will see heavy use. The right fabric ensures your comfy cushion is both stylish and durable, perfect for lounging and long-lasting use during family gatherings and movie nights.
Tools You’ll Need to Sew Floor Pillows Successfully
Tools Needed For A DIY Floor Pillow:
- Sewing Machine
- Serger (optional)
- Scissors
- Thread and notions
- String, tape, fabric marker, chopstick (something straight will do)

Step-by-Step Instructions: How to Sew a Floor Cushion
Cut Your Fabric for the Perfect Circle
- Tie one end to the marker and the other to the chopstick. Secure with tape.
- Fold fabric with right sides together.
- Hold the chopstick securely in the center.

- Extend the string to its maximum length and draw a circle.
- Pin along the edges of the circle to secure the fabric layers.
- Cut out the circle.

Create a Sturdy Handle for Your Floor Pillow
- Cut a 14” x 4” strip of leather (or faux leather) for the handle.
- Fold the leather strip lengthwise, wrong sides together.
- Sew along the long edge, about ¼” from the edge, to create a finished handle.

Prepare the Floor Pillow Structure
- Fold the fabric right sides together and stitch a ¼” hem.
- Flip the fabric right side out.
- Sandwich the leather handle between the two layers of fabric with raw edges facing out in a ‘U’ shape. Pin in place.
- Place the top fabric layer back over and pin in place.

Secure the Edges of Your DIY Floor Cushion
- Using a serger or a zigzag stitch, secure the fabric edges to prevent fraying, leaving a 6-8” opening at the back (opposite the handle).
- Sew a straight stitch ¼” from the edge, maintaining consistent seam allowance throughout.

Turn The Pillow Right Side Out and Prepare for Stuffing
- Turn the pillow cover right side out through the opening.

Add Stuffing to Your Floor Pillow
- Using the floor pillow stuffing, insert the bag into the hole.
- Wiggle the stuffing from the bag into the pillow.
- Note: Foam chips are affordable and comfortable, but very messy. It’s recommended to do this step outside or somewhere that is easy to clean up.

Close Your DIY Floor Cushion Neatly
- Pin the opening shut, tucking in the raw edges.
- Sew the opening closed using a ladder stitch (also known as a blind stitch) for an invisible finish, or stitch by machine for speed.

Final Touches for Your Handmade Floor Pillow
- Fluff your large floor pillow to distribute the stuffing evenly.
- Place it in your living room, cozy nook, or play area for a comfy and stylish seating option!

How to Make a Removable and Washable Cover for the Floor Pillow
To make a removable and washable cover for your floor pillow, start by creating a foam-filled liner to hold the stuffing. This will allow you to easily remove and wash the cover when needed. For ease of assembly, use dual zippers on the liner, ensuring one zipper is on the section you plan to leave open before turning and pressing the fabric.
This makes it simple to access the foam and wash the cover. After turning the fabric right side out and pressing the seams, the full-size cover will fit securely over the liner. Be sure to wash the cover with mild detergent to maintain its quality and softness. If you’ve used foam-filled materials, similar to those in foam-filled bean bags, this process will keep your pillow both functional and easy to clean.

Customization Ideas for Your DIY Floor Pillows
Want to make your floor cushions even more special? Consider these creative options:
- Add tassels or pom-poms along the edges for a boho look
- Use contrasting fabrics for the top and bottom circles
- Create a patchwork design using fabric scraps
- Embroider personalized designs or monograms on the surface
- Add piping around the edges for a professional finish
FAQ About Sewing Floor Pillows
-Extra Seating: Perfect for casual gatherings, game nights, or when you need additional seating for guests, especially around a coffee table.
-Lounging: Ideal for relaxing, stretching out, or creating a cozy spot to watch movies or read a book.
-Reading Nooks: Add a floor pillow to a corner with good lighting to create a comfortable reading space.
-Meditation or Yoga: Use a floor pillow to support your posture during meditation or as cushioning for yoga poses.
-Play Areas: Great for kids to sit on while playing games, building blocks, or drawing.
-Sleepovers: Use large floor pillows as makeshift beds for kids or as extra padding on the floor for sleepovers.
-Decor Accent: Floor pillows add texture, color, and coziness to your living room, bedroom, or any space in need of a casual touch.
Yes, floor cushions have awesome potential for your body. They encourage better posture by promoting a straighter back compared to slouching on a sofa. With modern foam technology, floor cushions offer a comfortable cloud feel, reducing pressure on your joints. They also allow for flexible sitting positions, making them great for activities like yoga, meditation, or lounging. Using floor cushions encourages movement, helping to prevent stiffness from prolonged sitting while providing natural, supportive relaxation.
Floor pillows are used for extra seating, lounging, creating cozy spaces, and adding decorative accents. They provide comfort and style for activities like reading, playing games, or relaxing.

Creating a DIY floor pillow is a fun and practical way to bring absurdly awesome comfort and style to your home. Perfect for lounging, extra seating, or creating a cozy nook, these versatile cushions can even double as poufs around your coffee table for a relaxed and functional setup.
With this step-by-step tutorial and a few basic materials, you can craft a beautiful and functional floor pillow that offers a cloud feel of coziness your family and guests will love during movie nights and gatherings. The total time investment is just a few hours, but the comfort lasts for years! Grab your fabric and sewing machine, and start creating your own stylish floor pillow today!
My goal is to learn how to sew! You are very inspiring. Thank you for sharing your wonderful creations.
You got this girl! Sewing is a very rewarding hobby. Beware of fabric hoarding, ha!
I’m excited to try this project! How much stuff does one pillow take to fill?
It really depends on the type of filling you use. The pieces I used in the video took two bags.
I absolutely love this project. These floor pillows will be great for my kid’s rooms and I love the easy carry handle too.
This is such a cute idea! I love that it has a handle, too.
Great Post! They came out so cute!
Thanks for the easy tutorial and circle drawing method! I bought some fabric that I knew would be perfect for a floor pillow for my son’s room, but a lot of the tutorials I’ve seen make pillows that don’t look very comfortable. I think this is one he’ll actually use!
My kids love them… so do I, makes floor playing a lot less painful!
Is that wall paper on the wall or is it hand painted
This is a wallpaper from Rocky Mountain Decals
Hi- love this pattern. But I am wondering if the pillow is washable with the foam chips as opposed to a removable pillow insert? Thanks!
you’d want to put a zipper in for it to be washable. I used indoor outdoor fabric so it resists soil a bit more than typical fabirc.
What a useful tutorial! I especially like the way to make a circle. Now, I don’t need to look around the house for something to trace!
However, if you want washable, it’s easier to make the pillow from sheeting or other fabric. Then add a zipper or Velcro so the cover removes to make it washable.
Thanks for your tutorials. I find them very helpful.
Hi! I’m a very new sewist so I’m still learning a lot of terminology. For your first step under “Prepare the Pillow” it says “ Fold the fabric wrong sides together and stitch a ¼” hem.” Stitching a hem in my mind would mean folding the edges down and sewing them to hide the edges, but later in the instructions it has steps to secure the edges and in the video it looks like you’re just pinning the 2 pieces together. What does that first step under “Prepare the Pillow” mean exactly? Thank you so much and looking forward to making this project!
Hey Katie, Sorry for the confusion and being unclear. I should have just said baste the two pieces together with the wrong sides of the fabric together. Then you can secure the edges with either a zig zag stitch or a serger if you have one available. Good luck with your floor pillow! I’d love to see it when you’re finished. V