Remodelling a 90’s Kitchen in 7 days!
Today I have an amazing kitchen before and after… if I do say so myself! This week I took on the task of remodelling a 90’s kitchen in just 7 days and am sharing the entire kitchen remodel before and after process!
90’s Kitchen Remodel Before and After

We had a few design issues that needed to be addressed, mainly the layout. You may not be able to tell from this image, but the cabinets had a cranberry glaze over the cream, along with a paper border, a painted border along the top, faux finished walls, and scallop trim above the window.
Remodelling a 90’s Kitchen

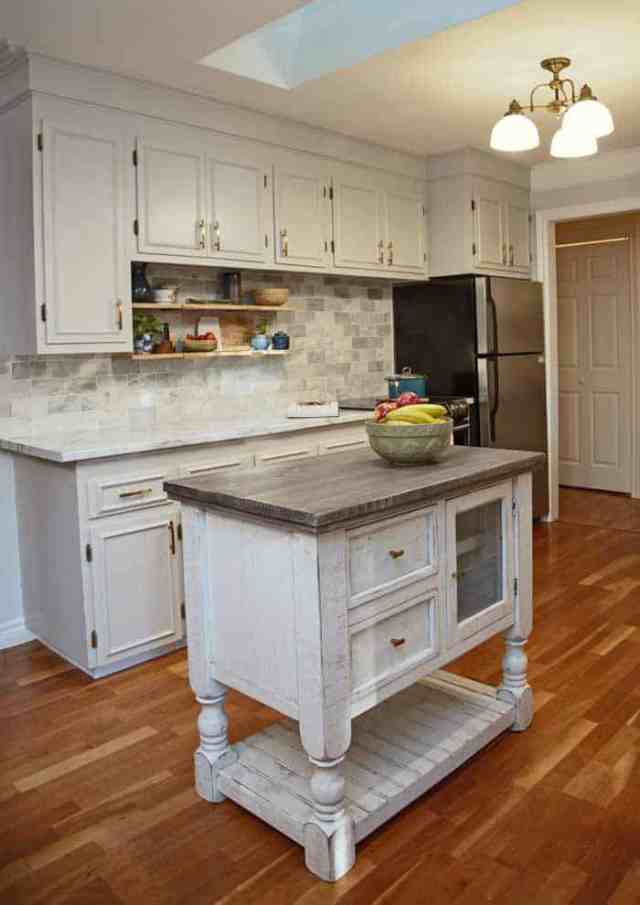
Ta-da!!! Can you believe this was a 7-day renovation? It was a long week, but rewarding, and the clients were so pleased with the final result.
Let’s have a closer look at some of the details.
The Kitchen Appliances

Organizing the appliances was the best thing we did for this kitchen. By moving the fridge to the right, and replacing the wall oven and cooktop with a one-piece slide in, it gave an additional five feet of workspace! It also opened up the sightline, and allowed for some pretty, yet functional open shelving.

We used PPG Breakthrough in Swirling Smoke to paint the cabinets. Let me tell you, if you are in a time crunch this is a fantastic paint, it dried so quickly and durable right from the start (this isn’t sponsored, I was just really impressed).
The Kitchen Island

The previous workspace was a peninsula that was previously cut from the existing countertop in the last renovation. However, it was so heavy it wasn’t practical to move if need be. We had planned on adding casters to this one to make it more useable but it turned out to be not structurally sound. We were able to source this beautiful island at a local discount store that coordinated so well.

Just by turning the island 90 degrees it opened up the flow between the kitchen and dining room and made the workspace much more usable.

The Sink

The new sink from Blanco in slate grey, it is paired with a new IKEA Champagne gold faucet that really compliments the hardware. After removing the scallop trim, the fluorescent tube light was replaced with a hanging pendant that was incorporated to match the existing fixtures.


The Countertop and Backsplash
Remodelling a 90’s kitchen it was no surprise the countertop needed to be replaced. We tossed around the idea of painting, but then found the Calacatta Marble from Formica was available in our short time frame, we jumped at the opportunity.

It wasn’t my intention to make the countertop and backsplash so matchy. Ordering tile wasn’t an option and when we found this one at Kent, we grabbed it immediately. Marble tiles can be so varied in color and veining. The open box was all white tiles, but as we got deeper into the project more grey appeared.

The Dining Room

Unfortunately I didn’t remember to take a dining room before photo, but all we’re really missing from this video capture is the golden valances.

Just some heavy duty painting over the faux finished walls, new textiles and she’s looking spiffy.

I have to send out a huge thank you to my family, this was certainly a group effort to pull this off in 7 days!
Loved this makeover? Check out these other before and after projects!
What did you most about our 90’s kitchen remodel before and after? Let me know in a comment below!


Did you do anything special paint wise to cover the faux finish? I need to paint mine. I tried thick primer for filling, but didn’t notice any difference.
Thanks!
No!! It is all in the paint I used! Breakthrough from PPG. It’s expensive but amazing quality!!