Spooky & Stylish Halloween Wreath DIY Tutorial
This post may contain affiliate links. Please read our Disclosure Policy.
October brings crisp air, colorful leaves, and the excitement of Halloween decorations. If you’re looking for the perfect Halloween wreath DIY project to welcome trick-or-treaters and visitors to your front door, this creepy rat-infested wreath combines simplicity with spine-tingling charm.
Looking for a spooky twist on your seasonal decor? This Halloween wreath DIY transforms a simple fall wreath into a creepy conversation starter—almost like a swarm of rats has taken over your display! The best part is you only need a few affordable supplies and basic crafting skills to pull it together. To complete the look, try pairing your wreath with DIY Halloween apothecary jars for your entryway table or a cluster of no-sew fabric pumpkins in coordinating colors. If you’re working with a tighter budget, my fall porch decorating ideas and budget-friendly tips will help you stretch your seasonal style. And if you’re new to crafting, my beginner’s fall wreath tutorial covers the basics you can use for any wreath project.

What to Put on a Halloween Wreath?
When designing Halloween wreath ideas, consider elements that create visual impact and tell a story. Popular embellishments include:
- Plastic spiders and spider’s web for classic Halloween appeal
- Black crows perched among the greenery
- Glitter pumpkins in different sizes for texture
- Skull and eyeballs for gothic drama
- Orange ribbons and black twine for color contrast
- Lanterns for ambient lighting effects
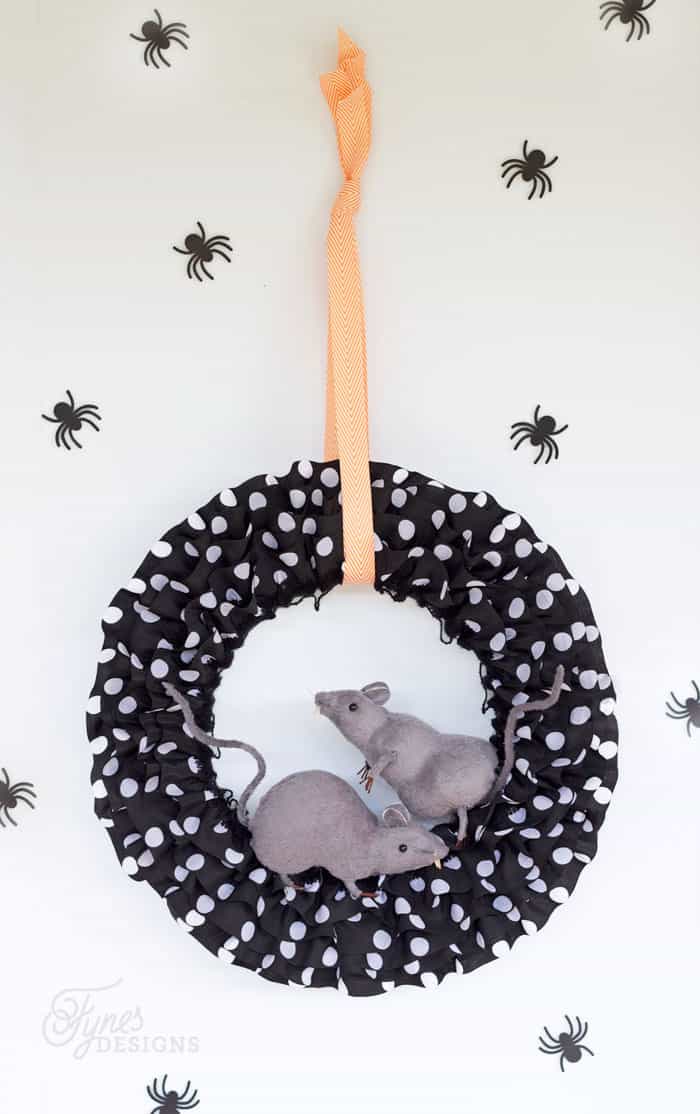
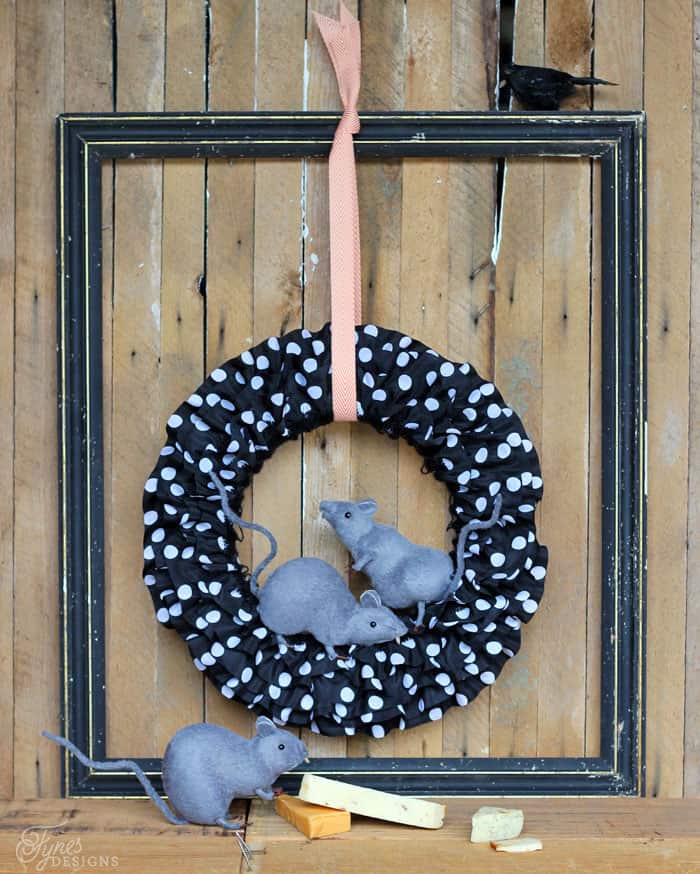
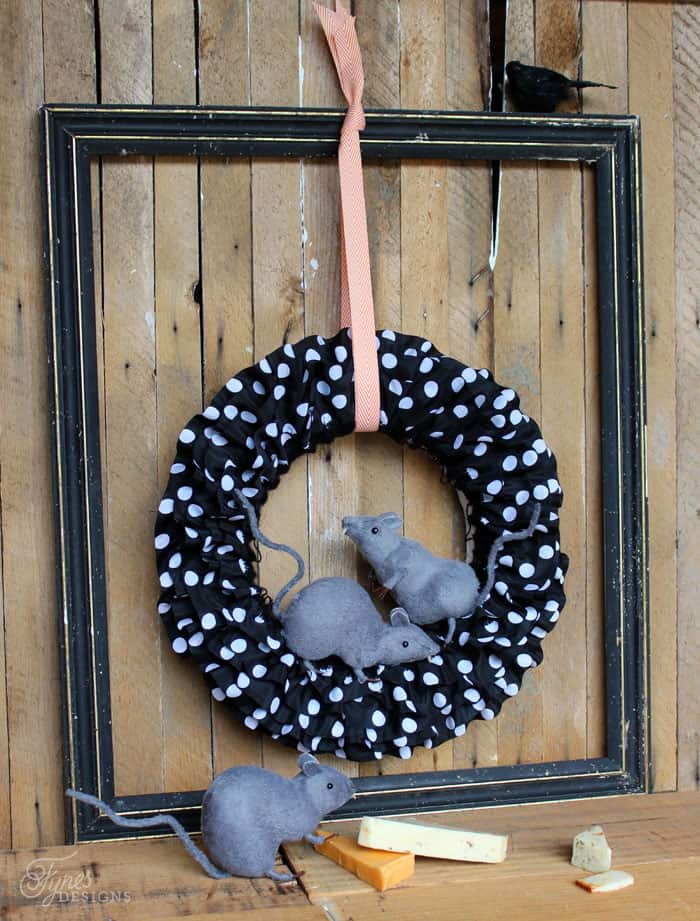
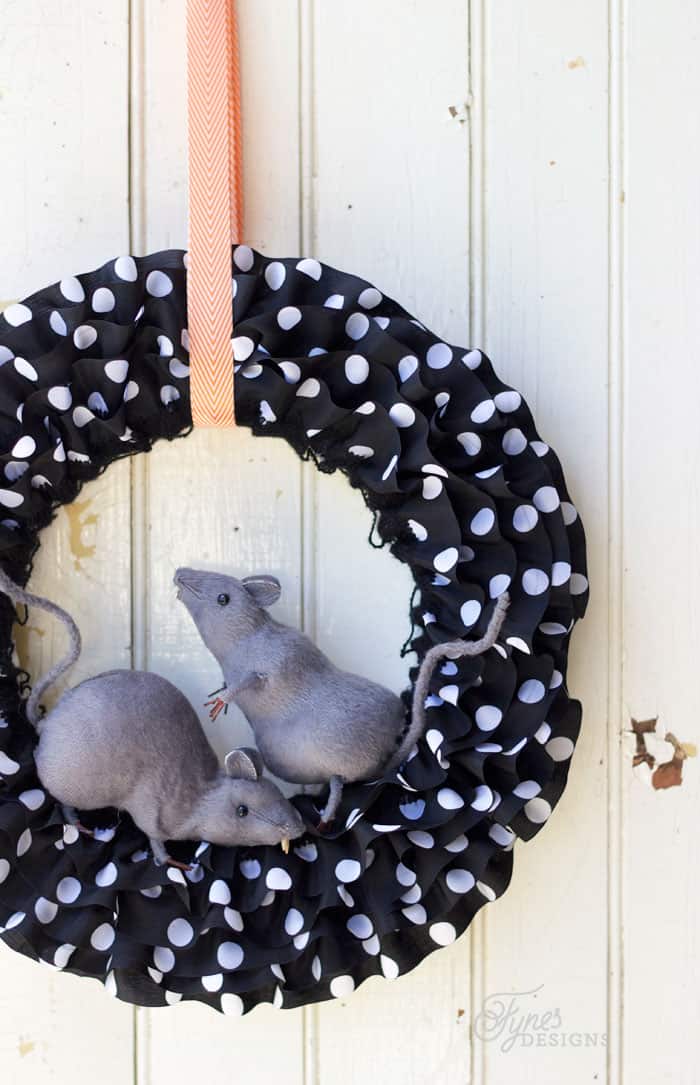
For this particular Halloween wreath DIY, we’re using realistic rats as the star attraction, creating the illusion that they’ve discovered your beautiful wreath and decided to make it their home.
How to Make a Halloween Wreath?
Creating a stunning Halloween wreath DIY doesn’t require professional crafting experience. This project focuses on layering textures and the strategic placement of spooky elements.
Supplies Needed:
- Foam wreath form
- Strip of scrap fabric
- Silk yarn (creates beautiful texture)
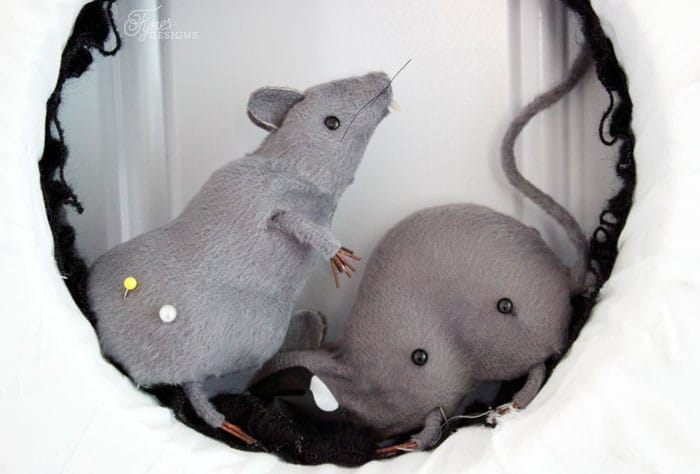
- Four realistic-looking rats
- Four large corsage pins
- Floral wire
- Scissors
- 24″ decorative ribbon
- Hot glue gun
Step-by-Step Tutorial:
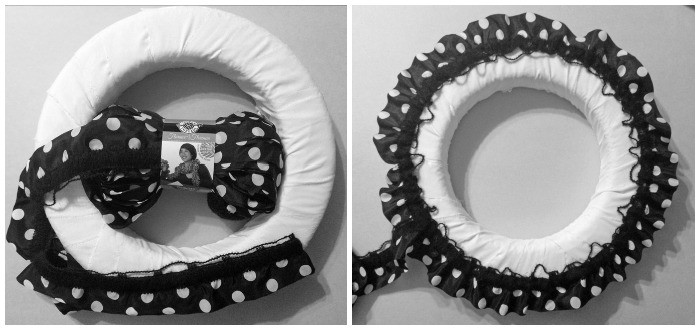
- Step 1: Prepare the Base. Wrap your foam wreath form completely with the scrap fabric strip. This step is crucial as it prevents styrofoam mess and provides a better surface for hot glue adhesion. Secure the fabric to the back of the wreath with floral wire.
- Step 2: Add Texture. Starting at the outer edge, hot glue the silk yarn around the entire wreath. When you complete the first circle, overlap slightly and continue wrapping inward. This creates beautiful layers and depth. The yarn should cover the entire surface, transforming your basic form into an elegant base.
Step 3: Position Your Spooky Elements. Arrange the rats on your wreath before securing them. Try different positions until you achieve the perfect “invasion” look. Consider having some rats appear to be climbing while others look settled and comfortable.
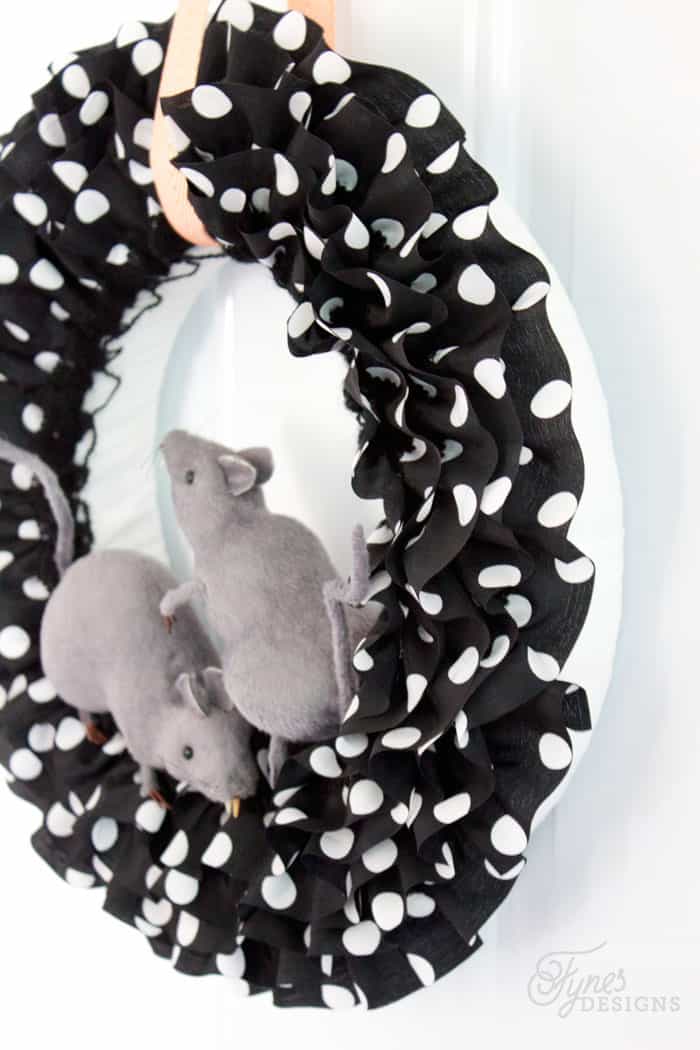
Step 4: Secure the Rats Using corsage pins from the back of the wreath, pierce through each rat and firmly into the foam. The pins should be long enough to hold securely but not protrude through the front.
Step 5: Add Hanging Hardware. Thread your decorative ribbon through the back of the wreath, creating a loop for hanging. Tie securely, leaving approximately 2″ ends of the ribbon for a polished finish.
How to Dress Up a Wreath?
The beauty of any Halloween wreath DIY lies in the finishing touches. Consider these enhancement ideas:
- Layering Elements: Add small plastic spiders nestled in the yarn texture, or weave thin spiders web material throughout for additional creepiness.
- Color Coordination: While this design uses natural yarn tones, you could incorporate orange ribbons or black twine wrapped around sections for more traditional Halloween colors.
- Lighting Effects: Small battery-operated LED lights can be woven through the yarn for an eerie glow, perfect for evening visitors.
- Seasonal Transition: This wreath works beautifully as part of your fall porch decorating ideas, and you can easily transition it by removing the rats and adding autumn elements.
Why This Halloween Wreath DIY Works
This project succeeds because it subverts expectations. Visitors approach expecting a traditional fall wreath, only to discover the delightfully creepy rats that have “invaded” your beautiful decoration. The contrast between the elegant yarn texture and the realistic rodents creates visual interest and memorable impact.
The design also offers versatility. Without the rats, you have a gorgeous textured wreath perfect for fall decorating. Add them back for Halloween parties or whenever you want to surprise guests with something unexpected.

Tips for Halloween Wreath Success
- Storage: Remove delicate embellishments before storing to prevent damage
- Quality Materials: Invest in realistic-looking rats – the more lifelike, the better the startled reactions from visitors
- Secure Attachment: Double-check that all elements are firmly attached, especially if displaying outdoors
- Weather Protection: If hanging outside, consider treating fabric elements with weather-resistant spray
FAQs About Halloween Wreath DIY
The key is balance. Start with a neutral base, then layer in creepy elements like black crows, spider webs, or realistic rats. Add pops of Halloween color—like orange ribbon or glitter pumpkins—for contrast, and finish with ambient lighting such as battery candles or mini LEDs.
Yes! If you’re hanging your wreath outside, make sure elements are securely fastened and consider using a weather-resistant spray on fabric or yarn. Place it under a covered porch if possible to protect it from rain and wind.
Remove delicate embellishments like rats, spiders, or lights before storing. Keep the base wreath in a sturdy wreath storage box or large plastic bag to prevent dust and damage. Store in a cool, dry place so you can reuse it for years.
Check Out These Other Halloween Ideas

- Creepy Crawly Resin Tray from Craftberry Bush
- A Witches’ Brew Martini from Suburble
- Halloween Dropcloth Sharpie Pillow from The Happy Housie
- Halloween Caramel Apples from Satori Design for Living
- Frankenstein Rice Krispie Treats and Free Printable from Clean and Sensible
- Halloween Planter Decorations: Chalkboard Wood Bats from The DIY Dreamer
- Jello Jar Monsters from Echoes of Laughter
- Black Cat Velvet Pumpkins from The DIY Mommy
OH so cool!!!!! The wreath is so creepy.. in a good way of course!! I would never have thought of making a wreath that way! Thanks so much for the tutorial Virginia!! Pinned!
Oh Virginia, this is so cute but totally gives me the creeps!! I am terrified of rats…last night I heard one scurrying around in our garage (we have a hole in the garage door my husbands NEEDS to patch)! AHHHH! So your wreath is very appropriately scary for me:) lol!
This is so fun Virginia! I love that it’s perfect for Halloween but not too spooky!
Love that polka dot! So the rats would probably creep me out a little, but for Halloween, they’re perfect. Then, please, take them down, K!
Hahaha! So clever and cute, Virginia. It makes me shudder, and then smile. 🙂 Thanks for sharing; Pinned!
Those rats are just…. ugh! It’s perfect. Rats freak me RIGHT out, so it’s perfect for Halloween! So pinned.
(Also, where did you get these ratty-fellas? I might want one or two for my decor?)
You can make even rats (gross) look cute.
OMG! Virginia, that is amazing! We always use rubber rats in our Halloween decor. Now I can think of a hundred ways to use them!!
I’m not much of a real rat fan, but these little rats are adorable!
Ha ha! These are probably the only rats that haven’t given me the creeps!
Love everything about this fun wreath! So cute, V!
This is a great wreath! I love the polka dots (it’s one of my favorite prints) and the rats are adorable, but I’m an animal lover so I could never think of them as creepy. 😉
Please stop by and share your wreath with us at our Wake Up Wednesday link party!
Hope to see you there!
http://www.theorganizeddream.com/2015/10/wake-up-wednesday-89.html
Kate | The Organized Dream
Ahh so creepy yet so festive! I love this diy!
Thanks Haley, we’re loving it creepey-ness!
Pinned! Thanks for sharing with us at #Throwback Thursday link party. Please join us again tomorrow and invite your friends.