Expert Tips for Arranging Beautiful Christmas Village Displays
This post may contain affiliate links. Please read our Disclosure Policy.
I love my glittery white Christmas village displays, which I’ve cherished and styled in many ways over the past 10 years. I enjoy finding new ways to set it up each year, adding different touches to make it feel fresh and festive. Through trial and error (and plenty of holiday spirit), I’ve gathered expert tips that beautifully bring the whole scene together. Here are my favorite tips to help you create a magical, well-arranged village display that will sparkle in your holiday decor.

After seeing my kids’ grandparents’ incredible Dickens Christmas Village, I was inspired to create a Christmas village display. To say I was envious would be an understatement! They’ve spent the last 20 years carefully building it, piece by piece, tree by tree. It’s truly stunning, with all the lights, skaters, horses, and carolers—pictures don’t do it justice; it’s something you have to see in person. Over the years, I’ve styled my glittery white village in countless ways, giving it a new charm each holiday season. Whether you’re creating a classic tabletop setup or something creative like a Christmas village tree, there are endless possibilities. If you’re inspired to craft your pieces, check out my guide to making a DIY Christmas village here. Or, if you’re looking for a unique way to display your village, see how to add it to your Christmas tree with this idea for a Stunning Village Tree with step-by-step tips here. Below are my go-to tips for arranging your village beautifully this season!

Planning Your Display Layout
When planning your Christmas village displays, start by gathering all your decorations in one spot to take inventory. There’s nothing worse than nearly finishing your setup only to remember you snagged a new house at the Boxing Day clearance last year and they didn’t make it into the mix! Choose the ideal location for your village, like a mantel, side table, or under the tree, ensuring it offers enough room. Decide on a focal point and build outward, checking for nearby power outlets if you’ll be adding lights, and plan how to manage or hide cords. Finally, consider extra elements like faux snow, risers, or backdrop pieces to create a layered, visually dynamic scene.

Choosing The Perfect Location
Choosing the perfect location for your Christmas village displays depends on the size of your collection and the space available. For a small Christmas village display, bookshelves, a hutch, or even a corner of a table can be perfect spots. Larger Christmas village displays may need a wider area, like a sideboard, large table, or mantle, where the village can be spread out and appreciated in full. Electrical connections are an important consideration if you’re using lights or powered accessories, so be sure to plan your placement near an outlet or think about how you’ll hide cords. Since my home is small, I often choose to place my village on a shelf or in my hutch or separate the pieces to create little village scenes throughout the house. For example, I love displaying parts of the village on a coffee table tray, a sofa end table, or even on top of the shoe cabinet inside the door, or on the pantry shelves. When selecting your spot, don’t forget to consider small kids with curious fingers, as well as pets who might be drawn to the display or have a wagging tail that could knock things over.

How To Light A Christmas Village
- Lighting Kits: Many manufacturers offer lighting kits to purchase designed specifically for their Christmas village sets, making it easy to add the perfect glow. These kits often include bulbs that fit seamlessly into the buildings and accessories. Try a light strand kit, or this lighting system.
- Remote Control Tea Lights: For a simple and safe lighting option, consider using remote control tea lights. These battery-operated lights can be placed inside houses or around the village and are easy to turn on or off from a distance. Try these remote-controlled tea lights.
- String Lights on a Timer: Add charm and convenience with string lights on a timer. These lights automatically turn on and off, saving you the hassle of remembering to switch them each day, and are perfect for illuminating large Christmas village displays. Try these remote tree lights or this remote that uses your current lights
- Fairy Lights: Twinkle lights can be wrapped around buildings or placed under the snow to create a magical, shimmering effect. These lights can add sparkle and depth to your village, making it feel extra festive. Try these remote control fairy lights.
- Extension Cords: For larger displays, you may need extension cords to reach outlets, especially if you’re working with multiple lighting elements or a large Christmas village display. I prefer a cord with a flat plug so a hutch or sideboard can be tucked in close to the wall if the plug is behind. Try this flat plug power strip.

Create Depth And Dimension By Varying Heights And Layers
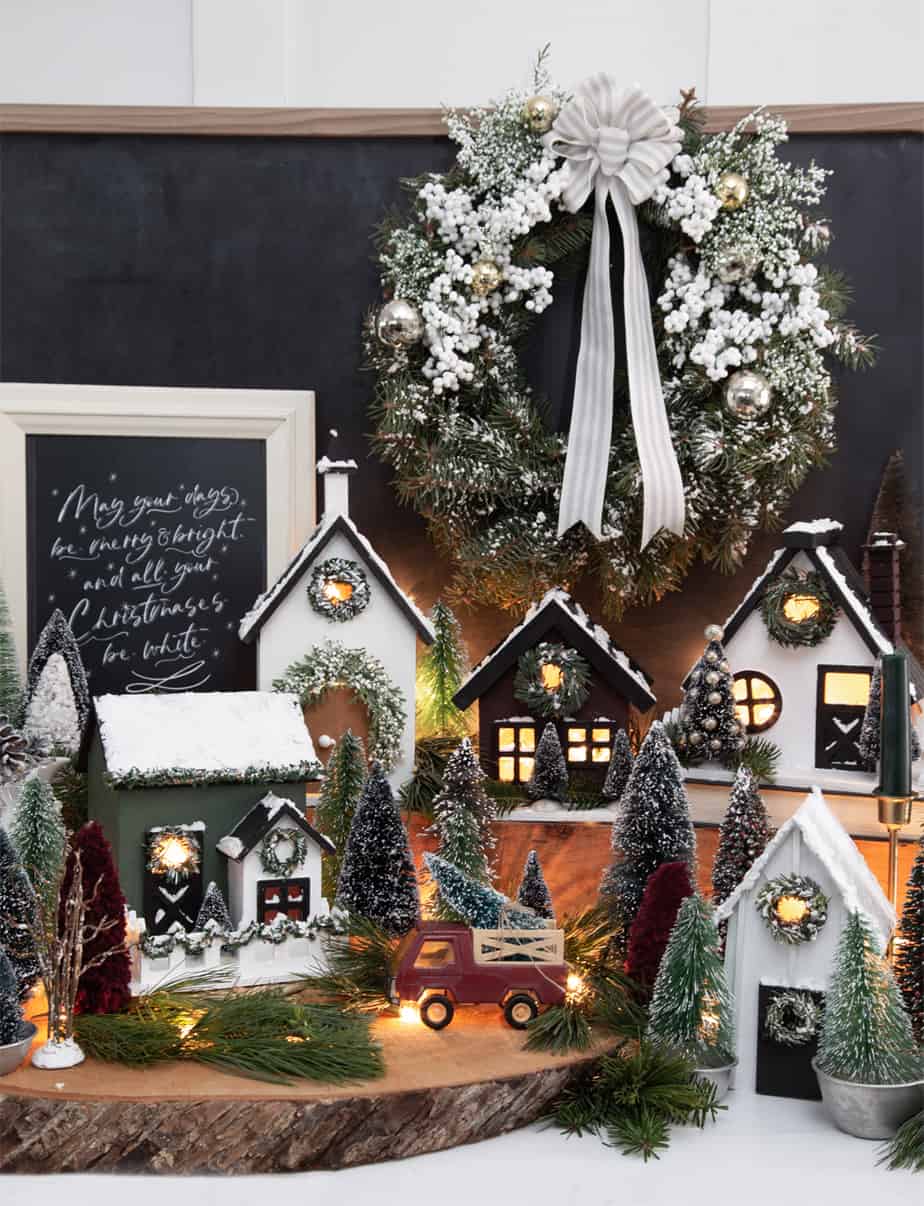
Like any great styling, creating movement and visual interest in your Christmas village is key. Having everything on one plane can be rather flat and boring. I suggest establishing a focal point within your village and building out from there. It could be your favorite house, a meaningful building like Santa’s Workshop, or a beautiful church. By starting with a central piece, you can guide the eye and create a more dynamic layout.

For smaller houses, you can easily elevate them by hiding a soup can, block of wood, or even a cardboard box under snow or decorative materials. You can see in the image below that I painted some blocks of wood white to raise some of the houses up. If snow isn’t part of your plan, try wrapping a box in gift wrap to make it look like a present, or use coordinating paper around a tuna can for a simple lift. If you need to elevate an entire section, like on a large table, consider building a platform out of plywood you can use year after year. This can be as simple as a wooden base or a foam board covered with white fabric or paper to match your decor. Layering different heights and creating visual interest in this way will add dimension, making your display feel more complete and inviting for guests to take in your Christmas decorations.

Adding Festive Decor To Enhance The Scene
To bring your Christmas village to life, consider adding these festive touches:
- Fake Snow: Use cotton batting or a snow blanket for a winter wonderland effect, or a white sheet for a more natural look.
- Miniature Trees: Add bottle brush trees for depth, or make your own to customize the look (check out this guide: Handmade Bottle Brush Trees).
- Small Wreaths, Garlands, and Ornaments: Decorate the houses with these to add charm and cheer.
- String Lights/Fairy Lights: Scatter around the scene to add sparkle and warmth.
- Village Accessories: Include figurines, skaters, or tiny animals to bring the village to life.
- Miniature Fences or Pathways: Create a cozy, charming vibe by adding these to your display.
- Candles: Place flameless LED candles around the edges for a soft glow.
- Garlands with Lights: Drape around the village to frame your scene and create a festive border.
- These simple additions help transform your village into a magical, enchanting holiday centrepiece!

Save Money And Get Creative With A DIY Village
Creating your own Christmas village can be a fun and budget-friendly way to bring holiday magic to your home, especially as a project to enjoy with kids. By getting creative with DIY projects, you can craft unique, personalized Christmas village houses that fit your style without breaking the bank. For example, you can make charming little houses from materials like wood or cardboard, and even turn birdhouses into festive buildings for your village. (check out this blog post for step-by-step instructions: DIY Birdhouse Christmas Village)Not only will you save money, but you’ll also have a one-of-a-kind display that reflects your creativity and holiday spirit.
Creating your own Christmas village can be a fun and budget-friendly way to bring holiday magic to your home. By getting creative with DIY projects, you can craft unique, personalized Christmas village houses that fit your style without breaking the bank. For example, you can make charming little houses from materials like wood or cardboard, and even turn birdhouses into festive buildings for your village. Follow these step-by-step instructions in this blog post to create your own: DIY Farmhouse Christmas Village. Not only will you save money, but you’ll also have a one-of-a-kind display that reflects your creativity and coordinates with the rest of your decor.
FAQ
Hiding cords for your Christmas village can be easy with a little creativity. Here are some ways to conceal them:
Faux Snow: Run cords under a layer of fake snow or cotton batting to cover them up seamlessly.
Platform or Raised Base: Hide cords underneath a platform or raised base, keeping them out of sight while supporting your display.
Cable Clips or Cord Covers: Use adhesive cable clips or cord covers to secure cords along the back edge of your village.
Decorative Containers: Place cords inside decorative baskets, crates, or wrapped gift boxes that match your village theme.
Velcro Straps or Zip Ties: Bundle cords with Velcro straps or zip ties and tuck them behind the village pieces.
No, not all Christmas villages are on the same scale. Christmas village sets come in a variety of scales, meaning the size of the buildings, figurines, and accessories can vary widely. When choosing pieces for your village, it’s important to consider the scale of each item to ensure that everything fits together well and maintains a consistent look. If you’re combining buildings from different sets, you may need to make adjustments or choose accessories that complement the size of your main village pieces.
Several well-known brands make high-quality Christmas village sets, and the “best” one often comes down to personal preference, budget, and the style you’re going for. Here are a few of the most popular and highly regarded brands:
Department 56: Known for highly detailed, premium-quality ceramic houses and figurines. They offer classic, themed collections like the Snow Village and North Pole Series, perfect for collectors.
Lemax: Offers a wide variety of affordable and whimsical village sets. Their collections feature intricate designs and are a great option if you want something detailed but at a lower price point than Department 56.
Target and Walmart: Both stores offer budget-friendly Christmas village sets, often with simple, charming designs. Like this ceramic white set or this affordable option for a 10-piece white set for those on a budget.
I find that Department 56 has a bit more detail, especially in the painting of the figurines and buildings. The intricate touches they add make the pieces stand out. However, Lemax and Department 56 blend well together overall, especially when you’re mixing different styles. They have similar sizes, so you can easily incorporate both into your display for a unique look, even if the detailing differs slightly. When blending them, consider how the color palettes, architectural styles, and overall feel of the two brands complement each other. You might want to group similar styles to maintain a cohesive look. In conclusion, arranging a beautiful Christmas village display can be a magical and rewarding experience. From planning the layout to adding festive decor, there are endless possibilities to create a captivating holiday scene. Whether you’re a seasoned village display enthusiast or just starting, I hope these expert tips have inspired you to create your stunning display. Share your favorite Christmas village arrangement tips or tell us about your village display in the comments below! 
In conclusion, arranging a beautiful Christmas village display can be a magical and rewarding experience. From planning the layout to adding festive decor, there are endless possibilities to create a captivating holiday scene. Whether you’re a seasoned village display enthusiast or just starting out, I hope these expert tips have inspired you to create your own stunning display. Share your favorite Christmas village arrangement tips or tell us about your village display in the comments below!


Your village looks great! Love your imagination. I would never have thought about using bird houses.
How creative and delightful. I have to admit I like your village more. You can add unique pieces every year! What fun! You just might be onto a new trend. ~Thea
Very nice! You could use both the houses and the trees in a wreath! That would be an awesome effect! You rock!
I love your christmas village idea !! So many other idea’s came into my mind to add to what you’ve done. I can’t wait to begin on mine after the new year. Thanks for sharing .
Love your villageI’m so going to make it for myself, thank you so much for sharing and have a great holliday,Greatings Ria
I love your ideas..who would have thought of birdhouses? Very creative!! Love this and am going to try it!!