Quick Tea Towel Apron Tutorial With Detailed Instructions
This post may contain affiliate links. Please read our Disclosure Policy.
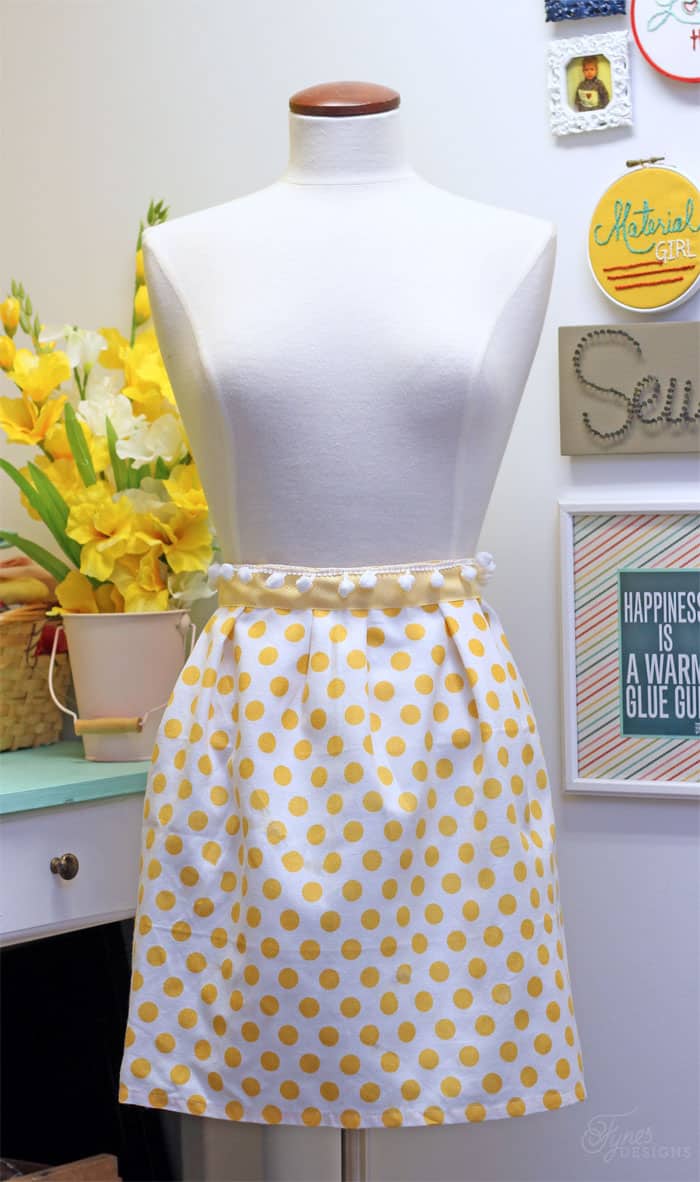
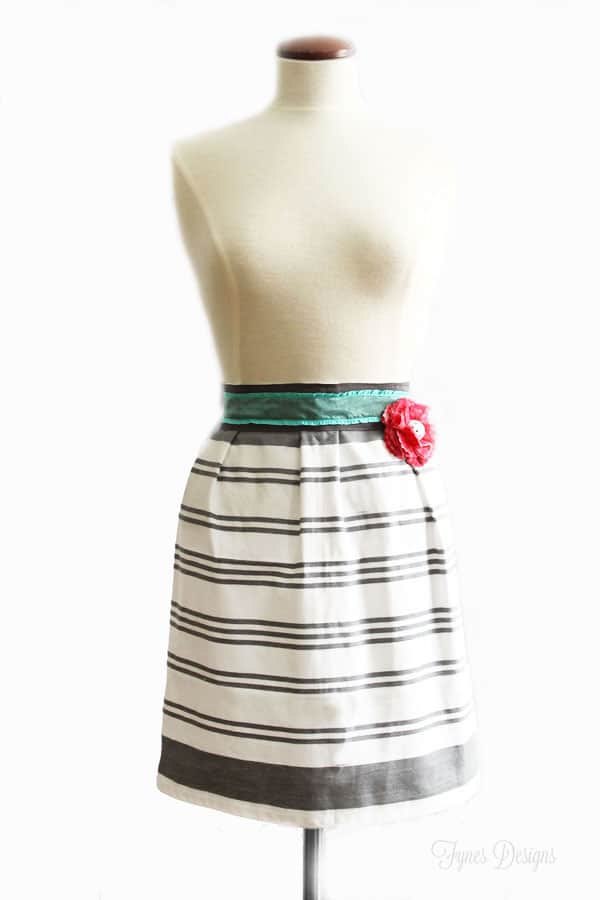
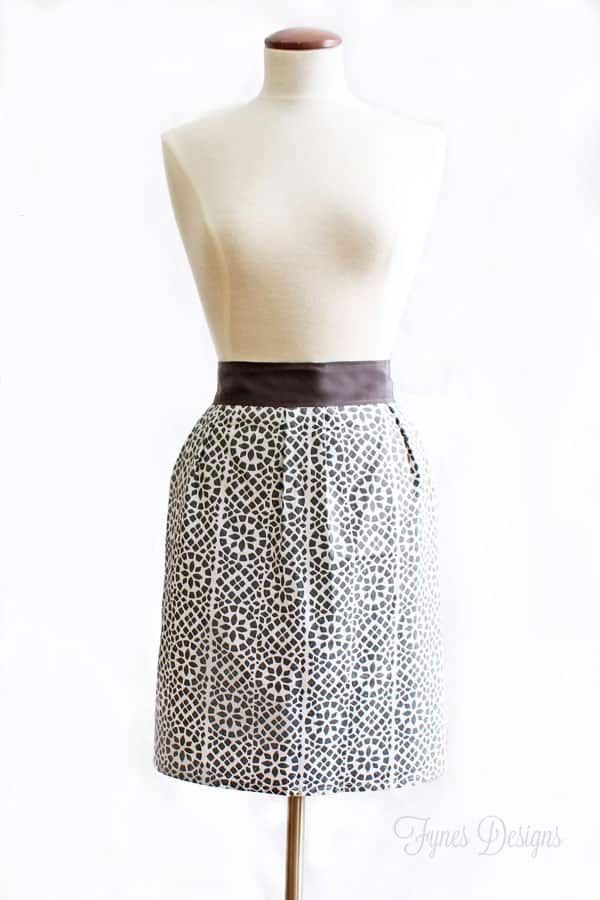
Looking for a quick and practical sewing project? This tea towel apron is the perfect solution! With just a dish towel and a few basic sewing supplies, you can create a stylish and functional apron in under 10 minutes. Whether you’re cooking, gardening, or crafting, this simple DIY project is as useful as it is charming. Plus, it’s a fantastic way to upcycle tea towels you already have at home!
If you’re like me and short on time, these tea towel aprons are the perfect solution—they truly take just 10 minutes to make (I timed myself, and it only took 7!). If you’re looking for more fast and fun sewing ideas, I’ve got you covered. Try this free sewing pattern for a girl’s purse—a delightful project that’s both practical and adorable. For something cozy, follow my guide to creating a DIY floor pillow, perfect for lounging or decorating. And if you have leftover materials lying around, these 10 project ideas for leather scraps are a fantastic way to repurpose them into something unique. Quick, creative, and satisfying—these projects are ideal for busy days!
Table of contents
Supplies To Make A Dish Towel Apron:
- 1 Dish Towel (Standard size, approximately 27″ x 21″)
- 85″ of Ribbon (At least 1.5″ wide; the wider, the better. Adjust the length to fit your body size)
- Sewing Machine
- Straight Pins
How To Make A Dish Towel Apron
If you can sew a straight line with your sewing machine, you’re on your way to creating adorable and easy aprons! First, let’s break it down step by step:
Preparing The Tea Towel
- Prewash the Tea Towel: Before starting your project, it’s a good idea to prewash the tea towel to remove any residual chemicals or shrinkage.
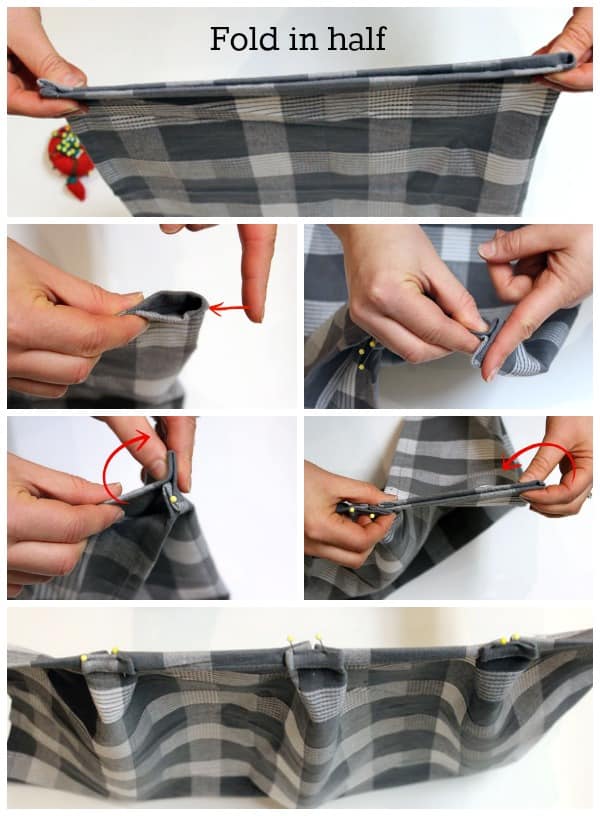
- Fold the Dish Towel in Half Widthwise: This will give you a center crease to guide your pleats, helping you align the fabric properly for a neat and even result.
Making The Pleats
- Pinch the fabric 1″ back from the center fold you just created.
- Push your finger into the fold to create a ‘T’ shape.
- Pinch one side of the ‘T’ and bring the edge of the dish towel back to meet it. Pin it in place.
- Repeat the same steps on the other side of the ‘T’.
- Fold the outside edge of the towel inward to meet the pleat you’ve just created. Repeat steps 2-4 for this side as well.
- Now, repeat the process on the opposite side of the towel.
- By the end, you’ll have three evenly spaced pleats along the long edge of the towel.
- To hold the pleats in place, baste a straight line along the top edge of the tea towel.
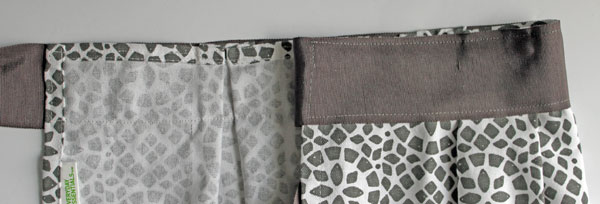
Sewing The Waistband
- Take your ribbon and fold it in half lengthwise to find the center.
- Align the center of the ribbon with the middle pleat on the tea towel. Pin it in place, ensuring the ribbon covers the pleats to form the waistband.
- Using a straight stitch, sew around the perimeter of the ribbon where it attaches to the dish towel. This will create a clean, rectangular stitch pattern securing the apron ties.
Adding The Finishing Touches
- Trim any excess threads and ensure your stitches are secure.
- Adjust the ribbon length as needed to tie comfortably around your waist.
- Your dish towel apron is now complete and ready to wear!

Customizing Your Tea Towel Apron
One of the best parts about making your cute little apron is the ability to customize it to reflect your personality or style. Here are a few ideas to elevate your apron design and make it truly one-of-a-kind:
- Add a Pocket: Stitch on a coordinating or contrasting fabric pocket for a practical yet stylish touch. A pocket can be handy for holding small items like a recipe card, kitchen tools, or even your phone.
- Include a Vinyl Phrase or Design: Use heat transfer vinyl (HTV) and a cutting machine to add a fun phrase like “Bake with Love,” “Kitchen Queen,” or “Flour Power.”

- Monogram It: Embroider or use HTV to add a monogram for a sophisticated, custom look. Monograms make it perfect for gifting as well.
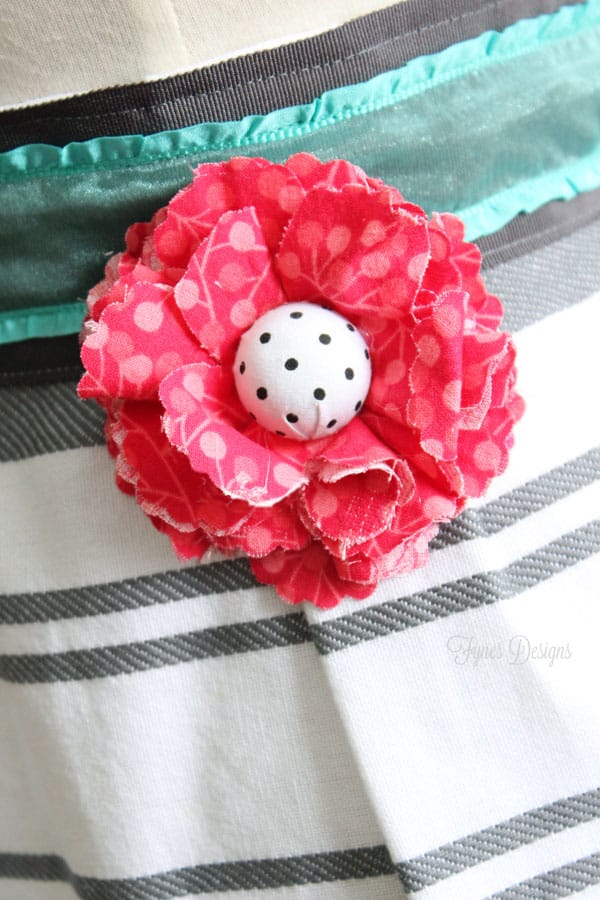
- Attach a Pretty Brooch: For a vintage or glam vibe, pin a decorative brooch to the top of the apron.
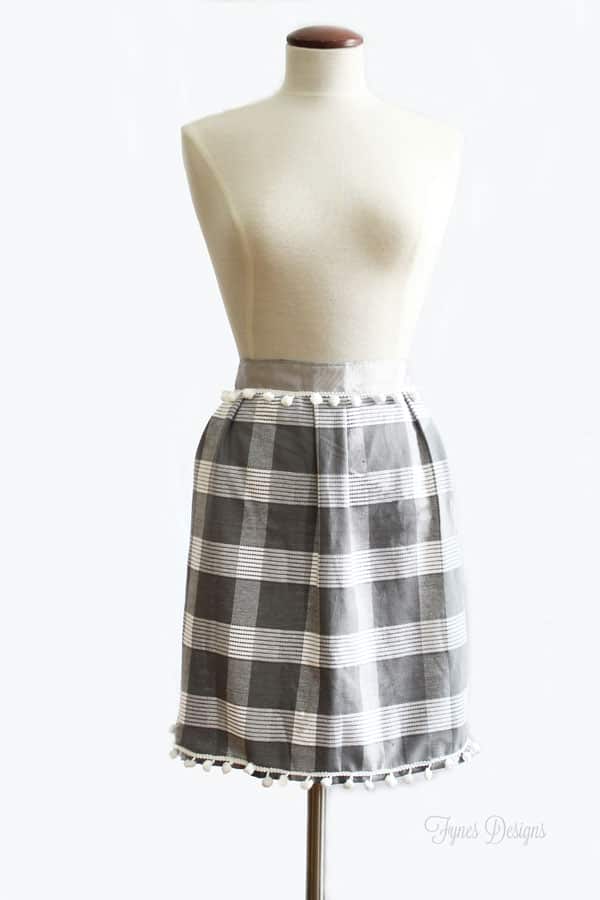
- Incorporate Ruffles or Trim: Sew on a layer of ruffles, lace, or pom-pom trim to the bottom edge for a whimsical and playful look.
- Add Buttons: Decorative buttons along the waistband or pocket can add charm and personality. Use bold, colorful buttons or stick to neutrals for a classic aesthetic.

- Tie a Bow: If you’re using an extra-long ribbon for the waistband, you can create a large bow at the back or side for an elegant finishing touch.
- Personalize with Fabric Paint: Get creative with fabric paint or markers to hand-paint designs, patterns, or doodles onto the apron. This is a fun option for kids’ aprons too!
- Seasonal Touches: Customize your apron for holidays by making a patterned apron or adding festive elements like small jingle bells, Christmas motifs, or pastel designs for spring baking.
Benefits Of Using A Tea Towel For This Project
Tea towels are a practical, cost-effective, and sustainable choice for making an apron. They come in a variety of colors and patterns, letting you customize your design to suit your style. Plus, their pre-hemmed edges make them perfect for beginners, eliminating the need for hemming and simplifying the process. This allows you to create a stylish, functional apron quickly and with ease.
FAQ
To make a child’s apron from a tea towel, first, cut the tea towel in half widthwise, and then place the waistband ribbon over the raw edge of the fabric.
This creates a simple and quick way to adapt the tea towel apron for a child’s size.
Tea towels can be turned into a variety of fun and practical items with a simple sewing project. Here are a few ideas that make great gifts:
Pillow Covers: Tea towels can be sewn into stylish pillow covers. Use one towel for a small throw pillow, or stitch several together to create a larger cover for a couch or bed.
Dishcloth or Pot Holders: Use the fabric from tea towels to create matching dishcloths or pot holders. It’s a simple sewing project that results in a thoughtful and practical gift for the home.
Table Runner or Placemats: Sew several tea towels together to form a table runner or placemats. This makes a charming addition to any kitchen or dining room and can be customized to fit the recipient’s style.
Tote Bags: Repurpose a tea towel into a lightweight, eco-friendly tote bag. A simple, sturdy design can make a wonderful, reusable gift for carrying groceries, books, or other everyday essentials.
Tea Towel Skirt: For a fun and unique project, sew a tea towel into a simple skirt. The lightweight fabric makes it perfect for crafting a fun, casual look.

In conclusion, creating a stylish and functional apron from a tea towel is not only a quick and simple DIY sewing project but can also be completed in just 10 minutes. Moreover, the versatility of tea towels allows for a variety of other creative sewing projects, making them a practical and cost-effective material for crafting unique and personalized gifts. Whether you’re a seasoned seamstress or a beginner, this tea towel apron tutorial is, without a doubt, a great way to add a touch of charm to your kitchen or crafting activities.
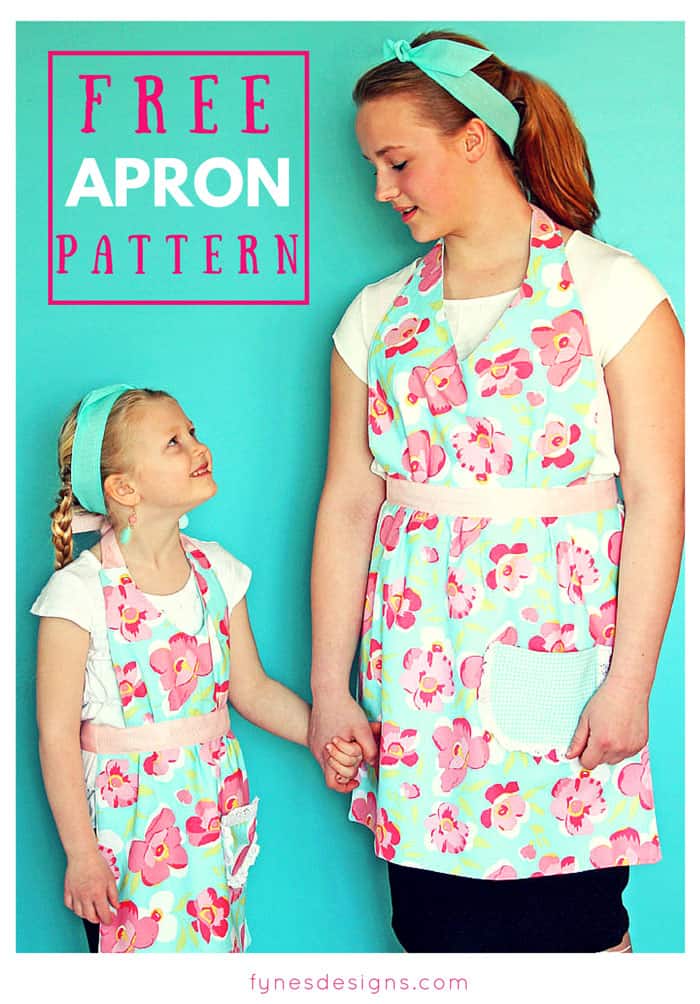
Try This Other Great Apron Pattern
Matching Mom and Child Free Apron Pattern
LOVE it Virginia!! Now that you can make some, you should make some for me! haha 🙂
love a These! What is the size of the dish towels?
Hi Sylvia, I think they are just standard… 27″ x 21″ are what mine measure. Hope this helps, happy sewing!
These are so so cute. What a great idea.
I ADORE these! Pinning and going to make FOR SURE! Great for mother’s day too!
Thanks Shauna! Mother’s Day is a great idea!
What brand are these dish towels? I haven’t seen any this cute! Any tips on where to find cute ones like this?
These dishtowels are “Everyday Essentials” from the Superstore (if you’re in Canada) I often see cute ones at Homesense or Tj Max or Marshalls in the US. Good luck, happy sewing!
These are so adorable Virginia!! Pinned and making one of these days- thanks for the easy tutorial!!
Wow! That is SO cute! Great tutorial, pinning for later 🙂
Are you kidding me!?! I’m crazy for these. I want to wear them as normal clothes they are so adorable. Please please stop by and share at our link party!
http://www.delineateyourdwelling.com/2014/02/link-it-or-lump-it-party-number-twenty.html
Unbelievably adorable! I cannot believe how cute they are! They look like they came straight out of Anthropologie. Love! – Bre @ Average But Inspired
These are just adorable! They would look just lovely hanging, one for every day of the week… all hanging in my pantry!
oooh, thats a great idea Laurie!
These are darling, love them!!
xo, Tanya
Thanks for stopping by Tanya!
So cute! love this idea!
What a cool idea! And your instructions seem very easy to follow! Thanks for sharing.
These aprons are seriously the best! I have a major apron addiction and I can very well see myself making these with cute towels! LOVE them!
How stinkin cute are these? This is such a great idea! I could see me giving these to all the crafty gals in my life. haha
I’d love it if you would share this tutorial sometime at my new Pinterest link-up hop!
http://www.21random.com/that-friday-pinterest-party/
I love these Virginia! I share them on my Facebook page for you, and pinned them to my ‘Aprons To Love’ board! So, so gorgeous! Have a lovely weekend! Angie xo
I adore these so much! I’ll be featuring them tomorrow at our link party. Be sure to stop by and grab a feature button!
http://www.delineateyourdwelling.com/2014/02/link-it-or-lump-it-no-27.html
Hi, Virginia! Popping over from Link It or Lump It. I love these so much! I can’t wait to find the perfect dish towel to try it out:) thanks for sharing!
Absolutely adorable! Love!
Oh my gosh these are so adorable! Pinned!
Thanks Katie!
Saw you featured at Lump it or Link It! LOVE these- PINNED! ♥
So cute, I’d need 2 dishtowels to make an apron for myself but I might understand how to pleast from your tutorial!
You inspire me! Thank you so much for linking up at Wonderfully Creative Wednesdays last week. I picked your project as one of my favorites and featured it. You can see it here:
http://www.sewcreativeblog.com/diy-craft-and-recipe-link-party-week-9/
Best Wishes,
Crystal
These are way cute, Virginia! I can’t sew a lick, but will probably send my mom a link to this so she can get her crafty hands to work. Pinned instantly! I wear an apron when I remember, but most of the time it’s a full apron. Since I tend to lean against the counter tops when I’m stirring and baking I usually get my shirt dirty if I only use my half-apron, though I do like it because that one has pockets.
Thanks for stopping by. I like an apron with a pocket too, but for simplicity sake I kept these ones simple.
I bet you could use half of a second towel to tack on as a top for your apron and just use extra ribbon for the top tie.
IKEA sells ADORABLE dish towels!!
“Full body or half, which do you prefer?”
Full body, it is usually my shirt that gets splattered when cooking and baking. But I hate the aprons that have a single loop around the neck, which gives me a headache. I like shoulder straps. A simple pattern for a shoulder strap full body apron would be incredible!
I really should do a apron with shoulder straps, my neck get so sore too. Put thinking cap on now!
I love a simple sewing project. Rainy days are my favorite time to sew. This is great!
Val
These are adorable. I prefer the full apron and I like the neck strap. Mine is adjustable and does not cause any neck or head pain.
I love to sew, and have very little time. I need a cute apron.Great idea &going to make it now.
Thanj yoy !!!
I’d love to see what you come up with!
These are so cute and what a great idea for a handmade gift! Pinning!
This is so cute! I am definitely pinning this and making it, possibly today. 🙂 Thank you for the easy to follow plan!
So glad you stopped by Melissa. Stop by my Facebook page to shop off your finished project, I’d love to see!
I plan to make these for my 5 granddaughters for Christmas.
Thats awesome! I’m so glad you can put this project to good use!
Quick question, my mom’s been wanting a terry cloth apron. Is Terry cloth easy to work with?
I honesty havn’et worked with it too much, but if you had a serger to fix the edges I can’t imagine it would be too hard.
What do you do to finish the ends of the ribbon?
They are adorable.
Sherri you can just use a lighter and barley touch the flame to the ribbon. It will singe the fibres so they won’t unravel
I’m making one of these for my 8 yr old granddaughter for Christmas, to go with the Children’s Cookbook I’ve gotten her. Thank you for sharing!
That will be a sweet gift Phyllis!
Made these for Christmas gifts. Can’t get enough. Live this quick and cute idea!
I’m going to use my vintage table cloth that is stained. I knew there was a reason I couldn’t let it go!
Thanks for sharing. Your instructions were easy-to-follow. Very easy for someone with little sewing knowledge.
SO CUTE!
Saw this over at DIY Dreamer Top 30 sewing projects.. love it!
Did u iron the pleats before you put on the ribbon?
I probably did, because I love using the iron, but the pleats are basted so you don’t necessarily need to. Good luck, and thanks for visiting!
I am so happy I ran across your page! As a 1st grade teacher I wear a half-apron EVERY day. Now I can make some new super cute ones! Thank you!!!
So glad you like them, they are super easy to make!
I would use a cordinating cotton fabric for the waist band. Cut or tear 2 strips 3 1/2″ wide by width of fabric…generally 44″…. sew the 2 pieces together…press seam and center on prepared .pleated towel. Sew right side of cotton to wrong side of towel. Then press under 1/2″ along cotton and then top stitch to front of towel along stitched seam…. thus waistband/tie. I love the use of buttons for decor so I’d probably sew a button on center seam to hide it…. that of course after I sewed a strip of ric/rac around center of belt/tie. … or a cute bow or flower would be adorable. For the ends of the ties I’d use an applique stitch sewn on an angle and trim raw edges close. For those wanting pockets you could use the fabric but possibly find matching dish washing little towels…like a regular wash cloth. They’d be fun folded over on one corner and make an angler pocket….again using a button to hold down that flap. (sewn by zig-zag or applique) Another idea would be using the cordinating cotton fabric and adding a ruffle along the bottom of the towel. …..so there goes the 10 minute easy apron to at least up to 45 minutes but just imagine how unique it will look. Make sure you have your own personally made by Leslie Lewis label sewn on so your friends and family will always remember it was sewn by their special loved one. Have fun…. share your ideas I tend to over do my simple little project.
During your “awaiting moderation” to my lengthy suggestions some important measurements were deleted. Can you please correct that?….. like width of fabric cuts, etc. LL
Great suggestions Leslie! Sorry for the slow response! happy sewing
Love, love the apron pattern.. Have been going to figure this out for ages and just didn’t…. Thanks for figuring for me…. Will be making aprons for everyone for Christmas…. even the guys!!!!!!
Great gift idea!!
What a great idea! I love these. So pretty. I will definitely try these to be sure. Thank you for the tutorial!
Sorry if I missed this in previous questions but do you use terry cloth towels or a cotton ‘tea towel’ type? I have solid color tea towels I embellish with machine embroidery and I was thinking these might make a cute apron. Thanks for a great idea!
You can use whoever type you like!
I like the full body aprons that way all my clothes are protected from splashes. I like the idea of the tea towel aprons. I am going to make some and add pockets.
Great idea, I need a pocket in my apron too.
I can’t express my feelings that how much it looks cute
great article, i love your designing dish towel, this is very amazing and you have described it with a very easy method step by step. I will try it at home may i made this like your.