Cardboard Christmas Village Houses: Free Printable Template
This post may contain affiliate links. Please read our Disclosure Policy.
To kick off our holiday creations this season, my kids and I make adorable village houses from cereal boxes, adding a bit of magic to our decor. And the best part? I’m sharing a free cardboard Christmas houses template both printable and SVG format so you can join in on the fun! Whether you’re looking for a family-friendly project or a unique way to decorate, these DIY cardboard Christmas village houses are perfect for adding a handmade touch to your holiday setup.

If you’re a fan of Christmas village displays, you’ll adore this Printable DIY Christmas village houses template! A few years ago, I posted my Easy DIY Christmas Village made from painted houses, which has been a hit among readers wanting to add a personalized cozy village charm to their holiday decor. I even dedicated a whole tree to my village obsession, which is featured in my Creating A Stunning Christmas Village Tree: Step By Step Guide, which is complete with tiny houses and twinkling lights.
Benefits Of Making The Cardboard Christmas Houses Template
Collecting Christmas village sets is a wonderful holiday tradition, but it can get pricey—especially when you add in all the little accessories. Making your own cardboard Christmas village houses is an affordable alternative that lets you customize the colors and style to match your decor. You can create a unique village scene perfectly tailored to your home using this free template. Plus, it’s a fun christmas craft for kids with a little help from mom or dad.
Materials And Tools Needed For The Village Houses
- Printable Template – Download and print the house template at the bottom of this post.
- White Bristol Board or Cereal Boxes – White bristol board or cereal boxes painted white.
- Scissors – To cut out the house shapes from the template.
- Craft Knife – For precise cutting, especially for window and door details.
- Cutting Board– For cutting out window and door details with the craft knife.
- Ruler – Helps in making sharp, straight cuts and folds.
- White Glue Stick– To adhere the printer paper to the bristol board.
- Hot Glue Gun – To assemble the houses.
- White School Glue – To paint the houses to adhere the glitter for a snowy look.
- Gold and White Glitter – To add sparkle to the walls and roof details.
- Paint Brush – For applying glue and paint.
Step By Step Instructions For Cardboard Christmas Village Houses
Step 1: Print the Christmas Village Template
- Download the free printable template at the bottom of this post. There are two sizes available: 11×17 and 8.5×11.
- Alternatively, use the free SVG file to cut the template easily with a Silhouette Cameo or in Cricut Design Space.
- Print the template on regular printer paper. You can adjust the size of the finished houses by changing the scale during printing.
- Use a glue stick to lightly tack the printed template onto the white bristol board.
- Note: If the bristol board has a shiny and dull side, adhere the template to the dull side.

Step 2: Cut Out the Shapes
- Use scissors or a craft knife to cut along the solid lines on the template.
- To cut out windows and doors, place the template on a cutting board and carefully trace the edges with a craft knife.

Step 3: Score the Folds
- Use a ruler to help you score and fold along the dotted lines in the template. *It works best if you can score the lines on the outside of the house to make a crisp fold.
- To score, place the ruler next to the dotted line and press very gently use the utility knife or craft knife to scratch a line in the bristol board.
- Gently press the folds for clean edges, ensuring all pieces will fit together properly.
- Note- the printed template should be on the inside of the house for the cleanest-looking finished house.

Step 4: Assemble the House Structure
- Start with the main walls. Apply a bead of hot glue along each folded tab and press the tabs together to form a box shape.
- Attach the roof piece using hot glue. Ensure it fits snugly.
- Tip: Don’t worry if hot glue spills over the edges; you can easily cover it with glitter in the next step.


Step 5: Tint the windows
- For a look similar to Putz houses, adhere the tissue paper to the inside of the windows using a glue stick or double-sided tape.
- For an opaque effect, attach vellum or parchment paper with packing tape (hot glue won’t hold parchment paper securely).

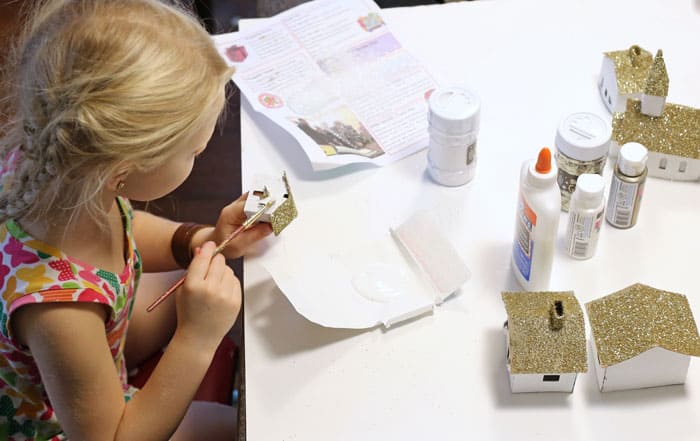
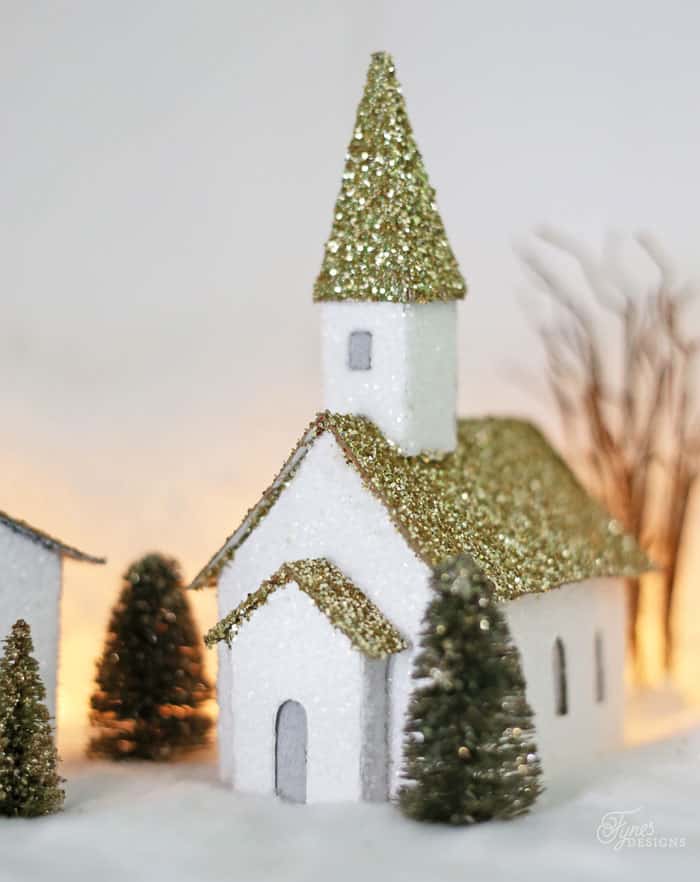
Step 6: Add Glitter
- Using a paintbrush, apply white school glue to the surfaces of the house.
- Sprinkle glitter over the glue. Start with the lightest glitter color and work towards darker colors for better coverage.
- Apply glue to the rooftops and sprinkle with gold glitter for a festive, sparkly effect.
- Shake off excess glitter and let the glue dry completely.

Step 7: Create a Snowy Village Setting
- Arrange your finished houses on a cotton batting or faux snow base.
- Optional: Place small LED tea lights inside the houses to create a cozy, glowing effect.

Tips For Customizing The Cardboard Christmas Houses Template
Get creative and make the cardboard houses uniquely yours! Add charming details like mini wreaths on the doors, and cute shutters, or paint them in festive colors to suit your holiday decor. You could even make them colorful like a traditional Putz house by using bright paints, markers, or pastel glitter for a vintage-inspired look, like Studio DIY did with her Colorful Christmas Village. Decorate them to resemble little gingerbread houses with puffy paint or icing-style embellishments. Don’t forget to tuck fairy lights inside to give them a warm, magical glow!
Ideas For Displaying The Christmas Village Houses
Looking for inspiration to showcase your finished Christmas village? Additionally, twinkle lights are the perfect way to add a magical glow to your display, whether arranged on a mantel, within a hutch, or across a snowy tabletop.Add bottle brush trees or other small holiday decorations around the village for a complete festive scene. For expert tips on creating captivating arrangements, check out our post, Expert Tips for Arranging Beautiful Christmas Village Displays. It’s packed with creative ideas to make your village the centrepiece of your holiday decor!

Printable DIY Christmas Village Houses Template
Download the Free SVG File for Your Electronic Cutting Machine
FAQ
To light Christmas village houses, you can use battery-powered tea lights or LED fairy lights for a warm, ambient glow. Remote-controlled lights or timers make it convenient to control the lighting, adding a cozy holiday atmosphere effortlessly. Miniature LED spotlights can also enhance the scene by shining through the windows for a realistic touch. For a more tailored setup, village-specific lighting kits are available at craft stores and online, designed to fit various styles and sizes of Christmas village houses safely and effectively.
If this cardboard Christmas house template isn’t quite what you were looking for, you could try an alternative village idea. This DIY birdhouse Christmas village, uses pre-made wooden birdhouses as the base, allowing you to customize each “house” with paint, glitter, and other holiday decorations. Check out the full tutorial: Diy Christmas Village: Step By Step Holiday Craft Guide
A Putz house is a cute, vintage-style Christmas village house, usually made from cardboard or lightweight wood, that first became popular in the early 1900s. The word “putz” comes from the German “putzen,” meaning “to decorate,” and these houses were traditionally part of festive displays set up under the Christmas tree. Decorated with glitter, fake snow, and sometimes cellophane windows to let light shine through, they add a cozy, nostalgic vibe to holiday decor. Nowadays, Putz houses are still loved for their charm—you can find vintage versions, DIY templates, or new styles to create your own holiday village display.


I love the houses you made. Thanks for the template I want to try and make a few. Could you use cardstock for the houses? I enjoy your blog so much.
I think cardstock may be too flimsy if you try to glitter it. Good luck and thanks for visiting!
Oh my gosh! Those little houses are absolutely adorable! And how cool is that faucet?!
Thanks Kristi! We had a lot of fun making a mess!
So cute, Visiting from Think Tank. Lynn
I love those little putz houses and someday will make some. The picture of your little girl caught my attention. I had blond pigtails just like that (and ear rings) So darling.
I looked quite similar (a little more pudgy) as a little girl too!
These are just lovely and I can’t wait to try this project~Thanks for sharing on Throwback Thursday!
What a lovely Christmas craft project. Congrats, you’re featured this week at the #ThisIsHowWeRoll Link Party on Organized 31.