DIY Christmas Village: Step By Step Holiday Craft Guide
This post may contain affiliate links. Please read our Disclosure Policy.
Are you dreaming of a charming Christmas village but can’t justify the high price? You’re in the right place! In this tutorial, I’ll show you how to create a beautiful DIY Christmas village without breaking the bank. With a bit of creativity and some affordable supplies, you can craft your own festive wonderland that’s just as magical as the store-bought versions.
This post may contain affiliate links. For more information, please see our disclosure policy.

If you’ve already explored my Printable Cardboard Christmas Houses Template or the Christmas Village Tree Guide, this post will be the perfect next step in building a complete holiday scene. Let’s dive into how you can make your very own village, full of character and charm, all on a budget!
Check out this quick video to learn how to transform craft store wood birdhouses into Christmas village houses:
How to Make a DIY Christmas Village
This holiday village DIY project transforms small wooden birdhouses into charming townhouses, which you can easily find at craft stores, dollar stores, and often even at thrift stores.

Supplies to Make Your Own Christmas Village:
- Craft wood birdhouses (house with a fence, two-story house, cottage house)
- Scissors
- Acrylic Paint
- Paint Brushes
- Floral Greenery picks or premade miniature wreaths and garland
- Hot glue and hot glue gun
- White Glitter
- DAP Fast and Final
- Drill and drill bit

Color Scheme Ideas for Your Christmas Village
- Rustic Farmhouse- Soft neutrals like beige, cream, and earthy greens (like this one).
- Classic Red and Green- Traditional holiday colors with pops of gold or silver.
- Winter Wonderland – All shades of whites, and silver for a frosty, snowy feel.
- Vintage Pastels– Light pinks, soft blues, and mint for a whimsical, retro Putz Christmas village vibe.
- Elegant Monochrome– Shades of white, grey, and black with metallic accents for a modern, chic look.
- Gingerbread House – Warm browns, deep reds, and candy-like accents for a sweet, cozy feel.
Choosing the right color scheme for your Christmas village can make all the difference. If you’re unsure, check out my Guide to the Best Christmas Colors for Your Home Decor for inspiration and tips to help you select the perfect palette for your festive display.

Painting The Village Houses
When you’re painting your village houses, start by checking for any rough spots that might need a quick sanding for a smoother finish. Feel free to get playful with different paint effects, like sponging or dry brushing, to add some flair. Metallic or shimmering paints can make your houses pop and catch the light just right during the holidays. To mimic the houses from high-end retailers, using realistic colors for different parts of the houses will give your DIY Christmas village extra charm and authenticity. Have fun with it and let your creativity flow!

Steps to Create a Stunning Christmas Village
- Paint the Houses: Use acrylic paint to give the small wooden houses your desired color scheme. For a sleek, monochromatic look, opt for spray paint instead.
- Add Lighting: Drill small holes near the bottom of each house to fit string lights or place a battery-operated candle inside for a cozy glow.
- Decorate with Wreaths and Garlands: Create miniature wreaths and garlands using floral picks or craft store garlands. If you want to cover the birdhouse hole, simply place a tiny wreath over it to mimic a window.
- Embellish the Details: Add garland around windows, doors, rooftops, and fences for extra charm. Trim small branches to size and shape them into garlands that perfectly fit your little village.
- Alter the House Design: Get creative with balsa wood pieces by adding small strips to the front and sides of the birdhouses to achieve a charming board and batten look or hand-cut shingles for a classic cedar shake appearance.
- Create Snowy Effects: Use lightweight spackling to add a layer of “snow” on rooftops, windows, ledges, and greenery. Dust it with glitter to create a sparkling snowflake effect.

Add Details And Personalize Your Village
Make your handmade village truly one-of-a-kind by incorporating special details. Consider adding house numbers, a sign featuring your family name in the yard or on a mailbox, or even a charming little library bookshelf in the driveway. If you’re a pet lover, don’t forget to include a doghouse! These thoughtful touches will help your village reflect your own home and create a personal connection.
Add Lights And Other Finishing Touches
Sprinkle some twinkling lights and battery-operated candles around your village to give it that warm, festive glow. You can use fake snow or a cozy blanket of batting to set the scene. Don’t forget to add a forest of bottle brush trees (you can learn how to make your own here!), a cute toy truck, some fresh greenery, or a lovely Christmas print that matches your other decorations. It’s all about creating that magical vibe!

How to Set Up a Christmas Village
Here are a few tips to help you set up your Christmas village:
- Create Different Heights: Elevate the houses at various levels by using risers—cardboard boxes or pantry cans can work great, depending on the size of your houses. Just cover them with some snowy fabric.
- Hide the Cords: Run an extension cord under the fabric layer to keep those cords out of sight.
- Make It Easy to Light Up: Plug the extension cord into a timer or a click button, so you can easily turn on your village without messing up its layout.
- Arrange Your Houses: Position the houses where you want them to create your ideal village layout.
- Add Finishing Touches: Decorate around the houses with the elements mentioned earlier to really bring your village to life!
Setting up your Christmas village is all about creating a magical scene with thoughtful placement and easy lighting. For more tips on setting up and decorating your village, check out my Expert Tips for Arranging Beautiful Christmas Village Displays post for more ideas to bring your festive display to life!

Display And Enjoy Your Handmade Christmas Village
Building your own DIY Christmas village is a fun and rewarding project that adds a personal touch to your holiday décor. Consider making it a family tradition to visit your local craft store each Christmas season to gather supplies for a new house. With a bit of creativity and some budget-friendly materials, you can create a charming display that showcases your unique style and brings warmth to your home during the holidays.
FAQ
To create realistic buildings, use textured paper for rooftops, add small details like windows and doors, and paint with festive colors. The more details you add, the more lifelike your village houses will look. Consider using tiny embellishments such as shutters, wreaths, or even miniature bricks for added depth. Adding faux snow around the base or on the rooftops gives a wintery charm, while glitter or iridescent paint can make the structures sparkle, mimicking the twinkle of holiday lights. These finishing touches enhance the overall look, making your DIY Christmas village truly come to life.
Can I add lights to my DIY Christmas village?
Yes! You can add tiny LED lights to your village houses by creating small holes for the lights to shine through or using battery-operated string lights for a charming glow. A great way to incorporate lights is by using a small drill bit to create a hole in the back of each house. This gives you the perfect spot to poke a few LED lights through, illuminating the interior and creating a warm, inviting glow. Alternatively, you can place a remote-controlled tea light inside each house for a flickering effect that mimics candlelight. These lighting options bring your village to life, adding a magical touch to your display.

This craft is part of a seasonal blog hop – Seasonal Simplicity – hosted by The Happy Housie. Make sure to check out all of the other Christmas DIY Craft ideas from my blogging friends.
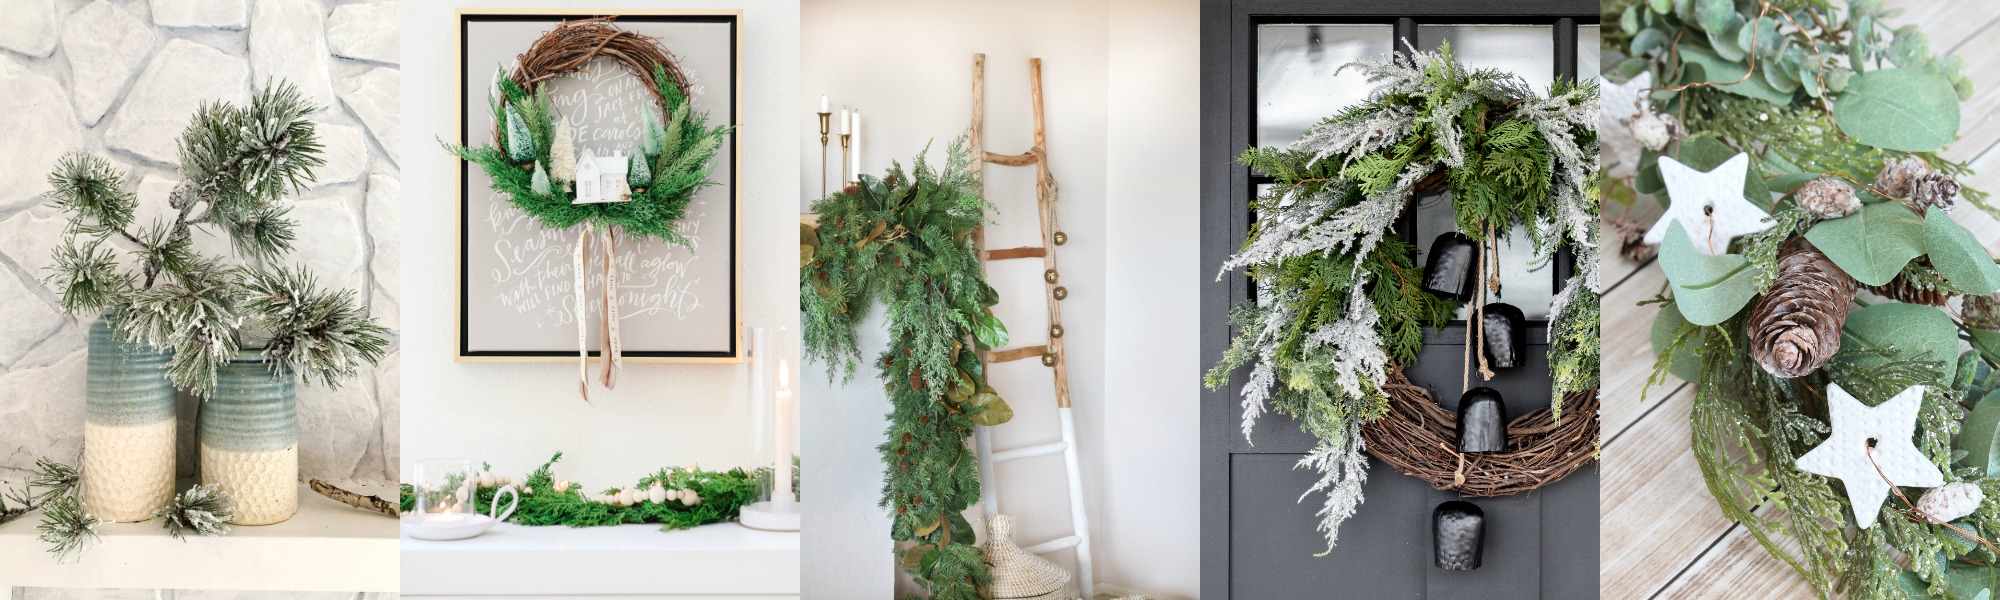
- How to Flock Natural Greenery at The Happy Housie
- DIY Winter Village Wreath at Modern Glam
- DIY Christmas Jingle Bells Hanging Decoration at Zevy Joy
- Modern Organic Christmas Wreath at Cherished Bliss
- Air Dry Clay Christmas Star Lights at Clean & Scentsible
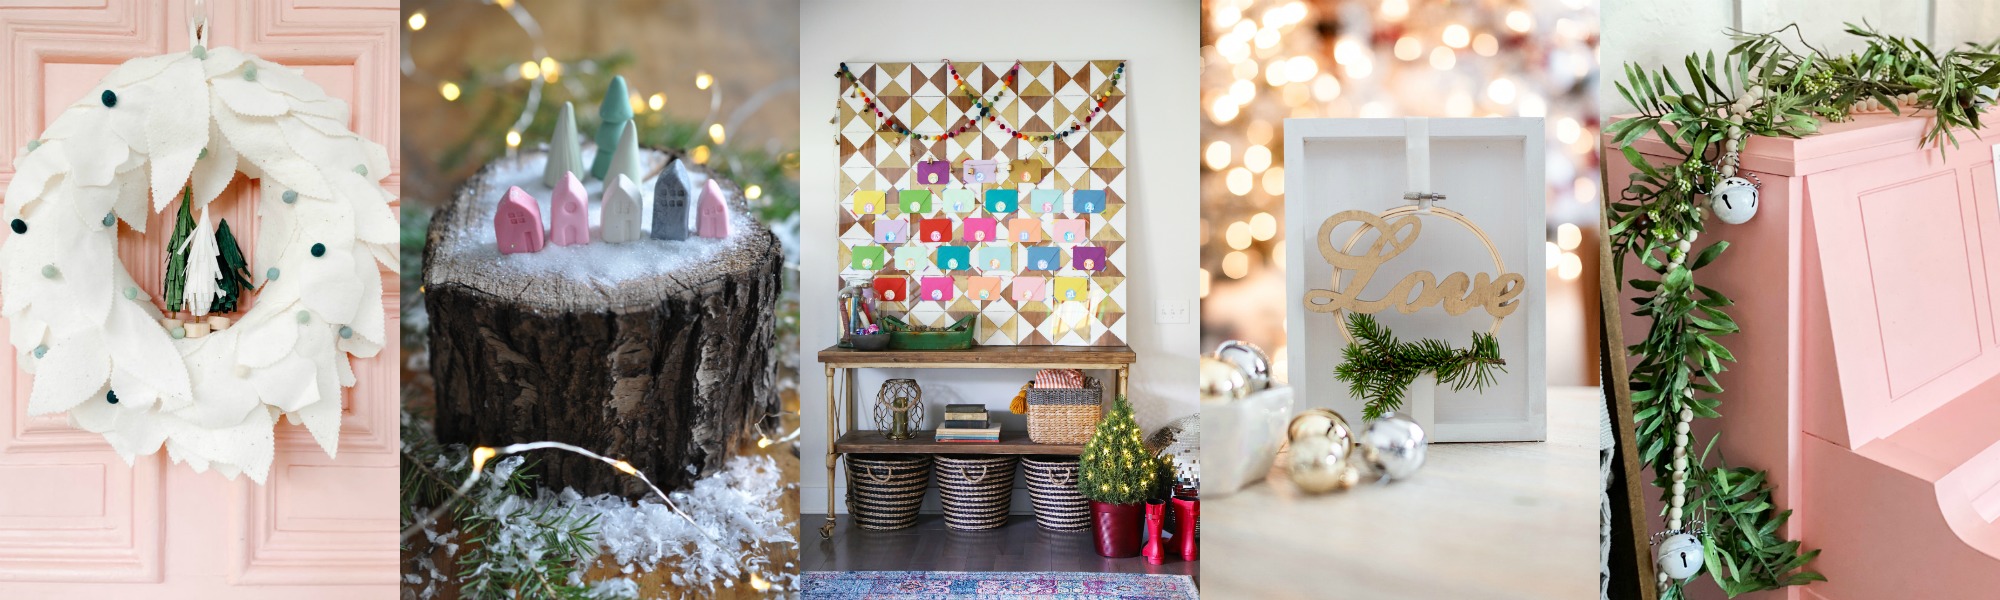
- Anthropologie Inspired Holiday Felt Wreath at Tatertots and Jello
- Polymer Clay Christmas Village at Life is a Party
- Free Advent Calendar at The Handmade Home
- Embroidery Hoop Love Sign at Craftberry Bush
- Jingle Bell Wood Bead Garland at Lolly Jane

- Homemade Pom Pom Garland at Sincerely, Marie Designs
- DIY Dollar Tree Succulent Christmas Tree at The DIY Mommy
- DIY Christmas Advent Calendar at She Gave it a Go
- DIY Faux Leather Trees at My Sweet Savannah
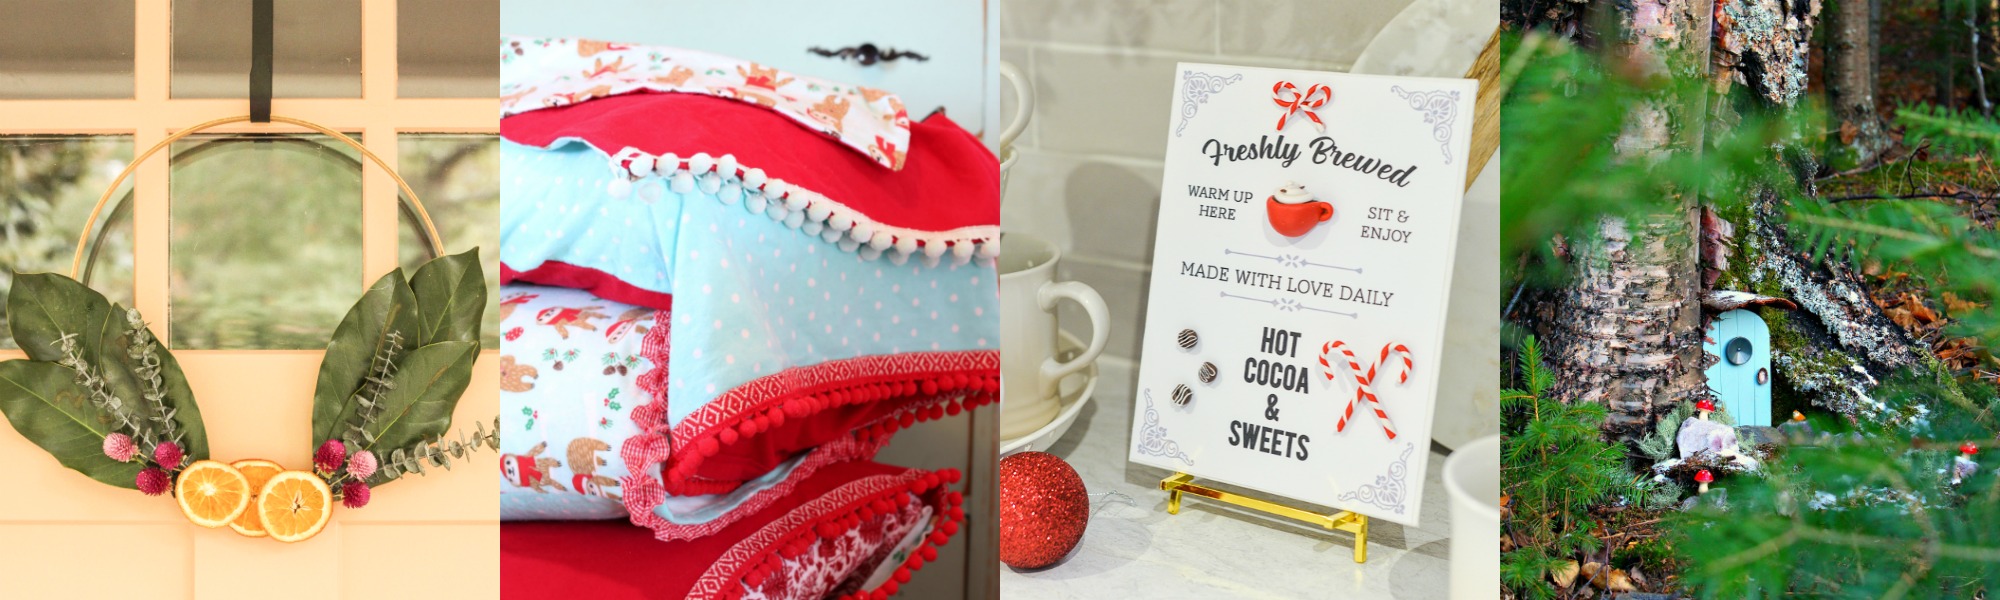
- DIY Orange Hoop Wreath at Cassie Bustamante
- Easy DIY Christmas Pillow Case at The Tattered Pew
- 3D Hot Cocoa Sign and Printable at Rambling Renovators
- DIY Elf House at Dans le Lakehouse
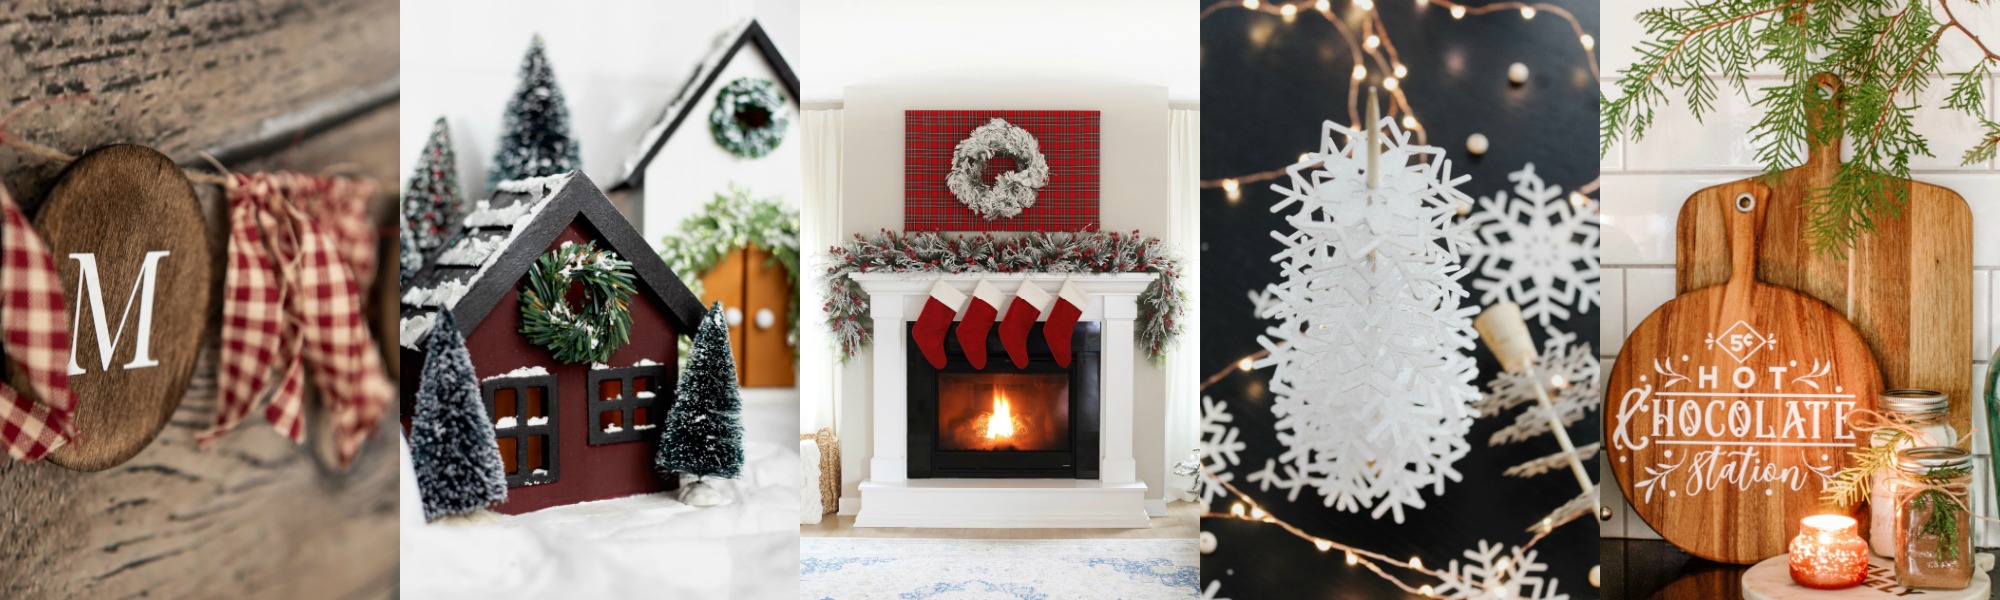
- Farmhouse Style Holiday Wood Banner at Home Made Lovely
- Joanna Gaines Inspired Christmas Village at Fynes Designs (that’s me)
- Christmas Canvas at Two Twenty One
- Modern Whimsical Snowflake Christmas Tree at This is Simplicite
- DIY Holiday Cutting Board at Joanna Anastasia
oh my goodness, this is adorable! it looks like such a fun project, too!
OMG! I love this so much! Now I need all the bird houses! Thank you!
Love this! I’ll be checking out birdhouse selection at Dollarama tomorrow 😊
I got most of these ones at Dollaramma! happy crafting!
I adore these! You are so creative!
Thank you so much Kelly!
Awesome! This article is very informative and very good. Thanks for sharing this with us. Keep sharing.