DIY Craft Table with Storage: Customize Your Workspace
This post may contain affiliate links. Please read our Disclosure Policy.
As any passionate crafter knows, creativity thrives in organized spaces. After years of working on a cramped table without storage for my craft supplies, I finally decided to upgrade my crafting experience. The result? A game-changing DIY craft table with storage that has completely revolutionized my creative process—and it might just do the same for yours.

I’ve recently moved this versatile craft desk with storage from our basement into our home office/art room, which required a fresh coat of paint and updated hardware to match the new space. I love how this workbench provides plenty of room for my fabric cutting mat, making it perfect for sewing, laying out quilting projects, painting, scrapbooking, and so much more. You can see a glimpse of my old setup in this original craft room reveal. The materials are incredibly sturdy, eliminating the wobble that plagues so many DIY craft desks. Pair the desk build with this DIY like this thread storage rack to keep a sewing space neat and functional.

The Perfect Balance: Function Meets Style
What makes the ideal craft table with storage? It needs to be sturdy enough to handle all your projects, spacious enough to give you plenty of room to work, and organized enough to keep your supplies accessible without the clutter. This large craft table checks all these boxes while also serving as a beautiful piece of furniture that enhances my creative space, and I’m not afraid to get messy or damage in some way.
Key Features That Make This Craft Table Ideal:
- Two-tiered design with a spacious work surface and accessible lower shelf
- Built-in drawers and cubbies for smaller tools and craft supplies are always within reach
- Open shelving for baskets, bins and frequently-used items
- Customizable dimensions to fit your specific space requirements
- Sturdy construction that handles heavy use without wobbling
- Easy to paint finish that you can customize to your craft room décor. For paint color inspiration, check out this curated collection of timeless cabinetry paint colors
- Countertop height option for improved health and comfort. Refer to the post to learn about the ideal Countertop Height for your workspace.
- Plenty of storage without sacrificing workspace

How to Make a Craft Table with Storage?
I based my design on Family Handyman’s simple workbench plans, which provide an excellent foundation for a sturdy, functional workspace. I then made a few modifications to transform it from a garage workbench into a stylish craft table with storage. The best part? This project is beginner-friendly and budget-conscious, perfect for anyone from the dedicated quilter to the busy parent looking to create extra crafting space.
Materials You’ll Need:
- Construction-grade 2x4s (quantity depends on your table dimensions)
- 3/4″ plywood for tabletop and shelving
- Wood screws
- Wood filler or crack filler
- Paint or stain of your choice
- Drawer pulls or knobs
- Pre-made drawers or drawer materials (optional)
- Storage baskets or bins (optional)
Basic Construction Steps:
- Build the frame: Create a sturdy rectangular frame using 2x4s for the table’s base.
- Add legs: Attach four 2×4 legs to the corners of the frame, ensuring they’re equal in length for a level surface.
- Install cross-bracing: Add support beams between the legs for stability.
- Create the lower shelf: Install 2×4 supports and plywood shelving.
- Attach the tabletop: Secure a plywood sheet to the upper frame.
- Add drawers: Install pre-made drawers or build custom ones.
- Fill, sand and paint: Use wood filler on screw holes and gaps, sand smooth, and apply your chosen finish.
- Add hardware: Attach drawer pulls or knobs for functionality and style.
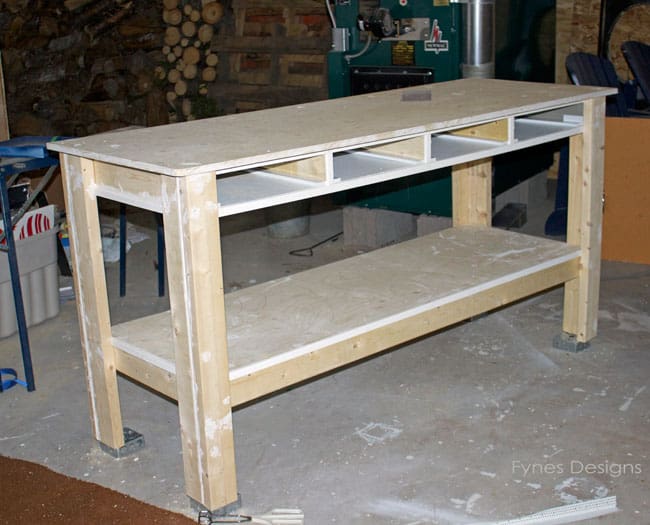
The detailed instructions from Family Handyman made this project approachable even for someone with basic DIY skills. I’ve made a few adjustments to transform it from a utilitarian workbench to a stylish craft desk that fits beautifully in our home office.
Pro Tips for Success:
- Measure twice, cut once: Ensure all your measurements are precise before making any cuts.
- Consider ergonomics: The standard height for a craft table is 30-36 inches, but adjust based on your height and whether you’ll sit or stand.
- Pre-drill holes: This prevents wood splitting and makes assembly easier.
- Level as you go: Check that your table is level at each stage of construction.
- Use quality finishes: A good primer and paint/stain will make your craft table look professional.
The Health Benefits of a Standing Craft Table
One of the best features of this design is its versatility as a standing desk. Using a standing desk for your crafting projects offers several health benefits:
- Reduced back pain from avoiding prolonged sitting
- Improved posture while working on projects
- Increased energy levels during creative sessions
- Better circulation throughout your body
- Potential calorie burn compared to sitting
If you’re interested in exploring sit-stand options for ultimate flexibility, check out my detailed post on sit-stand desks. You’ll find guidance on selecting the perfect surface for a convertible workspace that supports your health and creativity.
Customizing Your Craft Table with Storage
Storage Options:
The beauty of building your own craft table is the ability to customize it to your specific needs. Here are some ideas to consider:
- Drawers: Perfect for small tools, paper, and delicate supplies
- Open shelving: Ideal for frequently-used items and decorative storage containers
- Bins and baskets: Great for categorizing supplies
- Cubbies: Create designated spaces for fabric, paper, and other materials
- Pegboard attachment: Add a pegboard above your table for hanging scissors and tools
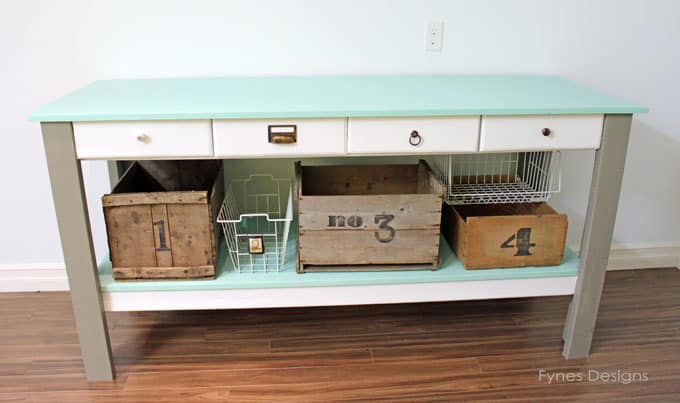
- Wire baskets: Excellent for keeping supplies visible yet contained (as shown in the image)
- Pull-out trays: Create sliding surfaces for extra workspace when needed
Style Customizations:
- Two-tone paint: As shown in the image, with mint green surfaces and gray legs
- Distressed finish: For a vintage or farmhouse aesthetic
- Modern hardware: Updated pulls can transform the look of your craft table
- Decorative edges: Router the edges of your tabletop for a more finished look or purchase countertop material rather than using plywood.
- Customized height: Make it countertop height for standing or standard height for sitting
Making the Most of Your Craft Table with Storage
Once your craft table is built, it’s time to organize it thoughtfully. Here’s how to maximize your new creative command center:

Organization Strategies:
- Group like items together: Keep similar supplies in the same drawer or cubby
- Prioritize accessibility: Place frequently-used items within easy reach
- Label everything: Use tags, labels, or even numbered crates like in the image
- Create zones: Designate specific areas for different types of crafting
- Rotate supplies: Seasonally adjust what’s most accessible based on current projects
Maintenance Tips:
- Wipe down the surface after each crafting session
- Periodically review and reorganize storage containers
- Tighten any loose screws or hardware when you first notice something loose
- Touch up paint or finish as needed to keep it looking fresh
FAQ About Craft Tables with Storage
With basic materials, you can build a craft table with storage for $100-250, depending on size and the quality of materials. My table cost under $150 since I repurposed some items I already had.
The ideal height depends on your intended use. When seated, 28-30 inches is standard desk height. Standing work, 36-38 inches (countertop height), is more comfortable. For my multipurpose craft desk, I chose a 36-inch height that works perfectly with a counter-height stool when I want to sit.
A cutting table for sewing is typically 36-40 inches tall (countertop height). This elevated height reduces back strain when cutting fabric for quilting and sewing projects. My craft table at 36 inches high has been perfect for fabric cutting without causing back pain during extended sessions.
A minimum width of 48 inches gives you enough workspace, but 60-72 inches is ideal if you have the space. Depth typically ranges from 24-30 inches. My large craft table is 60 inches wide, providing plenty of room for multiple projects.
Absolutely! Installing locking caster wheels allows you to move your table when needed while keeping it steady during use. Just be sure to select heavy-duty casters rated for the weight of your table.
Many home improvement stores offer cutting services for lumber. You can also consider simpler designs that require minimal cutting or look into tool-sharing programs in your community.

Why Investing in a Craft Table with Storage Is Worth It
After creating this DIY craft table with storage, I’ve noticed significant improvements in my crafting routine:
- Projects get completed faster because everything is organized and accessible
- Creativity flows more easily without the frustration of hunting for supplies
- My home office looks more polished with a piece that’s both functional and attractive
- I craft more often because the space is inviting and ready to use
- Cleanup is quicker with designated homes for all my tools and materials
- My body feels better when I can stand while crafting rather than sitting for hours
- The kids have a dedicated space for their art projects, keeping messes contained
Ready to Build A Craft Table with Storage?
Whether you follow this design exactly or use it as inspiration for your own creation, building a craft table with storage is a rewarding project that will enhance your creative process for years to come.
Remember that your craft table should be as unique as your creative practice. Don’t be afraid to customize the design, dimensions, storage options, and aesthetic details to perfectly suit your needs and style preferences.
Have you built a craft table with storage? I’d love to see your designs and hear how they’ve transformed your creative space! Share your projects in the comments below or tag me on social media.
What a great project – I am impressed – and a great spot to work in your craft room. Thanks so much for sharing at the Monday Funday link party. Take care, Laura
Wow, I’m impressed every time!
What a cool idea. I like how everything is so nicely organized and looks so pretty too.
Wow, this is seriously gorgeous. Love it! You should link this up to our party, Give Me The Goods Monday! {1 party, 5 blogs}
http://www.somuchbetterwithage.com/2013/04/give-me-goods-party-4.html
Jamie @ somuchbetterwithage.com
Love it! I need a workshop to build cool stuff like this 🙂
I’m visiting you today from Project Inspired. I hope you get a chance to stop by my blog and leave a comment, too!
~ Megin of VMG206
Enter my Blog Birthday Giveaway
I love the mix of rustic and fresh paint. A workbench is on my project list, first I have to reclaim our storage area. I’m pinning this. ~di
This is adorable and such a great workspace! LOVE the mint green color you used for the top!
Jenna @ Rain on a Tin Roof
Wow! So cute and functional… love the mismatched handles, what a great unique touch. Visiting from Give Me the Goods Monday.
Krista @thehappyhousie
Wow! I love that desk! The crates are my favourite, I have a few like that that I keep my hair stuff and make up in. If I had the room for a desk this would be perfect.
Hey there! Here from the blog hop and am following you on Twitter and Pinterest :o) Hope you’ll get the chance to visit and follow back. You can find me here:
Twitter
https://twitter.com/croppedstories
Pinterest
http://pinterest.com/croppedstories/
Will you get sick of me if just come here every week and tell you how talented you are?
Not at all, I will just have a huge head the next time you see me… beware!
No way… I guess it never occurred to me that work benches could be CUTE! You really outdid yourself. I want one now…. 🙂
hugs x
Crystelle
Crystelle Boutique
I love the storage crates – great find!
I LOVE the way it turned out! Thanks for sharing it at Monday Funday!
I’m in total looooove with this gorgeous workbench – when do you think you could drop it by so I can use it in MY studio? I’m so very impressed!!
On my way!
Love this! Love the color, love the knobs, love the storage underneath! Keeping this in mind for when I finally finish my craft room! Have a great weekend!
Susan
Thanks Susan, have yourself a great (maybe crafty) weekend!
Coming by from .#SITSSharefest.
Love the blog and this repurposing of this workbench is wonderful. Great job!!
xoxo,
Khloe
http://www.kgstyleblogs.com
I love this idea (your adaptation). Good looking and functional (your rustic boxes are the perfect touch). I’m working on improving my studio; I’ll tuck this notion for future reference. Thanks so much for sharing! Lynaea @ EveryDayBloom.com
Really beautiful! I love the crates too. 🙂
Such a great craft room desk! I’m featuring it in the PoPP Spotlight this week. Thanks for linking up.
You’ve been featured! Be sure to grab a button 😉
http://www.somuchbetterwithage.com/2013/04/give-me-goods-features-4.html
Jamie @ somuchbetterwithage.com
CONGRATS!!
You have been featured at The DIY Dreamer… From Dream To Reality! Come on over and grab your featured button, you deserve it 🙂
http://thediydreamer.com/from-dream-to-reality/features-63/
Don’t forget to come over this evening to link up again 🙂
wow…looove this! nice job!
Love this bench! The style, color, everything about it. I am trying to figure out how you were able to make it so inexpensive? We just came home from Lowes and priced all the materials including knobs using the materials list via the link provided. NOT including paint, it’s already over $225.00. Did you do something different or is there a cheaper place to buy lumber?
Hi Amy, To be honest it was so long ago, we did use some scraps we had on hand and I hunted around for cheap handles. I remember hubby telling me if I didn’t do the drawers it would have been cheaper and less work. Perhaps putting baskets in the holes would cut out a bit of cost. Maybe shop around for the best lumber price. Good luck!
Thanks for sharing your wonderful, creative ideas. Could you post about your neat desk you have in your craft area?
Thanks Cara! I used to have a post about it, but it was very dated. It is basically a shelf on one end with a bank of drawers from the Home Depot on the other. The top is a full sheet of plywood with arborite glued down. It was inexpensive but has served me very well!
This turned out so great! I love the eclectic crates and pulls.
Visiting you by way of Two uses Tuesday! Nice job on your craft table. Love , Love the baskets.
What a cute little table! I have an entry table that is laid out similar to that one and I love the idea of making it into a craft storage… Thanks for sharing!
I love that idea! I am in the midst of redoing my craft room….hmm.
I love the rustic bins underneath the bench. This turned out looking really good.
This is a perfect work table – I love the simplicity of it and the knobs on the drawers are perfect for a craft room. Thank you for sharing at Share It One More Time. Cathy
Love this friend! It’s so pretty!
Wow! This turned out great! Pinning for later. I wanted to let you know that I’m featuring this post tonight at the Create & Share Link Party (7:00 PM MST)! Congratulations!!! Can’t wait to see what you share with us this week. 🙂
What an awesome project! I love how you painted it, and those crates are fantastic!
I Llve, love, LOVE this workbench! I wish I had your artistic vision sometimes! Beautiful job Virginia 🙂
I love this! You would never know the before and after are the same bench! The color is beautiful and I love all the storage. Thanks for linking up to The Creative Exchange. We are featuring your project this week!
I adore this. Love the colors and overall design! Very inspiring!!
this information is good and creative.
Your woodbench work is amazing. so elegant.. Kudos