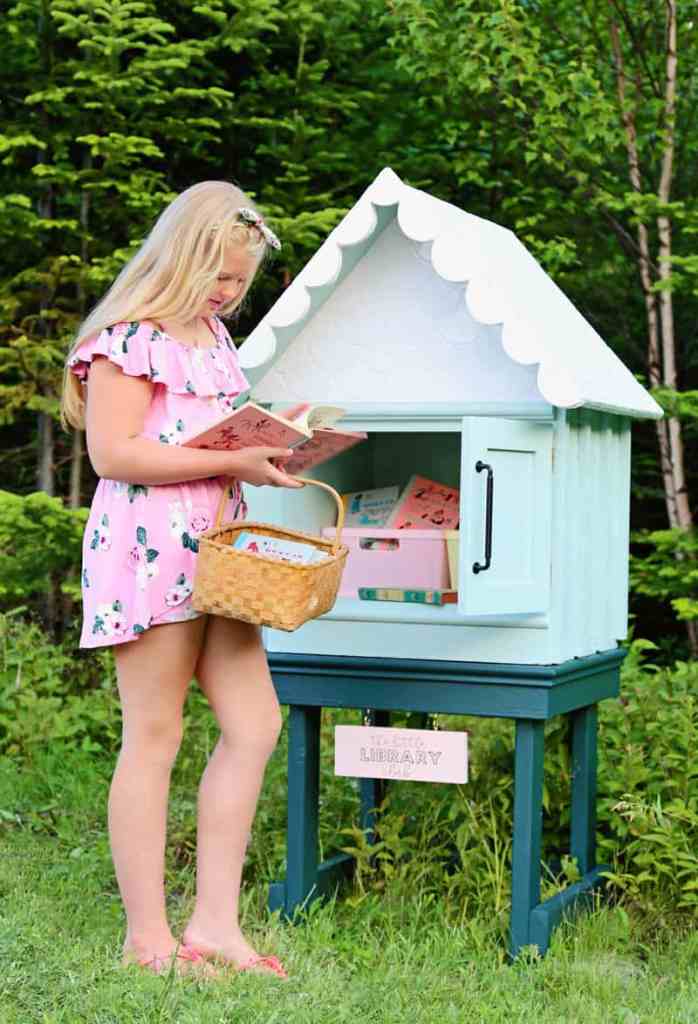
How to Make an Adorable DIY Little Free Library
My kids have been wanting a way to safely connect with friends this summer. I decided to repurpose an old TV cabinet into a DIY Little Free Library so they could swap books; and am sharing our step-by-step little free library plans in today’s post.

With a bit of creativity and some leftover building materials, I was able to make an old entertainment stand and make it into a sweet DIY little free library for the public to swap books.

After seeing this pink library from Lolly Jane, and another cute library from At Home with Ashley I was hooked and knew we needed one too.

What the little free library looked like before
First, look what I started with…

I had this part of an entertainment cabinet in my garage waiting for the perfect DIY project.
How to Make a DIY Little Free Library from a cabinet

We didn’t spend any money on this project! We used only scrap materials we had leftover from the upstairs bathroom makeover and the basement kitchen. The DIY little free library is the perfect project to use up odds and ends, as it is tiny and doesn’t require a lot of materials. I did not provide measurements as every base cabinet is different.
- Build roof trusses from 2×4’s, one for the front and back of the cabinet.
- Cut two rectangles of plywood to make a roof. Be sure to leave a bit of an overhang to protect your cabinet from the elements.
- Cut a triangle from plywood to fill in the front and back of the roof.
- Apply metal flashing to the roof seam, use weatherproof caulking to seal the seams.
- From a piece of strapping, cut scallops for the front edge of the roof.
- Cut tiles to fit the size of the roof. I used Allegro White Fan Tile from Jeffrey Court it took 12 tiles to fill the roof and front scallop edge. I then used Liquid Nails to attach the tiles as I was out of mortar.
- Grout and seal the tiles.
- Add desired trim work to the cabinet base and paint. Paint colors- Frosted Jade PPU11-13 for the cabinet and Black Evergreen MQ644 for the base, both from Behr.
- After exploring a few options on how to hold the library up, we decided to build a small table from 2×4’s, it looked a little rough so I added a small piece of trim around the top to make it seem like the two pieces fit together.


To complete the little free library we added colourful baskets from the dollar store with books from our collection and invited friends to join in on the fun!


The kids are having so much fun sharing books with their friends. Click here to learn how to join The Little Library Club.


If you’re looking for step by step plans to build a Little Free Library from scratch check out these posts:
- Lolly Jane- Cutest Pink Little Free Library Plus Plans
- At Home with Ashely-Little Free Library Plans
- At Home with Ashely-How To Make A Free Little Library
- Nesting with Grace- Little Library
- HGTV- Little Library
Thank you so much for visiting, I hope you find some adventure in a new book this summer!
Do you have any questions about these little free library plans? Let me know in a comment below!


I love little libraries! What a great way to encourage kids to read. Yours is adorable.
Thanks, Kris, so many children in the community are using it! xo
Very cute! I especially like that it does not require a post cemented into the ground. Are you worried about tipping over?
Not at all! I was, so there is one steak in the back that is screwed to the frame and hammered in the ground!