Easy Wallpaper Painting Ideas With Step By Step Tutorial
This post may contain affiliate links. Please read our Disclosure Policy.
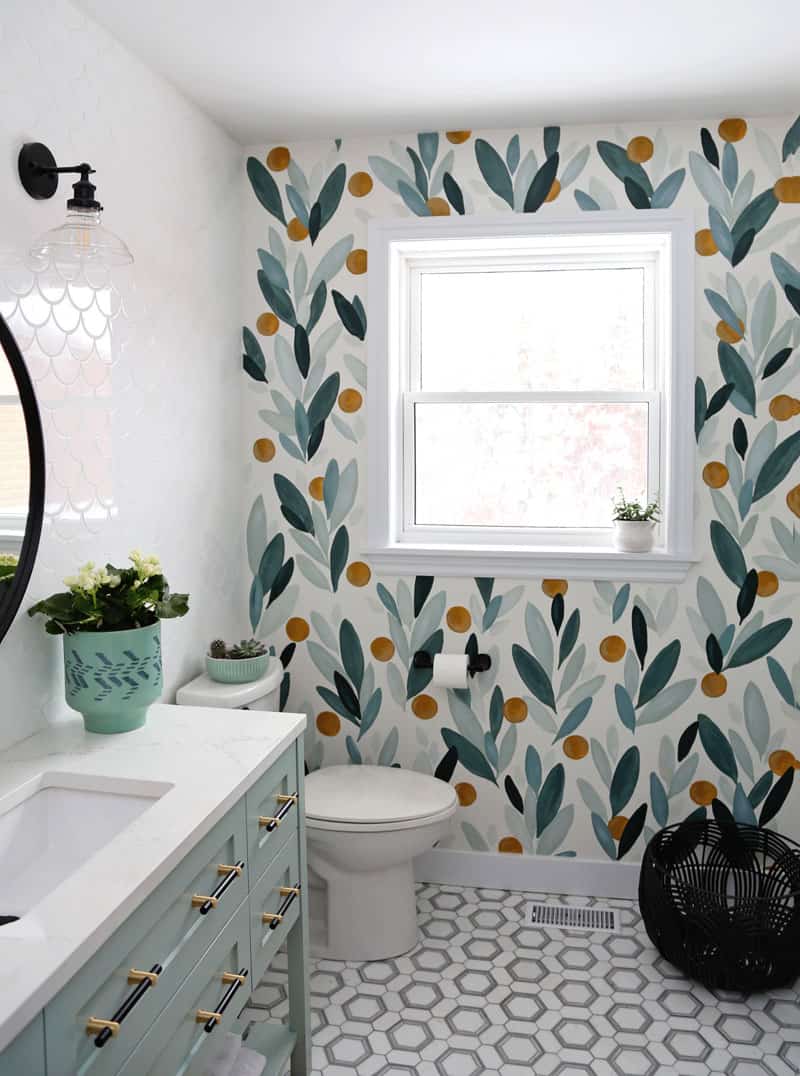
If you’re looking for a quick and budget-friendly way to update your walls, painting your own wallpaper might be the perfect solution! Whether you’re dealing with boring decor or simply want a fresh new look, these wallpaper painting ideas will help you transform your space. In this step-by-step tutorial, I’ll walk you through everything you need to know, from prepping the surface to choosing the best paint for long-lasting results. Plus, I’ll share creative ways to add texture, patterns, or color for a completely customized look. For inspiration, check out my Colorful Bathroom Makeover Ideas post, where I used this very technique to bring vibrant, personalized wallpaper to life in a stunning bathroom transformation!
If you’re giving your home a refresh, don’t stop at the walls! Choosing the right colors and finishes can make a huge impact throughout your space. Whether you’re selecting a modern farmhouse color palette for a cozy and inviting feel, exploring coastal kitchen ideas for a breezy, beachy vibe, or tackling an outdoor update with vinyl siding paint tips, I’ve got plenty of inspiration to guide you. Check out these posts for more expert advice and easy DIY projects:
- Modern Farmhouse Color Palette – Find the perfect warm and neutral tones for a timeless farmhouse look.
- Coastal Kitchen Ideas – Get inspired by soothing blues, natural textures, and airy design elements.
- How to Paint Vinyl Siding – Learn pro techniques for a durable, weather-resistant exterior makeover.

Wallpaper Painting Ideas
When selecting a pattern for your DIY hand-painted wallpaper, consider the overall style of your space and how the design will complement your décor. If you love classic elegance, floral wallpapers can add a soft, timeless touch, while geometric designs offer a bold, modern aesthetic. For a statement-making look, wall murals allow you to create large-scale artwork that transforms an entire wall. If you prefer subtle sophistication, vertical or horizontal stripes can make a room feel taller or wider, and extending the design onto the ceiling can add unexpected visual interest. Check out how Erin Zubot Design painted stripes in her closet makeover. Whether you’re mimicking traditional wallpaper or experimenting with something unique, choosing the right pattern ensures a stylish, cohesive result.Supplies Needed For Wallpaper Painting
- Free Printable Template – A guide for creating custom patterns.
- Paint – Choose a color that complements your space. (Behr colors shown: Recycled Glass MQ6-18, Nocturne Blue HDC-CL-28, Saga Blue S480-4, Secluded Woods S480-4, Rice Curry MQ4-09, Saffron Strands PPU6-02)
- Artist’s Paintbrush – For precise application and cutting in edges.
- Foam Roller – Ensures smooth, even coverage on larger areas.
- Painter’s Tape – Protects trim and edges for clean lines.
- Drop Cloths – Covers floors and surfaces to prevent spills.
- Cereal Boxes – Used for stencil backing or creative patterns.
- Adhesive Drawer Liner – Great for making reusable stencils.
- Scissors & Craft Knife – For cutting stencils and detailing designs.
- Pen or Pencil – To trace stencil designs before painting.
Supplies Needed For Wallpaper Painting

How to Paint Wallpaper: Step-by-Step Guide
Step 1: Prepare Your Pattern Template
Cut Out the Stencil – Use scissors or a craft knife to carefully cut out the inside of the traced shape, creating a stencil.
Download & Cut the Shapes – Print the free template and cut out the shapes you want to use for your design.

Create a Sturdy Stencil Base – Flatten an empty cereal box and use it as the base for your template.
Trace the Pattern – Place one of your cut-out shapes on the cardboard and trace around it, leaving 3–4 inches of space around the design for stability.

Step 2: Reinforce the Stencil for Reuse
Make It Reusable – The smooth surface of the drawer liner allows you to wipe off excess paint, making the stencil easy to reuse with multiple colors.
Cut the Adhesive Drawer Liner – Cut a piece of adhesive drawer liner large enough to fully cover the cardboard stencil.
Attach the Liner – Peel off the backing paper and stick the liner over the cardboard cut-out.
Trim & Finalize the Stencil – Use a craft knife to neatly cut out the pattern shape again, following the cardboard cut-out.

Watch this video to see how I painted this wallpaper pattern
Step 3: Paint Your Custom Wallpaper Design
Start with One Color – Choose one of your paint colors and grab a pattern template. This is the easiest way to begin building your wallpaper design with clean, crisp lines.
Apply the Paint – Hold the stencil firmly in place with one hand and use a brush or sponge to fill the negative space with paint. A steady grip ensures a sharp, professional look.

Let It Dry Completely – Allow the first layer of paint to dry before adding more colors. This is the best option for preventing smudging and achieving a smooth finish.

Alternate Colors & Patterns – Switch between different stencil sizes and paint colors, letting each layer dry before adding the next. This little detail will help create a balanced, artistic effect.

Add Dimension – Once the first layer is dry, enhance your accent wall by layering a slightly darker or lighter shade of paint over some of the designs. This technique adds depth and a modern twist to your artwork.

Complete the Wall – Continue filling the space, one stencil and one paint color at a time. Whether you’re decorating a small corner or covering a larger-scale wall, your custom wallpaper design will give your own home a unique, hand-painted look.

Now step back and admire your beautiful, DIY-patterned accent wall! This project proves that a little creativity goes a long way in transforming your space into a personalized piece of artwork.

Tips For Achieving A Professional Painted Wallpaper Finish
Creating DIY hand-painted wallpaper is a fun and creative way to refresh your space, but a polished, high-quality result comes down to the right techniques. Follow these expert tips to ensure your wallpaper painting ideas turn out crisp, clean, and professional.
1. Prep the Surface for a Smooth Finish
- Clean the wall thoroughly to remove dust, grease, or debris that could affect paint adhesion.
- Lightly sand glossy wallpaper or surfaces to create texture for better paint grip.
- Use painter’s tape to protect window frames, woodwork, and trim, ensuring clean, sharp edges.
2. Plan Your Layout & Wall Patterns
- Before you start painting, plan the layout of your design. Measure and lightly mark where each stencil or shape will go to maintain even spacing.
- If using multiple wall patterns, alternate shapes and colors in a balanced way for a cohesive look.
3. Use High-Quality Paint & Tools
- Choose coats of paint in durable finishes like eggshell or satin for walls, and semi-gloss for woodwork or window frames.
- Invest in high-quality brushes and rollers—cheap tools can leave streaks or bristle marks.
- A foam roller or stencil brush works best to prevent excess paint from seeping under the stencil edges.
4. Apply Thin, Even Coats of Paint
- Less is more! Apply a thin layer of paint using a dabbing or rolling motion rather than brushing back and forth.
- Build up the color gradually with multiple coats of paint to prevent bleeding and ensure a crisp design.
- Allow each coat to dry completely before adding another to avoid smudging.
5. Use Shades for Depth & Dimension
- Once your base layer is dry, use shades of a slightly lighter or darker color to add depth and interest to your wallpaper painting ideas.
- Blending similar tones can create a soft, artistic effect rather than a flat, one-dimensional look.
6. Clean Up Edges & Details
- If any paint bleeds under the stencil, use a small detail brush and the background wall color to touch up imperfections.
- A damp cotton swab can quickly remove small mistakes before the paint fully dries.
7. Step Back & Assess Your Work
Every few stencil applications, take a step back to check the overall layout and ensure even spacing in your wall patterns.

FAQ
Yes, wallpaper can be painted over. It’s a cost-effective way to update the look of your walls without having to remove the existing wallpaper. Make sure to use a high-quality primer and paint designed for wallpapered surfaces.
When painting over wallpaper, it’s best to use an oil-based primer first, followed by latex paint. A product like Zinsser or BIN 1-2-3 works excellently. The oil-based primer helps to seal the wallpaper and prevent the moisture in the paint from causing the paper to bubble or peel. After the primer has dried, you can then paint the wallpaper with high-quality latex paint in your desired colour.
The current trend in wallpaper is all about creating immersive environments. Wallpaper patterns are drenching entire rooms, with big murals spanning whole walls to create bold, artistic statements. At the same time, delicate floral patterns continue to be popular, bringing a soft, timeless touch to spaces. Classic designs, like those from William Morris, are also making a comeback, adding an elegant and historical flair to modern interiors. These trends reflect a shift towards using wallpaper not just as an accent, but as a key design element that transforms the entire atmosphere of a room.
In conclusion, painting your own wallpaper can be a fun and budget-friendly way to transform your space. With the right techniques and creativity, you can achieve stunning, personalized results. Whether you’re aiming for a classic, elegant look or a bold, modern aesthetic, these easy wallpaper painting ideas provide endless possibilities for enhancing your home decor. So, grab your paintbrushes and get ready to unleash your inner artist!

How do u know how far to space out the leaves?
It is really personal preference, I just eyeballed it because each set of leaves is a different cluster.
Where is the template? I am not seeing a link for that…
Just down at the bottom, it is a pdf clickable link. V
I LOVE your style and literally everything you do!! hehe!!! So talented!
You are so sweet! Thank you xoxo
This painted wall is AMAZING! I’m so excited to come across this. I am in the process of redoing my laundry room, and this is the perfect solution.
Thank you!! Good luck would love to see how it turns out, be sure to tag me on IG @vfynes!
You should get this leaf pattern patented in wallpaper. I want it but not wanting to paint it. Wish I could buy it!
Ha, thanks!!
Gorgeous! I went to Home Depot to purchase the paint (the same as what you have) yesterday (social distancing precautions taken!) I am nervous and scared and excited all at the same time! Which color should I begin with?
I started with the lightest and went darker, that way I could overlap a bit without it showing through. Good luck, would love to see how it turns out. V
Thanks so much for sharing this idea ! Wondering how do you stop the paint from bleeding when applied to the stencil and what type of brushes are best .. I’m already painting it but I’m scared the curves aren’t looking that smooth 😊
Nothing special for brushes, I just bought a value pack at Michaels. Good luck, I’d love to see the finished result!
I love that wallpaper, but have no painting talent. Can you tell me where to buy it as wallpaper? Thanks, Terri
I’m sorry, I can’t remember where I saw it, you could check Pinterest. I’m sure you could manage this without and painting talent!
I went to Home Depot to buy my Behr paint. I got the same ones you had listed, but they seems so much brighter in my bathroom than they do on your pictures. Especially the two blues. Not sure why that is.
Paint looks different in every light, buy a small tub of white as well and mix a little to tame it down. Good luck!
So I don’t have wall paper, but do you think this could just be painted on the wall and work?
absolutely! Good luck
I was so hoping you sold this in wallpaper haha. But I’m so impressed you painted it!! Question: did you paint the white in after? That would be the most intimidating part for me. I’m in the middle of a big kitchen reno, and downstairs bathroom. It’s a small space, and I could do something like what you’ve done (but not nearly as good). But I wouldn’t know when to do it. After they painted it white?? Thanks!
I painted the white as a basecoat and painted the leaves on after. Hope this helps, happy renovating! V
Eeek! I’m so happy I stumbled upon this blog post. I had everything measured out and ready to purchase (in wallpaper) but I just felt so bummed I was going to be spending $300 on wall paper that I could be spending on other upgrades. PLUS, I love this so much more. What size of paint did you get? I’m thinking of starting out with just the sample sizes.
This is going in a small half bath and don’t want to feel like I’m going to waste all these paints in quart sizes. What would you recommend/use?
Hey Millie, just the sample size will do and you’ll still have lots leftover. Hope to see your work of art! V
Are you tired yet of hearing about this wall? I hope not, for me it’s better than the original wallpaper. Thank you for sharing the inspiration and the detailed instructions on how to DIY. I’m nervous but also looking forward to the cuteness! When I do it, I promise to share photos. Also newest follower here 🙂
Hey Tiffany, thank you for your sweet comment. I hope you give it a try, please share when you do. You’ll love it!
What are the base colors you use before the highlights and shadows? thanks!
The shadows and base colours are just the next lighter shade mixed in a tiny bit I just do it right in the cap!
I am so sorry if this is a stupid question. It looked like you were painting the design on wood. I’m not sure exactly what you were painting the actual design on. I’m sure I missed something and I apologize but I want to do this and I want it to look as beautiful as yours!
Yes I was painting on wood in the video. I did my bathroom wall and had so many questions about how to do it after, that I made a video. Plywood was the only thing I had big enough to mimic the wall surface. Sorry for the confusion!
So creative and beautiful.
What color white did you use to paint the walls before doing the leaf pattern?
It is called Delicate White from PPG.
Hi there, I absolutely love this wall! Amazing work. I’m thinking about doing this in my bedroom. Can you confirm, what was the sheen was for the colors you listed (matte, eggshell etc…)?
Thanks, I’m a newbie 🙂
Hey! The paint I used is eggshell, which should be fine for most areas. If you’re concerned with dirty little fingers maybe you’d consider a satin.
Hi, there! What base wall color did you do under your beautiful faux wallpaper treatment?
This is Chantilly Lace from Benjamin Moore. Thanks for reading!
very creative and beautiful work!!! I also love to ask you where is your vanity from? thank you Lana
I’m so impressed!!! It’s prettier than your wallpaper inspiration!!
Thank you Lindsay!
AMAZING POST! I just bought the paint and I’m starting tomorrow. From the photos, it looks like you started with the second to lightest color (saga), then you did the second to darkest (nocturne blue), then the lightest (recycled glass), and finally the oranges and the darkest green (secluded woods). Is that right? I’m not artistic so I’ll be going solely off of your pictures. Thank you so much for posting this, it’s absolutely gorgeous and I can’t wait to start! (P.S. I saw the exact wallpaper that you were talking about but yours is way better! The wallpaper one online seemed too cluttered and close together in my opinion)
This is beautiful! And I’m so appreciative that you shared the paint colors. I am going to be brave and do this is a little powder room. It’s only paint right? if I don’t like it, I can paint over it. Wondering…is there a video? I can’t seem to find a link if there is.
You’ll do great! Thanks for visiting!
I just wanted to thank you for this post. I’ve been looking for a quick and easy way to paint over my wallpaper in the bathroom, but couldn’t find anything that was practical or affordable. I’m so glad I found your post. The instructions were clear and easy to follow, even though it did take me longer than usual (about an hour) because of all the steps involved! It’s also very satisfying to know that what you’re doing is going to last forever – no more worrying about finding something that will peel off after 6 months like previous attempts have done! Thanks again
How did you select colors that would go well? We have a dragon fly color that I would like to use as the medium tone to match the rest but struggling to pick the other shades that will go well.
I absolutely LOVE your bathroom remodel. Everything about this bathroom is perfect and I am in love with it. Can you please share the link to the wallpaper you copied for your painted wall? There is no way I could tackle the paint project but may consider getting the wallpaper.
Thank you so much!