Budget Bedroom Furniture Makeover Ideas: Before and After
This post may contain affiliate links. Please read our Disclosure Policy.
A bedroom makeover doesn’t have to break the bank—sometimes, the best updates come from transforming the furniture pieces you already own. When I was reimagining my bedroom decor, I couldn’t justify spending $1,000+ on a new bed frame, so I took on a DIY project to give my dated sleigh bed a whole new look.

Transform Your Bedroom with a Budget-Friendly DIY Makeover
Using simple materials like trim, paint, and creativity, I turned an outdated piece of furniture into a beautiful focal point for my space. Whether you’re working with a dresser, night table, or drawer fronts, this step-by-step guide will show you how a fresh coat of paint and a few simple upgrades can bring new life to your bedroom.
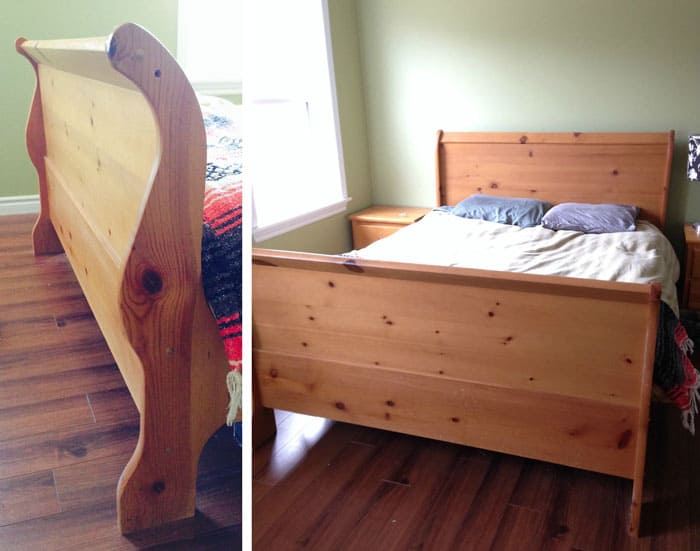
The Before: A Dated Pine Sleigh Bed
My original bed was a classic pine sleigh bed—curved, chunky, and seriously outdated. The swooping lines didn’t fit my modern vision, but I knew with a little creativity, I could give it a whole new lease on life.
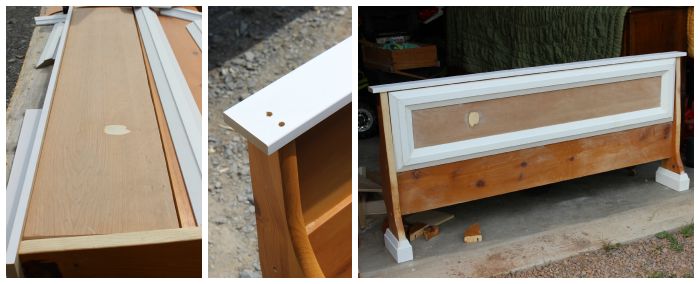
Trimming the Bed Frame for a Custom Look
Since my sleigh bed had outdated curved edges, I wanted to give it a more structured and modern design. Here’s how I did it:
Steps for Adding Trim Work:
- Cut-Off Excess Curves – Using a jigsaw, I trimmed away the curved edges on the footboard and headboard for a cleaner look.
- Level the Footboard – I attached a small plywood panel to create a flat surface where needed.
- Add Architectural Trim – Using a combination of:
- Chair rail trim for an elegant border
- MDF jamb to reinforce the top edges
- 3 1/2″ casing around the base for a built-in appearance
- Architrave for a bold focal point on the headboard
- Fill Gaps and Sand Smooth – Once the trim was secured, I filled in any seams with wood filler and sanded everything for a smooth surface.

Prepping the Sleigh Bed for a Makeover
Before diving into the transformation, I had to properly prepare the bed frame to ensure a smooth surface for painting. If you’re tackling a furniture makeover, this step is crucial for achieving a professional finish.
Steps to Prep Your Furniture:
- Clean the Surface – Use a damp cloth to remove any dust, dirt, or grime. This is especially important if your piece of furniture was a thrift store find or a flea market score.
- Remove Hardware – If your project includes a dresser or night table, take off the drawer fronts and handles. Upgrading to new hardware can instantly modernize a piece.
- Sand the Original Finish – Lightly sand the surface using 120- to 150-grit sandpaper. This helps the primers and paint adhere properly.
- Repair Any Imperfections – Fill dents, scratches, or deep gouges with wood filler, then sand smooth.
- Apply Primer – A good primer ensures a durable finish and prevents stains from bleeding through. I used BIN primer for a strong base.
Check out my tall dresser makeover tutorial here for more DIY inspiration!

Applying the Perfect Paint Finish
A fresh coat of paint can completely transform a piece of furniture. I wanted my bed frame to have a bright, versatile look, so I chose PPG Voice of Color Macaroon Cream, a soft, classic white.
Steps for Painting a Sleigh Bed:
- Seal the Wood – Since my sleigh bed was pine, I applied a shellac-based primer to prevent yellowing over time.
- Apply Coats of Paint – Using my Home Right Finish Max Fine Sprayer, I applied coats of white paint in even layers for a smooth, brush-stroke-free finish. You can Learn How To Use A Paint Sprayer from My Friends Lindi and Russ
- Lightly Sand Between Coats – For a professional look, I lightly sanded between each layer of paint.
- Seal with a Topcoat – To protect the finish, I used a water-based polyurethane sealant for durability.
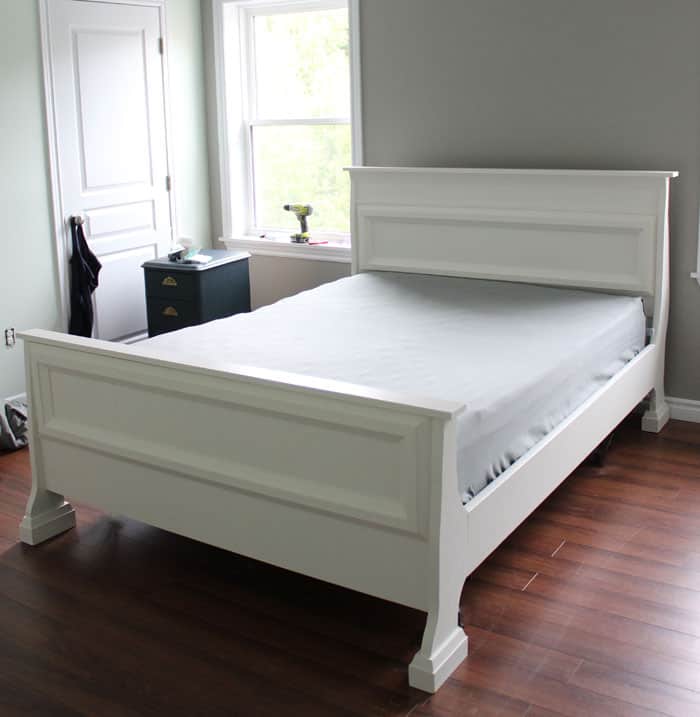
The Amazing After: Coastal Cottage Bedroom Upgrade
The transformation was nothing short of miraculous! What was once a dated pine sleigh bed became a chic, versatile piece that fit my coastal cottage aesthetic beautifully.
Designer Tip: White furniture is a decorator’s best friend—it adapts to any style and makes a space feel light and airy.
My Cottage Bedroom Evolution
Years later, I took the makeover a step further. Using IKEA BRANÄS baskets, I created a custom caned look that added texture and coastal charm to the bed frame. The white base made it easy to style and restyle as my design preferences evolved.

Looking for more budget-friendly bedroom inspiration? Check out these basement bedroom ideas!
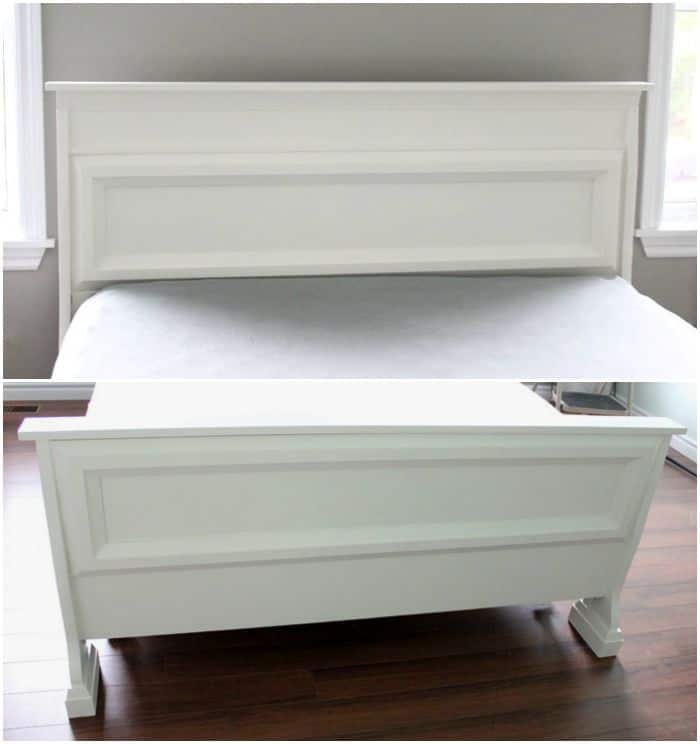
The Final Look: A Budget-Friendly Bedroom Makeover
The final result was a beautifully updated sleigh bed that looked like a high-end designer piece. I couldn’t believe how a little paint magic and some DIY ingenuity could make such a difference.

Budget Breakdown:
- Trim materials: $100
- Paint and supplies: $100
- Total cost: Under $200!
By repurposing what I already had, I saved hundreds of dollars and created a custom design tailored to my space.
If you love creative DIY bedroom furniture ideas, you’ll also love these bunk room ideas!

FAQs: DIY Bedroom Furniture Makeover Ideas
With some basic DIY skills and the right tools, most people can achieve a similar transformation. Take your time, plan carefully, and don’t be afraid to experiment!
You’ll want a jigsaw, mitre saw, primer, paint sprayer, and basic carpentry tools.
Plan for a weekend project—preparation and painting take the most time.
Check garage sales, flea markets, thrift stores, and even Facebook Marketplace for pieces in great shape that just need a little love.
Giving your bedroom furniture pieces a makeover is one of the easiest DIY projects to breathe new life into your space. If your existing furniture is still in great shape, a little creativity, paint, and trim can give it a whole new look—without the hefty price tag. Whether you’re refreshing your decor or completely transforming a piece, small updates can make a big impact. So, before you splurge on something new, consider how a little paint magic can turn what you already have into something spectacular!
Have you tackled a DIY bedroom furniture makeover? I’d love to hear about it in the comments!
This post was updated in 2025 to reflect the new changes made to the bedroom furniture.


Sleigh beds take up so much space. I’ve never seen a tutorial to alter one before. Thanks for sharing.
Can’t even believe it’s the same bed. It looks sweeeeet!
That’s a fabulous transformation. You’re talented, I can’t saw or paint (breathing problems)
Visit me please at http://linorstore.com/august-birthstone/
Love the bed!! It looks completely different, that’s what I need done to our sleigh bed.
liz @ sundays with sophie
Oh WOW! Looks so much better in white… You didi a great job… Love it!!! Pinning!
XOXO
Thanks for sharing with Small Victories Sunday Linkup. Pinning to our linkup board and hope you join this week’s linkup that just went live!
Wow! I would’ve never thought to take apart the bed and trim the edges like that. The bed looks amazing! Hope you can come and share this on Merry Monday tonight at 6pm PST.
Beautiful! This looks so amazing. Pinned and tweeted. Thank you for bringing such amazing creations to our party. We hope to see you tonight at 7 pm because we LOVE to party with you! Lou Lou Girls
This is such a great idea!! Your bed looks great..I love almost anything painted white :). I’ve seen this concept done on other household items like kitchen cabinets or office filing cabinets or even on a wall in a dining room..but I’ve never thought of applying that concept to a bed or other large furniture! Good job on getting it finished!! The bedding should be fun now!
Thanks so much Kristi!
This bed transformation is fabulous! What a great job and the dresser to match is equally as as wonderful! Thank you for joining us at the Thursday Favorite Things Blog Hop! Stop by today where I have featured you on my Tuesday Treasures from the hop!
You were so right – what a jaw dropping result – love what you did to transform it. So pretty. Thank you for sharing at Share It One More Time. Cathy
WOW that is just crazy how different you were able to make it – IMPRESSIVE. I absolutely love it!!
I was very interested in your article because I do a lot of furniture makeovers myself. When I read that you used the Home Right Finish Max Fine Sprayer on your bed I was eager to give it a try. I just painted two chairs in a matter of minutes with the sprayer and will never use a brush again. Thank you for your entertaining and educational website!!