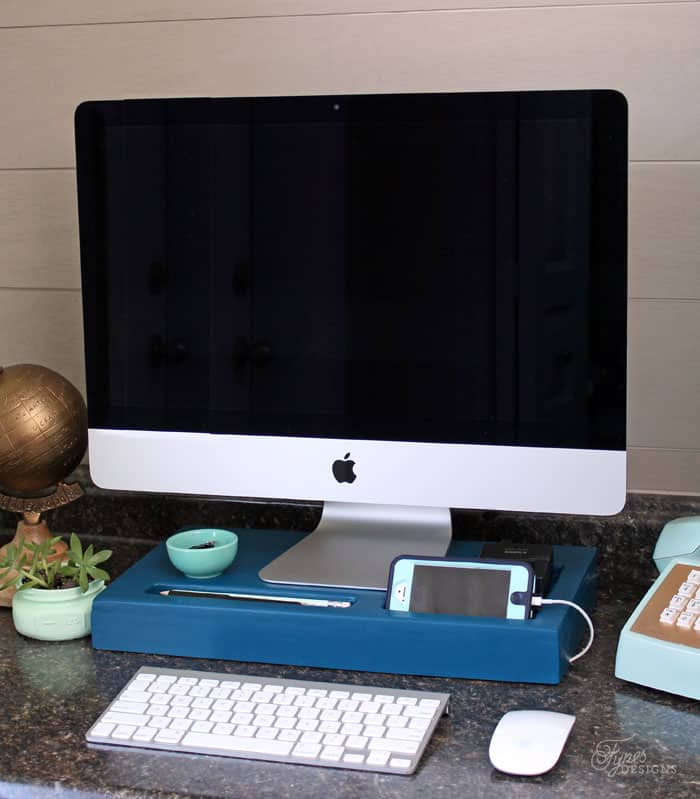
DIY Monitor Riser and Charging Station
My office makeover is finally coming together. I’m just putting the finishing touches on a few things, I can’t wait to share what I’ve been working on! Today I’m giving you a little sneak peek of what has been going on in office town, and share how to make your very own monitor riser and charging station (psst… its really cheap and easy!).
We all know having an ergonomic workstation is key to being a happy camper in the office. But lets be honest, most bloggers frump on the sofa with their laptop, or buy fancy furniture pieces that look super sleek but don’t give a lick towards good posture. I’ve fallen victim to a few bad office practices, so it is time to get my act together and make my space work for my body, before I’m a crumpled up old woman.
How to build a DIY Monitor Riser
I’m providing measurements for this monitor riser as a guide, but they will need to be adjusted to suit your needs, specific monitor, and items that you’d like to have charged.
Finished measurements: 18″ x 8.5″ x 3″ high
What you’ll need:
- 1×3 spruce– 2 pieces cut 18″ long, 2 pieces cut 7 1/2″ long, 1 piece cut 1″ longer than cell phone
- 1/4″ plywood– cut to 18″ x 8.5″
- Wood glue
- Air nailer or finish nails
- Jigsaw
- Drill
- Sandpaper
- Paint
- Wood filler
Create a rectangle with the 1×3’s, glueing at the joints, and reinforcing with the air nailer.
Cut the plywood top to size. Trace each item you’d like to include in the charging station onto the plywood around the outside edges (I traced the edge of my iphone, my camera battery charger, and a few full length pencils).
Drill a few small holes where you will cut out as a starting point for the jigsaw (I have a Ryobi 18V Orbital Jigsaw and I LOVE it). Cut out holes and sand edges smooth. If you have a router you could finish the edges nicely (that’s on my tool wish list).
Attach the plywood top to the rectangle, using wood glue and nails.
Flip over and from the bottom side cover holes to create a bottom to the slots you have cut out. For the pencil slot, I used a small piece of hardboard glued directly to the backside, and the phone and battery charger I used strapping scraps.
I wanted the phone to rest down in a bit further than the depth of the plywood so I attached the 1×3 down about 1/2″ from the top and reinforced in the corner.
The underside of the monitor riser looks like this
Drill holes in the back panel to run cords trough and sand entire piece. Fill nail holes and seams, allow to dry and sand to finish. Paint with desired color. I used Plymouth Blue from PPG Voice of Color.
Now all you need to do is feed the wires through and set up your computer monitor.
I started with a 3″ depth but did have to shave a bit off the edge to get the correct monitor height. I already feel better with the height of the monitor, and I love how eliminating just two cords has really made the desktop less cluttered. The wires now feed down through a hole in the desktop into a power bar below.
I love how easy this project was. I whipped it together in about a half hour, and I made it completely with scraps I had kicking around- Bonus!
I’m really looking forward to completing this little office makeover project (you can get the details here), but for now my new DIY monitor riser is making my new office space much more comfortable.
You might also dig this other easy wood craft project


Looks great!!!
Thanks Lindsay!
Great idea, and as always, very useful!
That is so cool! My ipod keeps getting knocked on the floor, so I definitely need to make one. 😉
Thanks Lisa, so far its working out wonderfully!